Tutorial: llmPrompt Back End
Cover Page
All the tutorials and projects in this course require access to a back-end server to host your harness. You may want to keep the server you set up here running for the duration of the term.
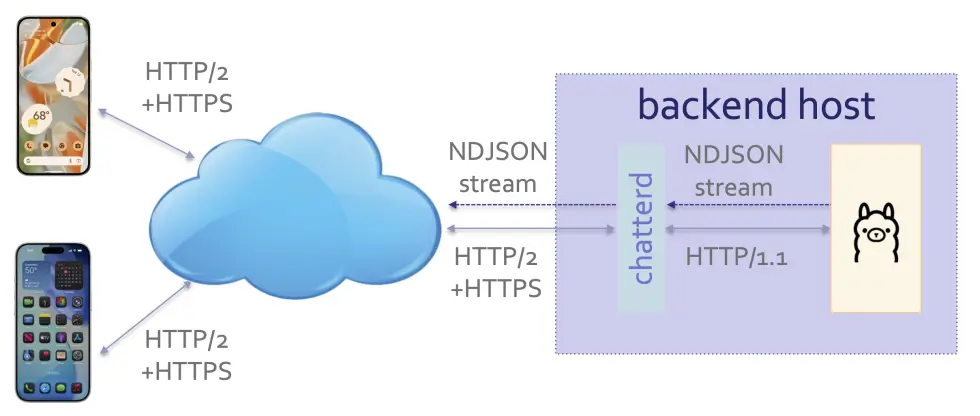
harnessd serving as HTTP/2 proxy for an LLM runner
Harness hosting
You need an Internet-accessible server with a public IP address and is online at all times (i.e., it cannot be running on your laptop) to host your harness. And your server must be running the Ubuntu 24.04 operating system. You can use a real physical host or a virtual machine on Amazon Web Services (AWS), Google Cloud Platform (GCP), Microsoft Azure, AlibabaCloud, etc. as long as you can ssh to an Ubuntu shell with root privileges. Apparently GCP offers a permanent Always Free tier that includes a free micro virtual machine. It’s worth checking out, especially since AWS’s free tier is limited to only 6 months. The setup presented here has been verified to work on Ubuntu 24.04 hosted on AWS, GCP, a local Linux KVM and on a physical host.
WARNING if you need help with your back-end server setup and code, we can only
help if your back end is running on GCP or AWS. For example, in the past, students have been
assigned compromised Digital Ocean IP addresses that were blocked by the rest of the Internet.
Unfortunately we are not able to help solve this issue and students’ only recourse would be to
setup a new server, with a clean IP address, from scratch. Oracle Cloud also offers a free tier, but
is capacity limited, so you may not get one. It also reclaims your instance if your usage stays
below 20% for seven consecutive days.
if you need help with your back-end server setup and code, we can only
help if your back end is running on GCP or AWS. For example, in the past, students have been
assigned compromised Digital Ocean IP addresses that were blocked by the rest of the Internet.
Unfortunately we are not able to help solve this issue and students’ only recourse would be to
setup a new server, with a clean IP address, from scratch. Oracle Cloud also offers a free tier, but
is capacity limited, so you may not get one. It also reclaims your instance if your usage stays
below 20% for seven consecutive days.
Please click the relevant link below to view the instructions to set up your host and return here to resume the server setup once you have your instance running.
Updating packages
Login/ssh to your newly instantiated server and run the following:
server$ sudo apt update
server$ sudo apt upgrade
If you see *** System restart required *** when you ssh to your server,
immediately run:
server$ sync
server$ sudo reboot
Your ssh session will be ended at the server. Wait a few minutes for the system
to reboot before you ssh to your server again.
Clone your course tutorial repo
Clone your course tutorial GitHub repo so that you can push your back-end files for submission:
- First, on your browser, navigate to your course tutorial GitHub repo
- Click the green
Codebutton and copy the URL to your clipboard by clicking the clipboard icon next to the URL - Then on your back-end server:
  server$ cd ~
  server$ git clone <paste the URL you copied above> agentic
If you haven’t, you would need to create a personal access token to use HTTPS Git.
If all goes well, your assignment repo should be cloned to ~/agentic.
Check that:
server$ ls ~/agentic
shows the content of your agentic git repo, including your Agent front end.
Preparing certificates for HTTPS
Apple required apps to use HTTPS, the secure version of HTTP. Android has followed suite and defaulted to blocking all cleartext (HTTP) traffic.
To support HTTPS, we first need a public key signed by a Certification Authority (CA). Obtaining
a certificate from a legitimate CA requires that your server have a fully qualified domain name (FQDN),
such as www.eecs.umich.edu, which would require extra set up. Instead, we opt to generate our own
certificate, which can only be used during development–good enough for the course.
Start by installing wget so that we can grab the configuration file, selfsigned.cnf, which
we will use to generate a certificate and its corresponding private key:
  server$ sudo apt install wget
  server$ hash -r
  server$ wget https://reactive.eecs.umich.edu/asns/selfsigned.cnf
Open selfsigned.cnf:
server$ vi selfsigned.cnf
When asked to open and/or edit a file on your back-end server, use your favorite editor. In this and all subsequent tutorials, we will assume
vi(orvimornvim) because it has the shortest name 😊. You can replaceviwith your favorite editor; for example,nanohas on-screen help and may be easier to pick up. See cheatsheet for a list ofvi’s commands.
search for the string YOUR_SERVER_IP and replace it with yours:
  extendedKeyUsage = serverAuth
  #                  👇👇👇👇👇👇👇
  subjectAltName = IP:YOUR_SERVER_IP   # replace YOUR_SERVER_IP with yours
Can I use DNS instead of IP?
If your server has a fully qualified domain name (FQDN, e.g., agentic.eecs.umich.edu and
not the public DNS AWS/GCP assigned you), you can use it instead, tagging it as DNS
instead of IP in subjectAltName field above. With your IP address in the subjectAltName,
you can only access your server using its IP address, not by its FQDN, and vice versa.
Now create a self-signed key-certificate pair with the following command; here also,
replace YOUR_SERVER_IP in the command line with yours:
  server$ openssl req -x509 -newkey rsa:4096 -sha256 -keyout /home/ubuntu/agentic/harnessd.key -out /home/ubuntu/agentic/harnessd.crt -days 100 -subj "/C=US/ST=MI/L=AA/O=UM/OU=CSE/CN=YOUR_SERVER_IP" -config selfsigned.cnf -nodes
  # replace YOUR_SERVER_IP with yours
We will use the generated key and certicate files later.
Can I use mkcert instead?
Instead of generating a self-signed certificate, you could use the tool
mkcert to create a local Certification Authority
(CA) and then generate certificates signed by that local CA.
With self-signed certificates, you must tell your device OS to trust each and every one, one at a time. If you have a local CA, once you tell your device OS to trust the local CA’s root certificate, all certificates generated by this local CA will be trusted. The process to get your device OS to trust your self-signed certificate or the local CA’s root certificate is the same (on both iOS and Android). If you need to trust multiple server cerficates, installing a local CA’s root certificate is more convenient. However, trusting a root CA’s certificate means you trust all certificates generated by that root, which seems to be a bit more vulnerable than just trusting one self-signed certificate. Since we are running only one server in this course, we’ve opted to use a single self-signed certificate.
Web server framework and harnessd
We provide instructions to set up the harness using different back-end stacks.
Note: in this and all subsequent tutorials and projects, we will assume your
folders/directories are named using the “canonical” names listed here. For example, we
will always refer to the directory where we put the back-end source code as ~/agentic/harnessd.
You’re welcome to choose your own names, if you prefer, but be aware that you’d have to map your
naming scheme to the canonical one in all the tutorials—plus we may not be able to grade your
tutorials correctly, requiring back and forth to sort things out.
Please click the relevant link to setup the harnessd server with llmprompt API
using the web framework of your choice:
Go | Python | Rust | TypeScript
and return here to resume the server setup once you have your web framework running.
Which back-end stack to use?
🔸 Go is a popular back-end language due to its learnability. We considered several Go-based
web frameworks and ended up using the Echo web framework,
which is built on the net/http web server from Go’s standard library. Personally, I find Go
awkward to use; see, for example, I wish Go were a Better Programming
Language.
🔸 JavaScript is familiar to web front-end developers.
TypeScript introduces static type checking to JavaScript.
Node.js was the first runtime environment that enables use of JavaScript
outside a web browser, to build back-end applications. Subsequently, Deno
(written in Rust) and Bun (written in Zig–transitioning to Rust?) have come on
the scene, with better runtime performance and smoother developer experience; unfortunately, neither
fully supported HTTP/2 when we started this project. We have chosen the Fastify web
framework running on Node.js, with TypeScript code compiled
with tsgo for its native support for HTTP/2 and iOS
and Android video streaming. JavaScript documentation and community often assume code running in a
web browser, resulting in explanations that can be disorienting to native mobile developers.
JavaScript being an interpreted language also makes it slower than compiled languages. For example,
the TypeScript compiler achieved 10x performance increase by switching from JavaScript to Go
[1,
2].
🔸 Python: If you plan to use any AI-related libraries in your project’s back end, a
Python-based stack could mean easier integration. We considered several web frameworks that support
asynchronous Python operations and ended up choosing Starlette.
Starlette commonly runs on the uvicorn web server, created by the same author. To support HTTP/2
however, we run Starlette on Granian.
This is made possible by Python’s Asynchronous Standard Gateway Interface
(ASGI), which was expressedly designed to
allow plug-and-play between various modules in the Python stack. Interestingly, Granian uses
hyper, written in Rust, as the underlying web server. If you decide to
use the Python stack, be aware that it has the worst performance compared to the other options, by a
large distance. Python’s reliance on indentation to delimit code blocks makes it bug prone. A Python
IDE that uses a Language Server to watch over the use of the correct amount of indentations is
highly recommended.
🔸 Rust does static type checking and memory-ownership data-flow analysis, resulting in a
language that allows you to write safe and performant code, two goals that are hitherto considered
antithetical. Alone amongst the language choices here, Rust does not rely on runtime garbage
collection for memory management. We use the axum web
framework, built on the hyper web
server and the tokio asynchronous
stack. Rust-based axum-hyper stack consistently outperforms all the other options here, by an
order of magnitude. Should you contemplate using the Rust stack, however, be forewarned that Rust
does have a reputation for being hard to learn and frustrating to
use, mainly due to its
reliance on its type system to enforce memory ownership, scoped lifetime, and safe concurrency.
The advantage is that the compiler can check and enforce these ownership, lifetime, and safe access
requirements statically at compile time. The frustration comes when your use of existing APIs does
not meet one or more of these requirements and you don’t know how to satisfy them. A Rust IDE that
uses a Language Server for type inference can be immensely helpful, or rather, indispensable, in
resolving type mismatches.
 Should you decide to switch from one back-end stack to another during the term, be sure
to disable the previous one completely before enabling the new one or you won’t be able to start
the new one due to the HTTP/S port already in use:
Should you decide to switch from one back-end stack to another during the term, be sure
to disable the previous one completely before enabling the new one or you won’t be able to start
the new one due to the HTTP/S port already in use:
server$ sudo systemctl stop harnessd
server$ sudo systemctl daemon-reload
server$ sudo systemctl start harnessd
Evaluating web frameworks
In this course, our demands on web frameworks are modest, yet the need to support mobile apps, on both the Android and iOS platforms, brings its own requirements: the front-ends are not web browsers and do not understand JavaScript. The framework must support HTTPS, required by both iOS and Android. The apps in our tutorials are multi-modal and the web framework must support both download and upload of text, audio, images, and video. Some frameworks can support video transfer when communicating with one mobile platform but not the other. Others can transfer video on HTTP/1.1, but not on HTTP/2, even when they otherwise purportedly support HTTP/2. We require HTTP/2 in course projects that transmit Server-Sent Events (SSEs). We further require the following from web frameworks:
- handling of missing or duplicated trailing slash in URL endpoints,
- serving dynamically added static files from a designated directory,
- generating url for dynamically added static files,
- specifying upload size limit.
We limit our back-end stack choices to those supporting asynchronous operations–hence not Flask nor
Django for Python, for example. Finally, given our modest needs, we consider only frameworks with
minimal API surface—so-called microframeworks, eschewing more comprehensive,
“batteries included,” ones that integrate object-relational mapper (ORM) for database
access, OAuth and JSON web token (JWT) for authentication/authorization, auto-generated interactive
documentation (OpenAPI), automatic collection of instrumentation and logging (telemetry) data
(OpenTelemetry), etc. While such frameworks are useful for building and maintaining enterprise-level
production sites, they are usually also more opinionated and have a larger API surface. This
table comparing
microframework Starlette (our choice for Python) against the more
comprehensive and opinionated Starlite illustrates the differences. (For
further discussions on micro- vs. batteries-included frameworks see also, Which Is the Best
Python Web Framework: Django, Flask, or
FastAPI?, I Compared 4
Python Web Frameworks: One Surprised Me
Completely,
and Flask as April Fools’ joke
(slides).)
The linked table below lists the web frameworks, with their web server pairing, that we have either considered (C), evaluated (E), implemented (I), or finally deployed (D). For those we do not deploy, the notes column records the first road-block we encountered, stopping us from considering the entry further. A couple of those not deployed we’re watching (W) for further development.
TODO (graded!)
Add a route for an HTTP GET / API end point and route it to a top() handler. The top() handler
simply returns a JSON containing the string “UM EECS agentic harnessd” and, by default,
HTTP status code OK (200).
WARNING: We found that an HTTP(S) server with the / API endpoint seems to attract more random
probes from sundry hosts on the Internet.
Disable the / API endpoint in your back-end server after you’re done testing your setup,
before you turn in your submission. With the / API endpoint disabled, trying to access it using a
REST API client or the Chrome browser should result in HTTP error code 404: Not Found (Safari may
simply show a blank page instead of the 404 error code).
Disabling the / API endpoint is part of the TODO. You will not get full credit if you don’t
disable your otherwise working / API endpoint.
Testing llmprompt APIs
There are several ways to test HTTP APIs. You can use a REST API cient with a graphical interface or you can use a command-line tool.
Your harnessd must be running on your back-end host. If it’s not running, there is no server to test.
with a REST API client
To test HTTP APIs graphically, you could use a REST API client such as
Postman, Apidog, or, if you use VSCode, the
EchoAPI plugin. On
Android or iOS device and emulator/simulator, you can use Teste - API, downloadable from both
Apple AppStore and Google PlayStore.
The new REST API client Apidog can auto-merge the return stream and display it as scrolling text. It is a bit more opinionated and thus harder to learn than Postman, but the Auto-Merge feature for viewing LLM completion is indispensable.
Postman
The instructions for Postman in this and subsequent tutorials are for the desktop version. If you’re proficient with the web version, you can use the web version.
-
First for
Settings > General > Request > HTTP versionchooseHTTP/2on the drop down menu. Then three items down, disableSettings > General > SSL certificate verification. We use self-signed certificate that cannot be verified with a trusted authority. -
Then in the main Postman screen, next to the
Overviewtab, click the+tab. You get a newUntitled Requestscreen. You should seeGETlisted underUntitled Request. -
Click on
GETto show the drop down menu and selectPOST. -
Enter
https://YOUR_SERVER_IP/llmprompt/in the field next toPOST. -
Under the server URL you entered, there’s a menu with
Bodyas the fourth element. Click onBody. -
You should see a submenu under
Body. Click onraw. -
At the end of the submenu, click on
TEXTand replace it withJSONin the drop down menu. -
You can now enter the following in the box under the submenu:
{
    "model": "gemma3:270m",
    "messages": [
      { "role": "user", "content": "howdy?"}
    ],
    "stream": true
}
and click the big blue Send button.
If everything works as expected, the bottom pane of Postman should say, to the right of its menu line,
200 OK, and the pane should display OpenAI’s SSE stream. If you’re using the provided llama-server,
the first JSON looks something like:
{
    "choices": [
        {
            "finish_reason": null,
            "index": 0,
            "delta": {
                "role": "assistant",
                "content": null
            }
        }
    ],
    "created": 1781690778,
    "id": "chatcmpl-LeLlnEvnjbZAveeg9QgABzJmAfWoR8Cw",
    "model": "gemma3:270m",
    "system_fingerprint": "b9656-581e8eca8",
    "object": "chat.completion.chunk"
}
with a command-line tool
For all of the below, if you’re running a server without HTTPS, replace https with http.
curl
To test HTTP POST requests with curl:
laptop$ curl -i -X POST -H "Content-Type: application/json" -d '{ "model": "gemma3:270m", "messages": [ { "role": "user", "content": "howdy?"} ], "stream": true }' -kL https://YOUR_SERVER_IP/llmprompt/
# output:
HTTP/2 200
server: llama.cpp
content-type: text/event-stream
access-control-allow-origin:
date: Wed, 17 Jun 2026 10:33:12 GMT

data: {"choices":[{"finish_reason":null,"index":0,"delta":{"role":"assistant","content":null}}],"created":1781692392,"id":"chatcmpl-2nXU2XB3p2MW21VHomxZOSmdMv2HD846","model":"gemma3:270m","system_fingerprint":"b9656-581e8eca8","object":"chat.completion.chunk"}
# and a few more lines . . . .
The -k (--insecure) option tells curl not to verify your self-signed certificate and the -L
(--location) option tells it to follow redirect (usually from a URL with trailing / to one
without, or vice versa, depending on the back end router implementation).
If you have
jqinstall, you can try the following to pretty print the output, without HTTP headers:laptop$ curl -X POST -H "Content-Type: application/json" -d '{ "model": "gemma3:270m", "messages": [ { "role": "user", "content": "howdy?"} ], "stream": true }' -kL https://mada.eecs.umich.edu/llmprompt/ | awk '/^data:/ && !/\[DONE\]/ {sub(/^data: /, ""); print}' | jq --unbuffered .To view the list of available models on the back-end server:
server$ curl -s http://localhost:11433/models | jq -r '.data[] | "\(.id)\t\(.status.args | contains(["--embeddings"]))\t\(.status.value // "loaded")"' | sort -t$'\t' -k2,2 | awk -F'\t' 'BEGIN {printf "%-20s %-12s %-12s\n", "MODEL", "EMBEDDINGS", "STATUS"} {printf "%-20s %-12s %-12s\n", $1, $2, $3}'
HTTPie
You can also use HTTPie instead of curl to test on the command line. The --verify=no option tells HTTPie not to verify your self-signed certificate:
laptop$ echo '{ "model": "gemma3:270m", "messages": [ { "role": "user", "content": "howdy?"} ], "stream": true }' | http --verify=no POST https://YOUR_SERVER_IP/llmprompt/
# output:
HTTP/1.1 200 OK
access-control-allow-origin:
connection: close
content-type: text/event-stream
date: Wed, 17 Jun 2026 10:20:01 GMT
keep-alive: timeout=5, max=100
server: llama.cpp
transfer-encoding: chunked

data: {
    "choices": [
        {
            "delta": {
                "content": null,
                "role": "assistant"
            },
            "finish_reason": null,
            "index": 0
        }
    ],
    "created": 1781691601,
    "id": "chatcmpl-vAxze9iMVWniY7MoLjdMCgU6VBosW12I",
    "model": "gemma3:270m",
    "object": "chat.completion.chunk",
    "system_fingerprint": "b9656-581e8eca8"
}
# and a few more lines . . . .
Automatic harnessd restart
The following steps apply to all variants of the web server. The only difference is in
the ExecStart entry of the harnessd.service file. Go and Rust have the same entry.
Python and TypeScript each has a different entry. All options are listed but commented
out in the file below. You need to uncomment the line(s) corresponding to your framework
of choice.
Once you have your server tested, to run it automatically on system reboot or on failure,
first copy the /home/ubuntu/.env file you created in the “Storing API keys” section of
your respective web framework tutorial:
server$ cp /home/ubuntu/.env /home/ubuntu/.env.sys
Edit .env.sys to remove all occurrences of export ’s.
Next create the service configuration file:
server$ sudo vi /etc/systemd/system/harnessd.service
and put the following lines in it:
[Unit]
Description=UM EECS Agentic harnessd
After=network.target
StartLimitIntervalSec=0

[Service]
Type=simple
Restart=on-failure
RestartSec=1
User=ubuntu
Group=www-data
WorkingDirectory=/home/ubuntu/agentic/harnessd

# Allow non-root user to bind to port 443 and read
SecureBits=keep-caps
Capabilities=cap_net_bind_service+ep
CapabilityBoundingSet=CAP_NET_BIND_SERVICE
AmbientCapabilities=CAP_NET_BIND_SERVICE

# Copy of `/home/ubuntu/.env` with all `export `'s deleted:
EnvironmentFile=/home/ubuntu/.env.sys

# >>>>>> Uncomment one of the following choices for your web framework of choice <<<<<<

# >>>>>> Go or Rust <<<<<<
#ExecStart=/home/ubuntu/agentic/harnessd/harnessd

# >>>>>> Python <<<<<<
#ExecStart=/home/ubuntu/agentic/harnessd/.venv/bin/python3 -u harnessd.py

# >>>>>> TypeScript <<<<<<
#ExecStart=/usr/bin/node harnessd.js

[Install]
WantedBy=multi-user.target
To test the service, run:
server$ sudo systemctl daemon-reload
server$ sudo systemctl start harnessd
server$ systemctl status harnessd
# first 3 lines of output:
● harnessd.service - UM EECS Agentic harnessd
     Loaded: loaded (/etc/systemd/system/harnessd.service; disabled; vendor preset: enabled)
     Active: active (running) since Thu 2026-08-15 01:28:56 EDT; 2min 30s ago
     . . .   👆👆👆👆👆👆👆👆
The last line should say, Active: active (running).
To have the system restart automatically upon reboot, run:
server$ sudo systemctl enable harnessd
server$ systemctl status harnessd
# first 2 lines of output:
● harnessd.service - UM EECS Agentic harnessd
     Loaded: loaded (/etc/systemd/system/harnessd.service; enabled; vendor preset: enabled)
     . . .                                                 👆👆👆👆
The second field inside the parentheses in the second line should now say “enabled.”
For each tutorial, leave your harnessd running until you have received your tutorial grade!
To view harnessd’s console output, run:
server$ sudo systemctl status harnessd
To view continuous status updates from harnessd, run:
server$ sudo journalctl -fu harnessd
TIP:
server$ sudo systemctl status harnessd
is your BEST FRIEND in debugging your server. If you get an HTTP error code 500 Internal Server Error
or if you just don’t know whether your HTTP request has made it to the server, first thing you do is run
sudo systemctl status harnessd on your server and study its output, including any error messages and
debug printouts from your server.
Everytime you rebuild your Go or Rust server or make changes to either of your TypeScript or Python files,
you need to restart harnessd:
server$ sudo systemctl restart harnessd
If you change the /etc/systemd/system/harnessd.service configuration file, run:
server$ sudo systemctl daemon-reload
before restarting your harnessd.
To turn off auto restart:
server$ sudo systemctl disable harnessd
WARNING: You will not get full credit if your front end is not set up to work with your back end!
That’s all we need to do to prepare the back end. Before you return to work on your front end, wrap up your work here by submitting your files to GitHub.
Submitting your back end
We will only grade files committed to the main branch. If you use multiple branches,
please merge them all to the main branch for submission.
Navigate to your agentic folder:
server$ cd ~/agentic/
Run:
server$ cp /etc/systemd/system/harnessd.service harnessd/
Then run:
server$ git add harnessd
You can check git status by running:
server$ git status
You should see the newly added files.
Commit changes to the local repo:
server$ git commit -am "harnessd"
and push your harnessd folder to the remote GitHub repo:
server$ git push
If git push failed due to changes made to the remote repo by your tutorial
partner, you must run git pull first. Then you may have to resolve any
conflicts before you can git push again.
Go to the GitHub website to confirm that your back-end files have
been uploaded to your GitHub repo.
You can now return to complete the front end: Android | iOS.
References
Setup
- Ubuntu setup
- GCP Instructions to set up ssh access with public key pair.
chmodin WSL- Creating a Linux service with systemd
Security
- What is HTTPS
- Everything about HTTPS and SSL
- New self-signed SSL Certificate for iOS 13
- Self-Signed SSL Certificate for Nginx
- Connecting mobile apps (iOS and Android) to backends for development with SSL
- How to do the CHMOD 400 Equivalent Command on Windows
LLMs
- A Very Gentle Introduction to Large Language Models without the Hype
- Large language models, explained with a minimum of math and jargon
- How computers got shockingly good at recognizing images
- Few-Shot Prompting
- A Deep Dive into Building Enterprise grade Generative AI Solutions
Appendix A
Optional: self hosting llama-server
Should you choose to self host an LLM, we provide a llama-server LLM runner you can run on a
1GB *-micro instance. On such a resource-constraint host, however, the LLM models you can run are
limited to gemma3:270m (~240 MB file) and qwen2.5:0.5b (~490 MB file). You likely won’t be
satisfied interacting with these models, but they are good enough to show that your solutions are
working. Furthermore, you will need to run two such instances in the last third of the term, so
you may want to team up with a classmate then if not now. Incidentally, the reference harnessd
running on mada.eecs.umich.edu connects to an oMLX LLM runner hosting models gemma3:270m,
gemma4:e4b, gemma4:12b, qwen2.5:0.5b, qwen3.5:4b, and qwen3.5:9b.
You can download the llama-server LLM runner we have pre-built for Ubuntu hosts following the
instructions below:
server$ cd ~/agentic
server$ wget http://web.eecs.umich.edu/~sugih/courses/reactive/llama-server-bundle.tgz
server$ tar xzf llama-server-bundle.tgz
server$ cd llama-server
server$ ls                  # and you should see:
README.txt   args   bin/   llama-server.service   models/   models.ini
Our llama-server bundle comes with four models in the models subfolder that are suitable to run
on GCP/AWS free-tier micro instances: gemma3:270m (for quick testing), qwen2.5:0.5b (for tool
use in latter tutorials and projects), nomic1.5 (for quick testing of embedding generation), and
egemma:300m (for embedding generation in latter tutorials and projects). The file README.txt tells you more about the content of this bundle.
You run the llama-server on the CLI by:
server$ xargs -P 1 -a args bin/llama-server-static
# Hit ^C to end process
To run your llama-server everytime your instance reboots:
server$ sudo cp llama-server.service /etc/systemd/system
server$ systemctl daemon-reload
server$ systemctl start llama-server.service
| Prepared by Tiberiu Vilcu, Wendan Jiang, Alexander Wu, Benjamin Brengman, Ollie Elmgren, Luke Wassink, Mark Wassink, Nowrin Mohamed, Chenglin Li, Xin Jie ‘Joyce’ Liu, Yibo Pi, and Sugih Jamin | Last updated June 24th, 2026 |