AWS
The instructions to set up an AWS instance here is adapted from EECS 485’s tutorial.
Create an account
Create an AWS account at the AWS Registration. You should be eligible for their free tier, which means that you will be able to run an instance for free for the duration of the course.
Despite that, you will need to enter a credit card number on the account, even if you only use free tier resources. This is how Amazon charges, in case you request more resources than provided in the free tier. Do not launch any additional instances other than the one we specify in order to avoid additional charges.
Optionally, you may redeem extra benefits as a student, including $100 in AWS credits.
Start instance
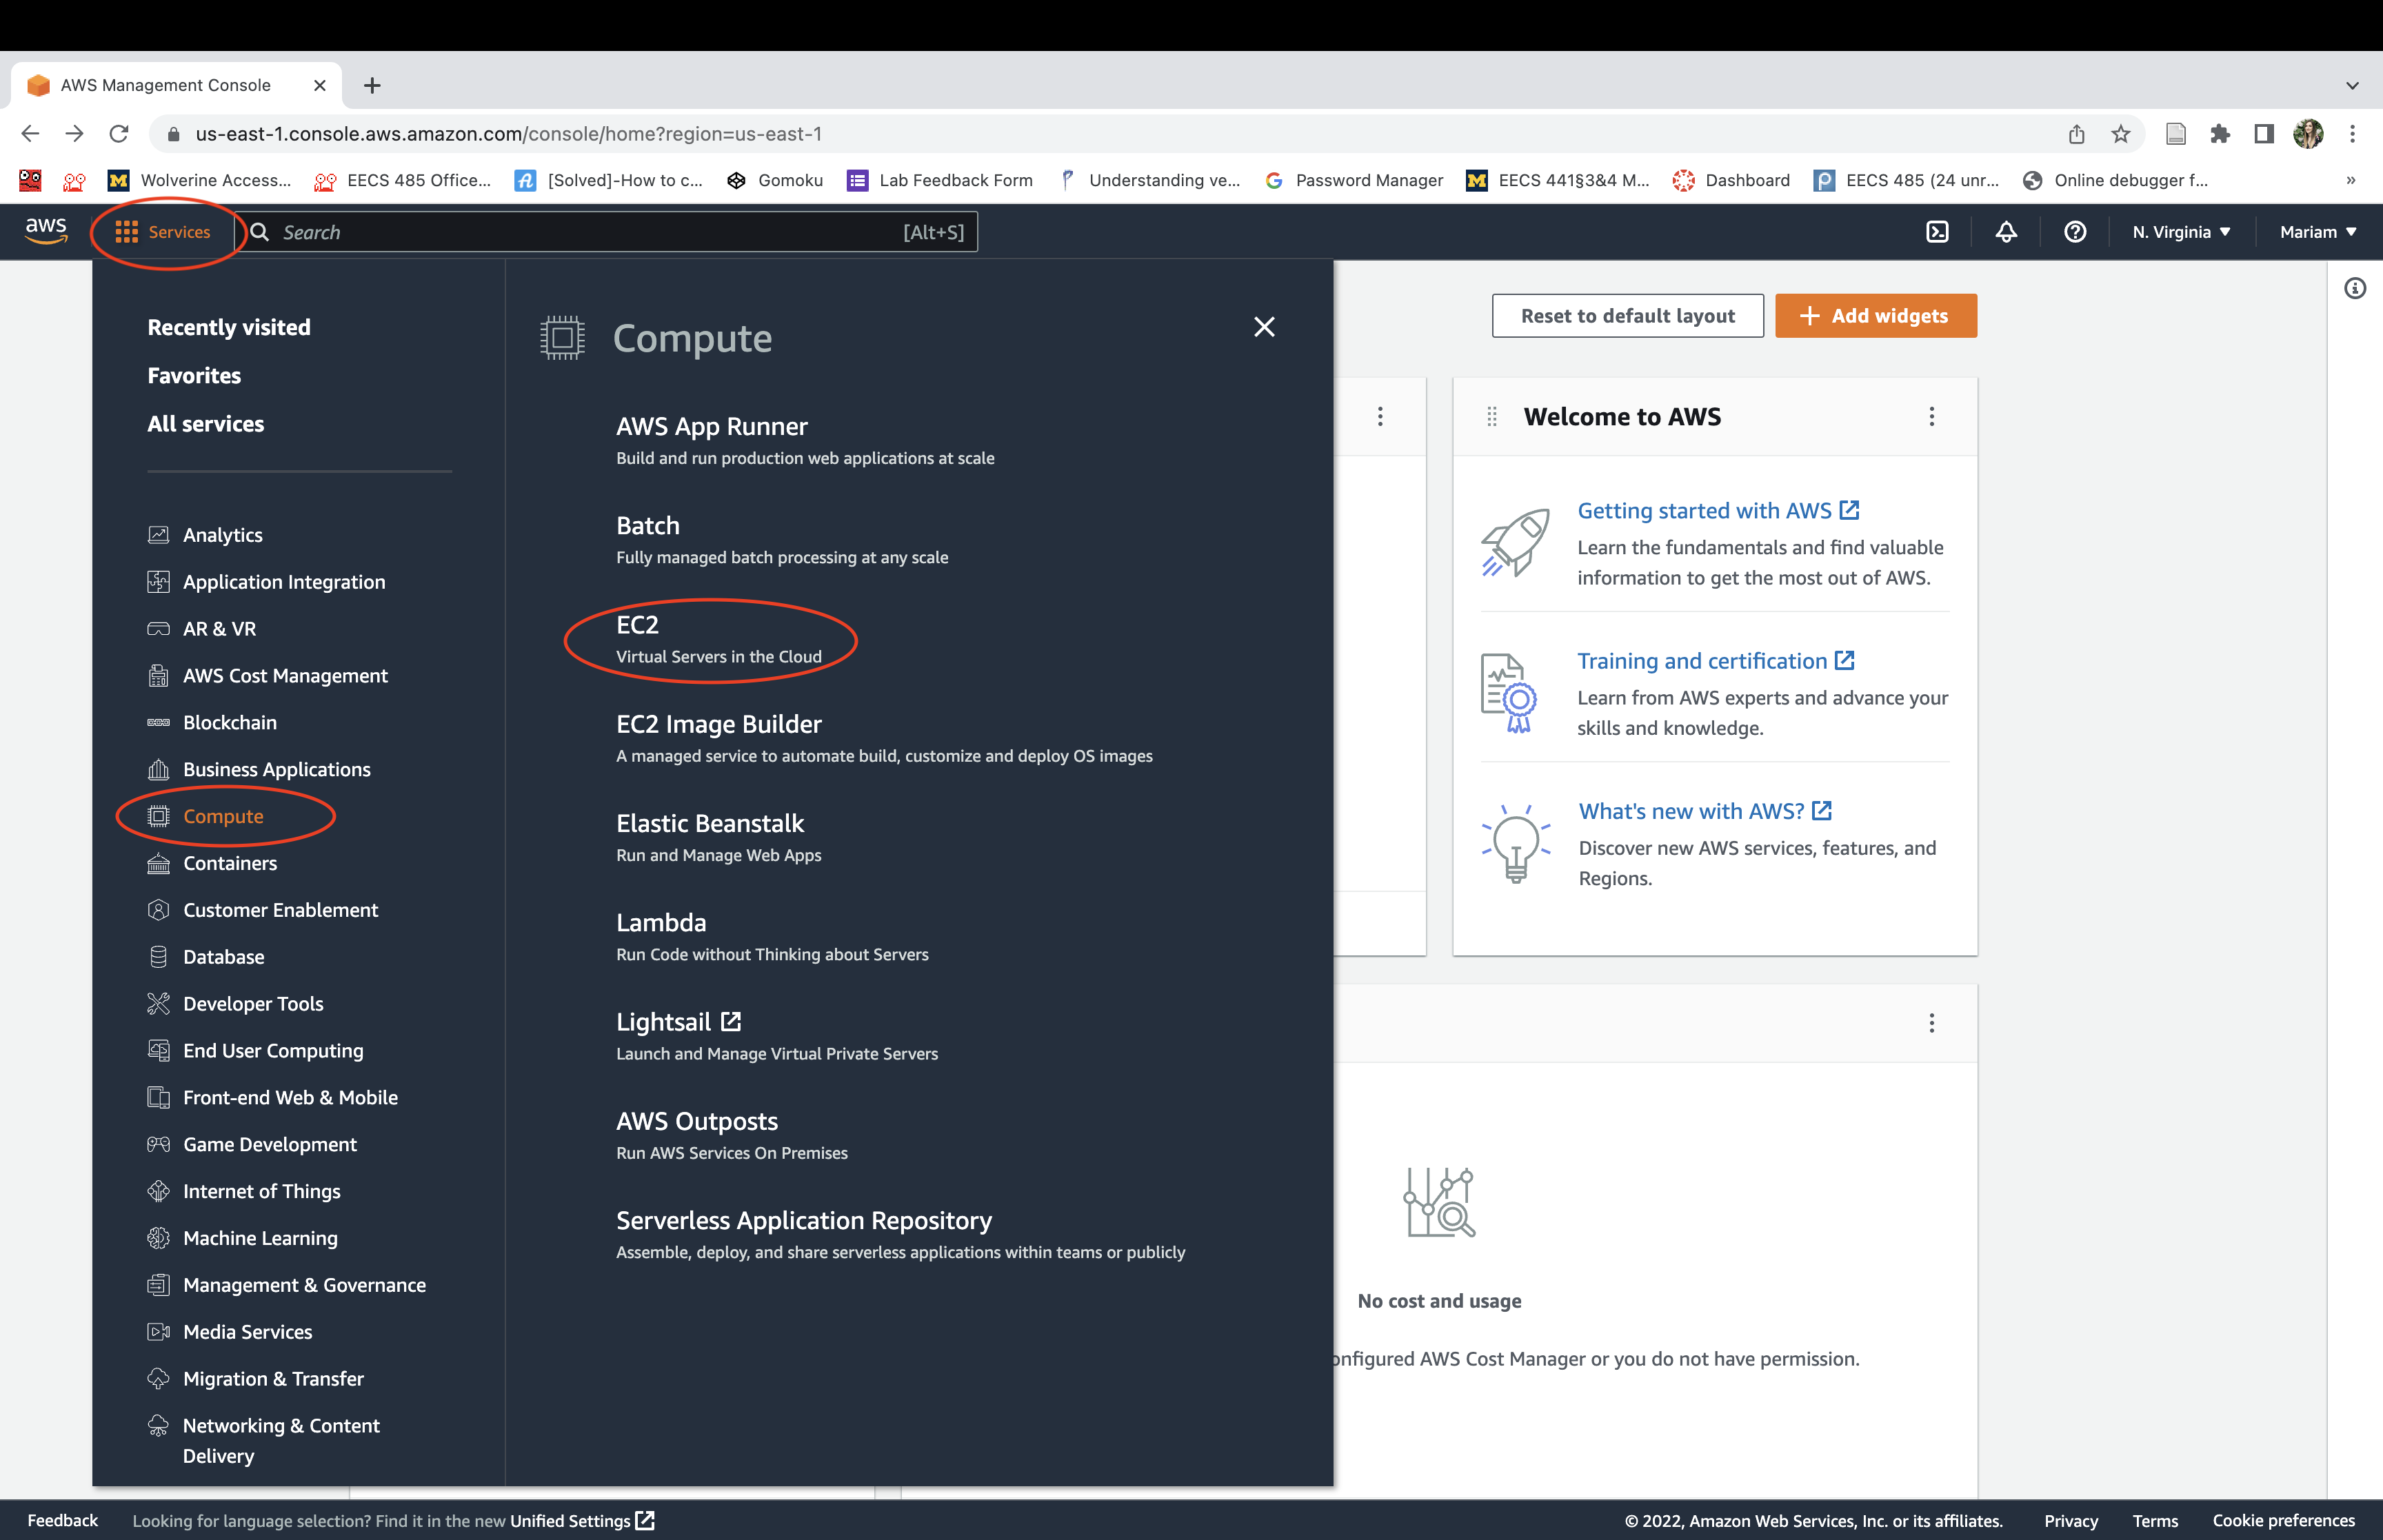
Navigate to the AWS Management Console. Select the “Services” dropdown menu, then “EC2”. An EC2 “instance” is a virtual machine running on Amazon AWS hardware.
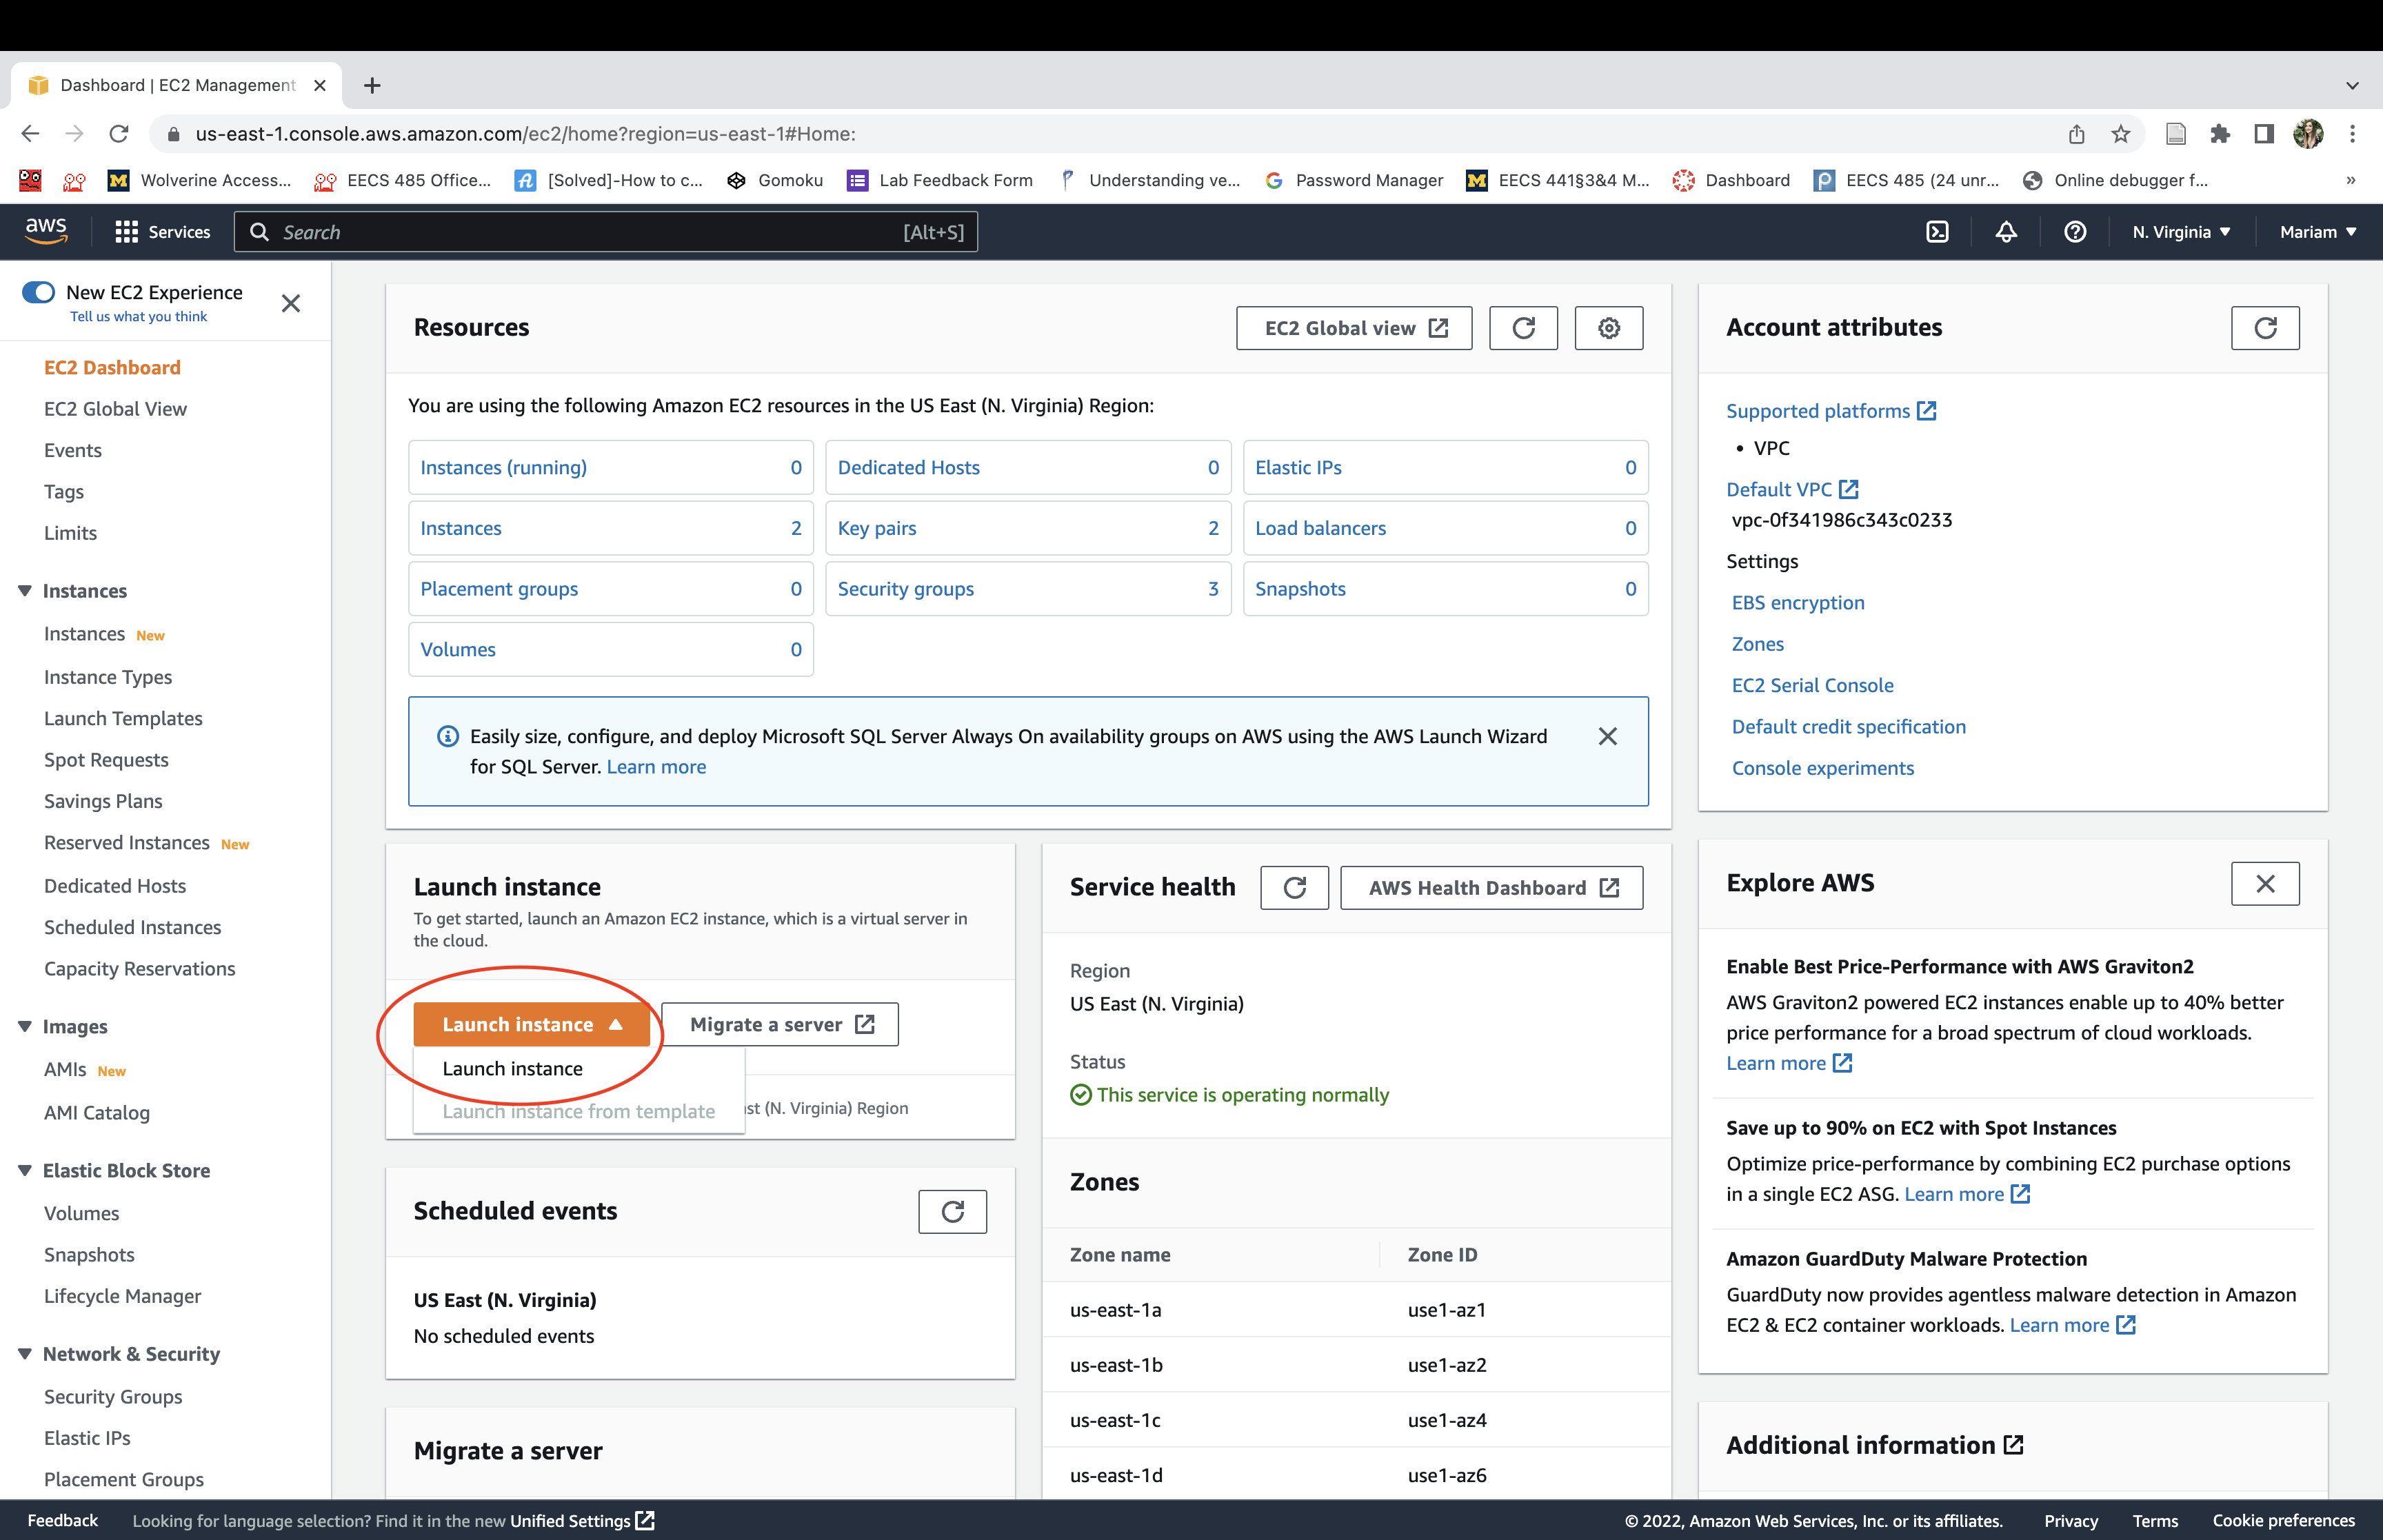
Click launch an instance. It may take a few minutes to initialize before it’s running.
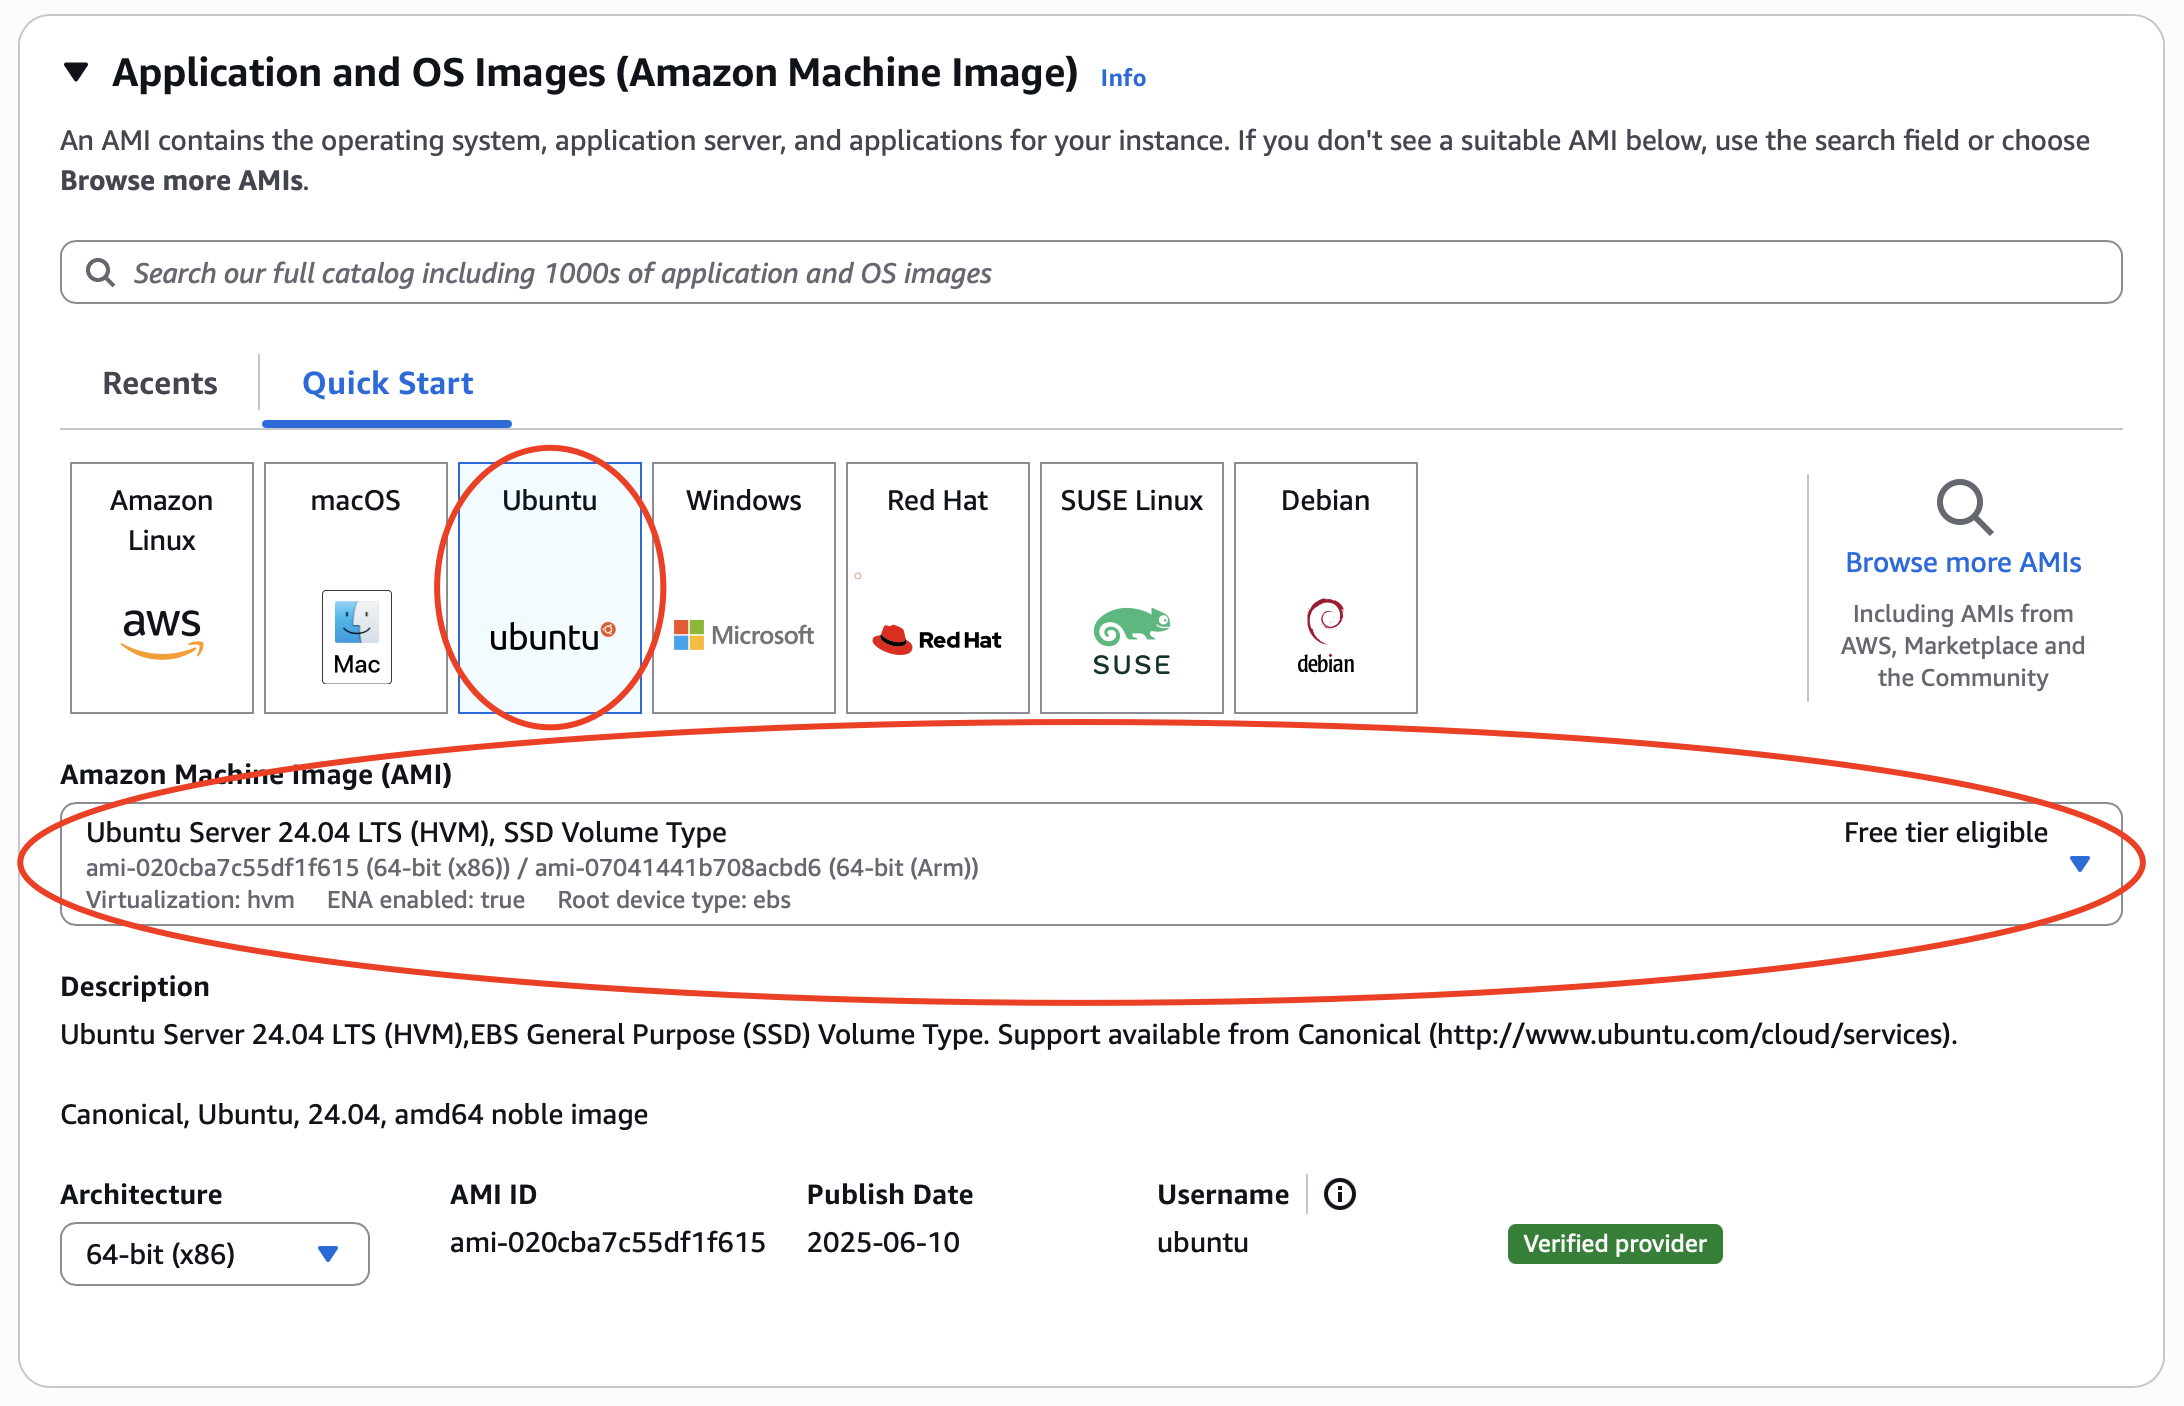
Select the “Ubuntu Server 24.04 LTS” Amazon Machine Image (AMI).
Choose instance
As discussed in the “Hosting cost” section of the
spec, for this course, we assume you are running a free-tier backend and will provide
only instructions to set up a free-tier backend, which can only run the tinyllama
LLM model. If you want to run other LLM models, choose the VM instance with enough
resources to host your model of choice. VM instances with more resources cost more.
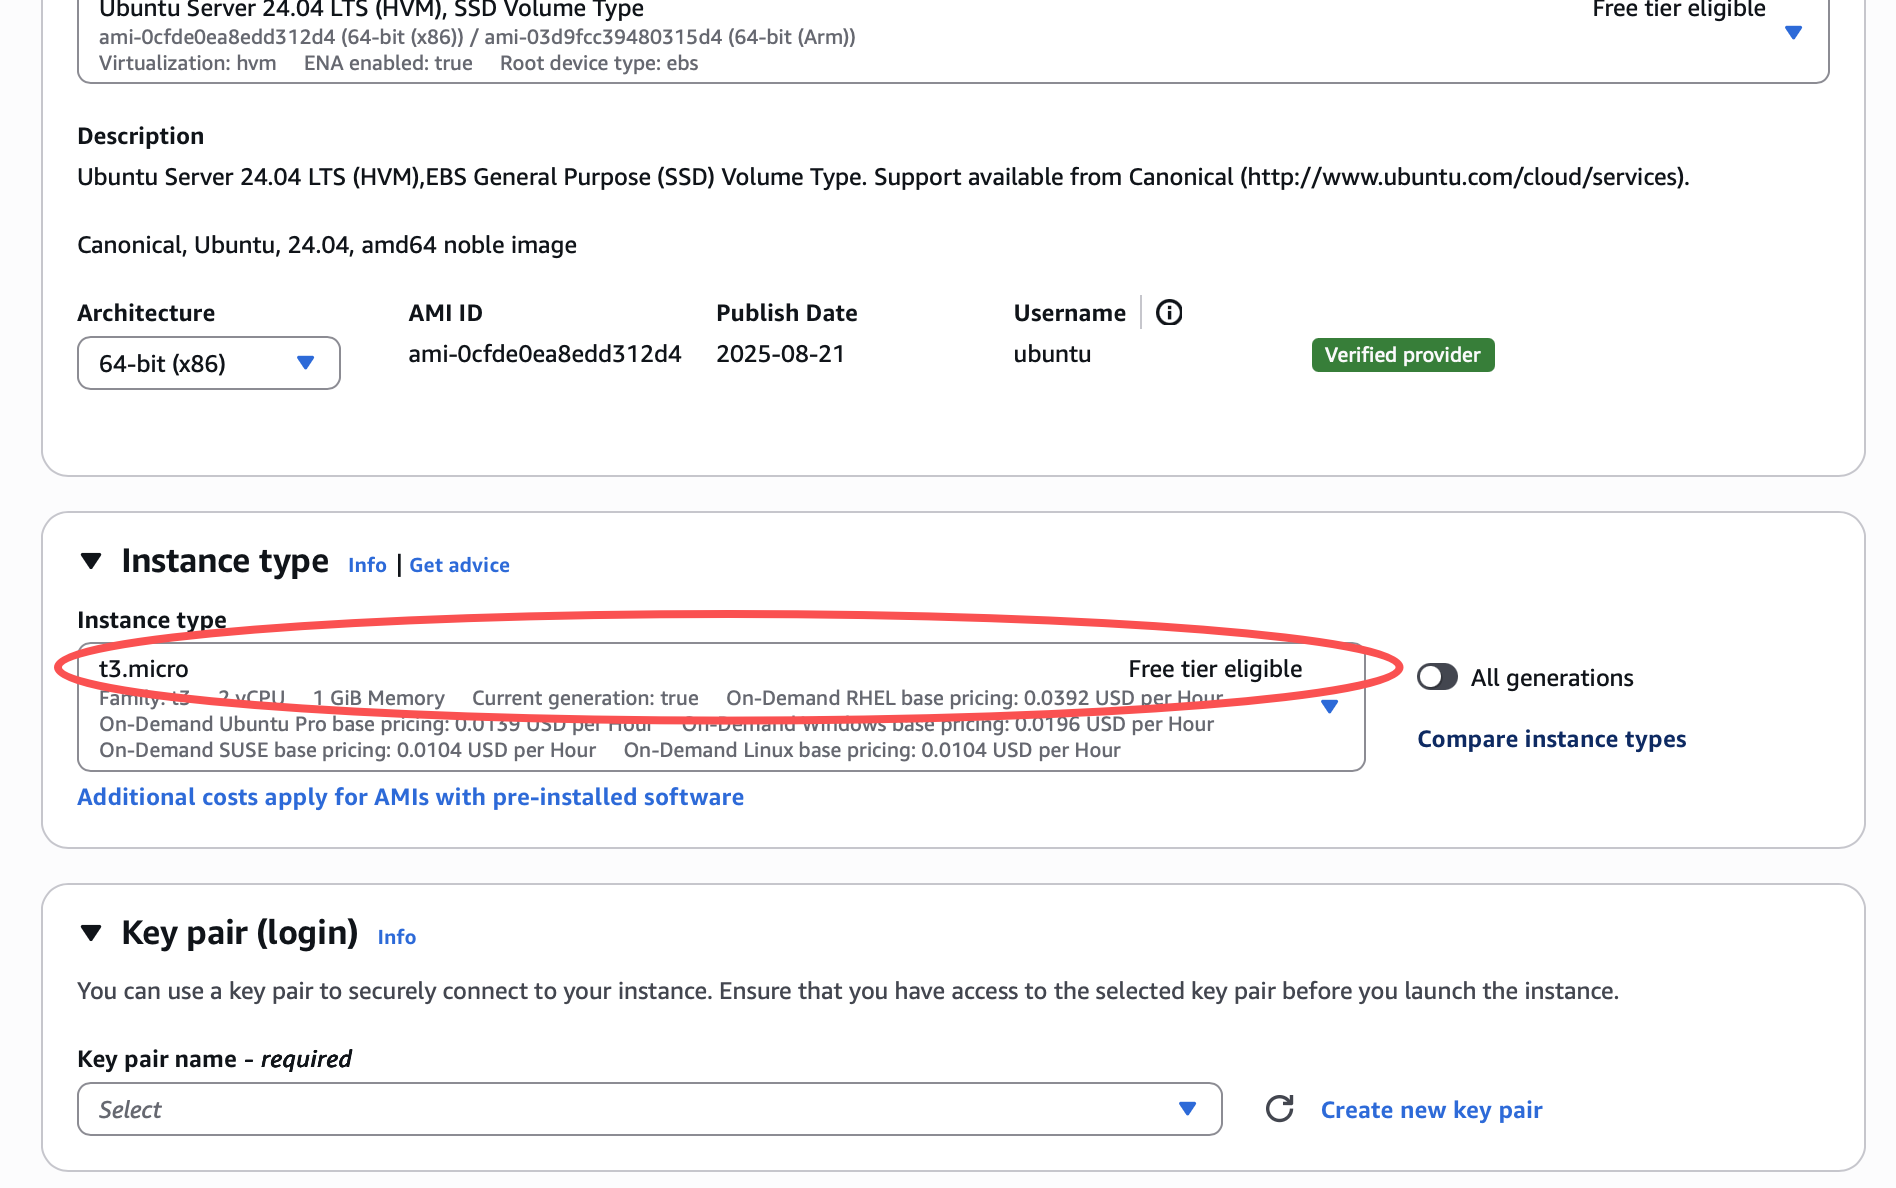
Select the “t3.micro” instance type. Double check and confirm that you see “Free tier eligible” next to the instance type you choose:
Setup security
When you create an instance, AWS automatically creates user “ubuntu” for you on the instance.
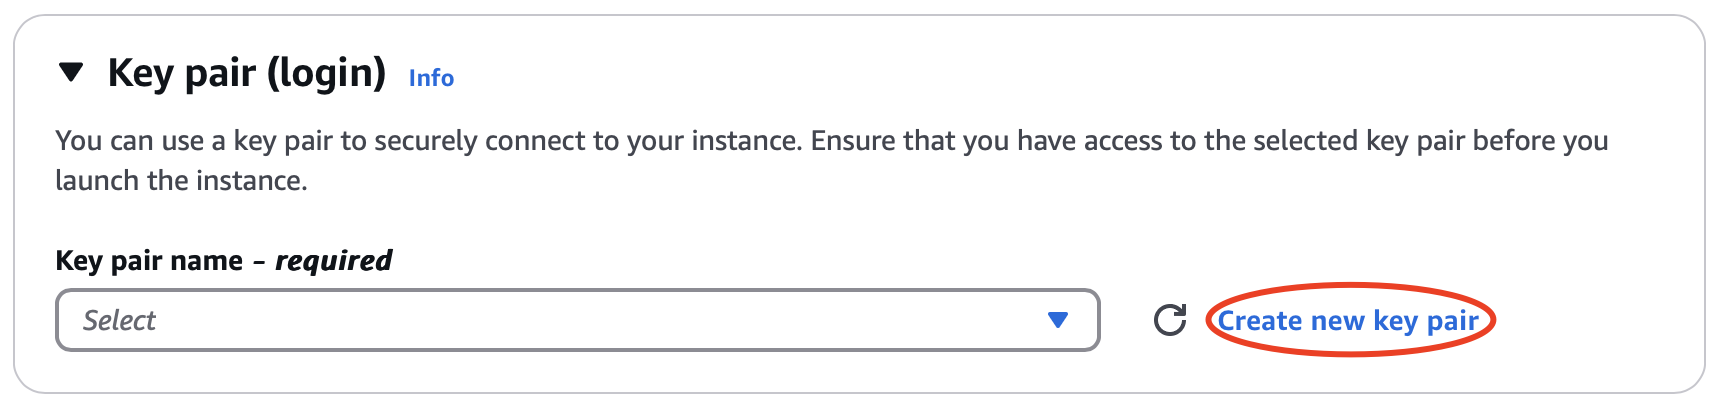
Create a key pair for user “ubuntu”. The private key will be automatically downloaded for you once the key pair is created. You’ll use this private key later to ssh to the instance. Click on Create new key pair:
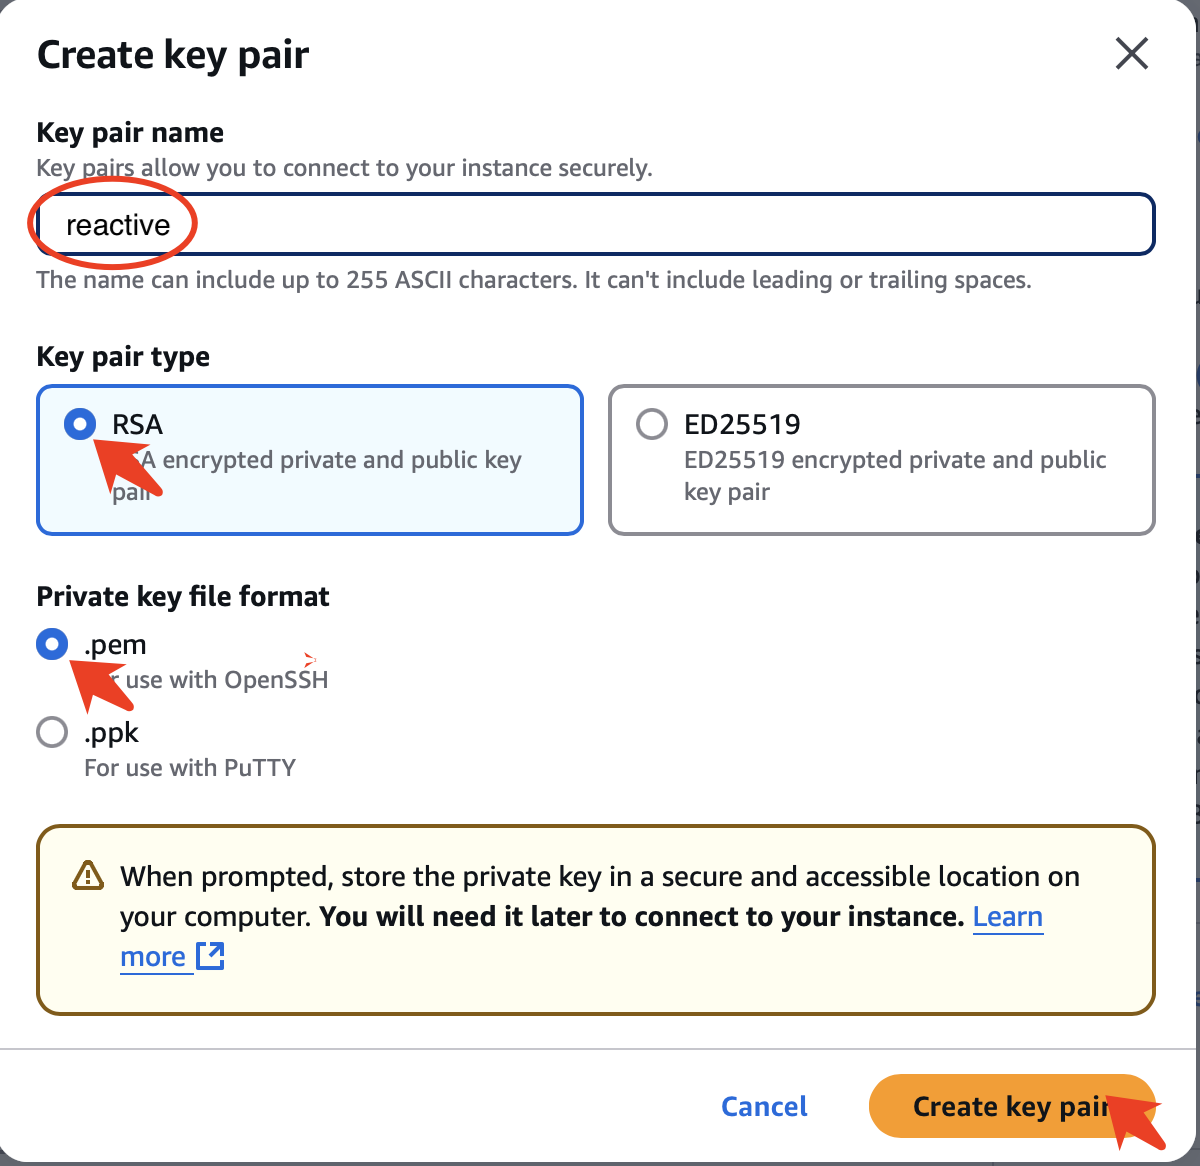
Then enter “agentic” as the key pair name and click Create key pair:
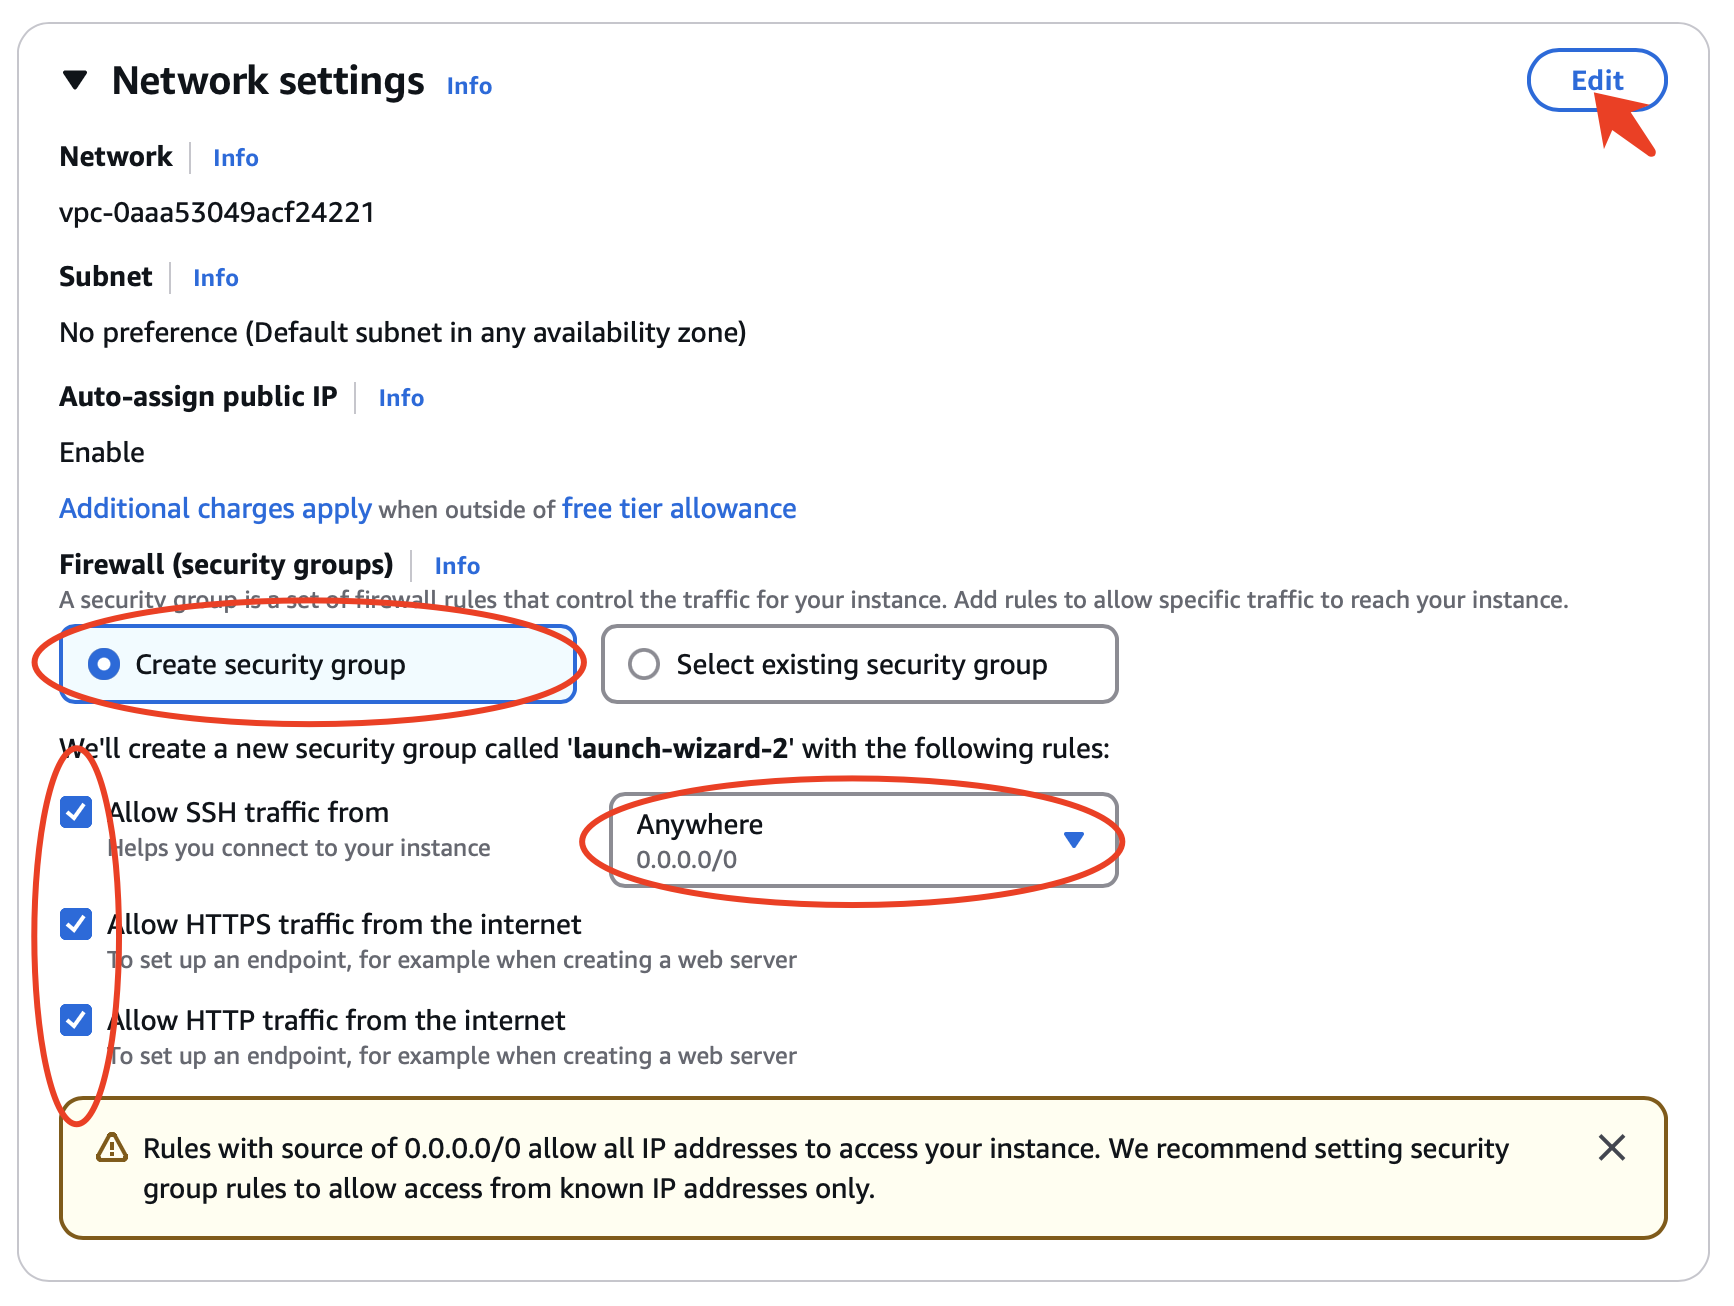
Allow SSH, HTTP, and HTTPS and click Edit on the top right:
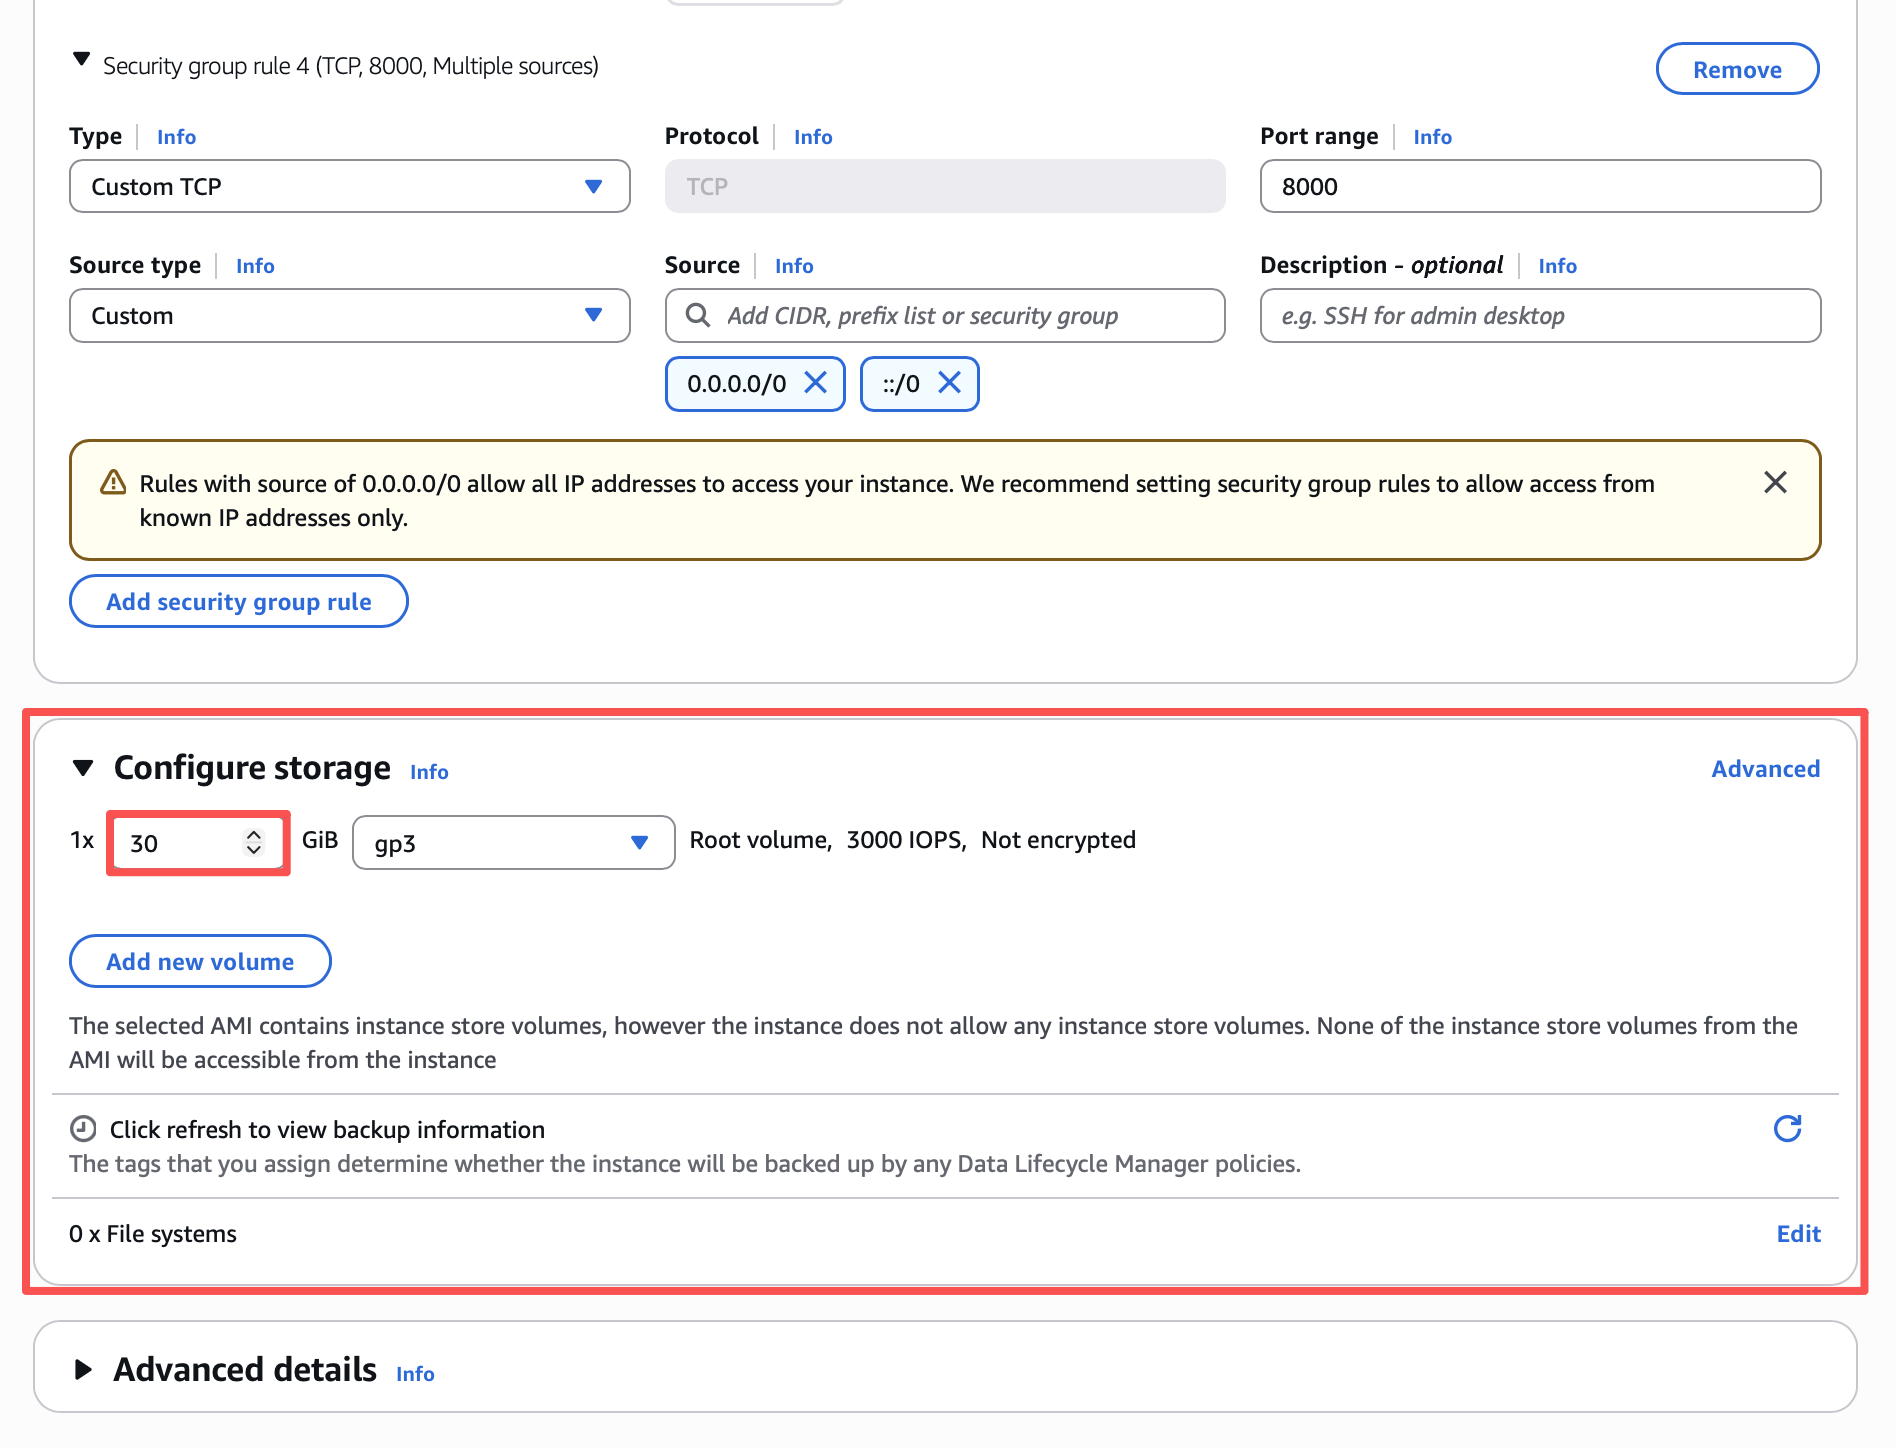
Verify if three security group rules have been added. After this, Click on Add security group rule.
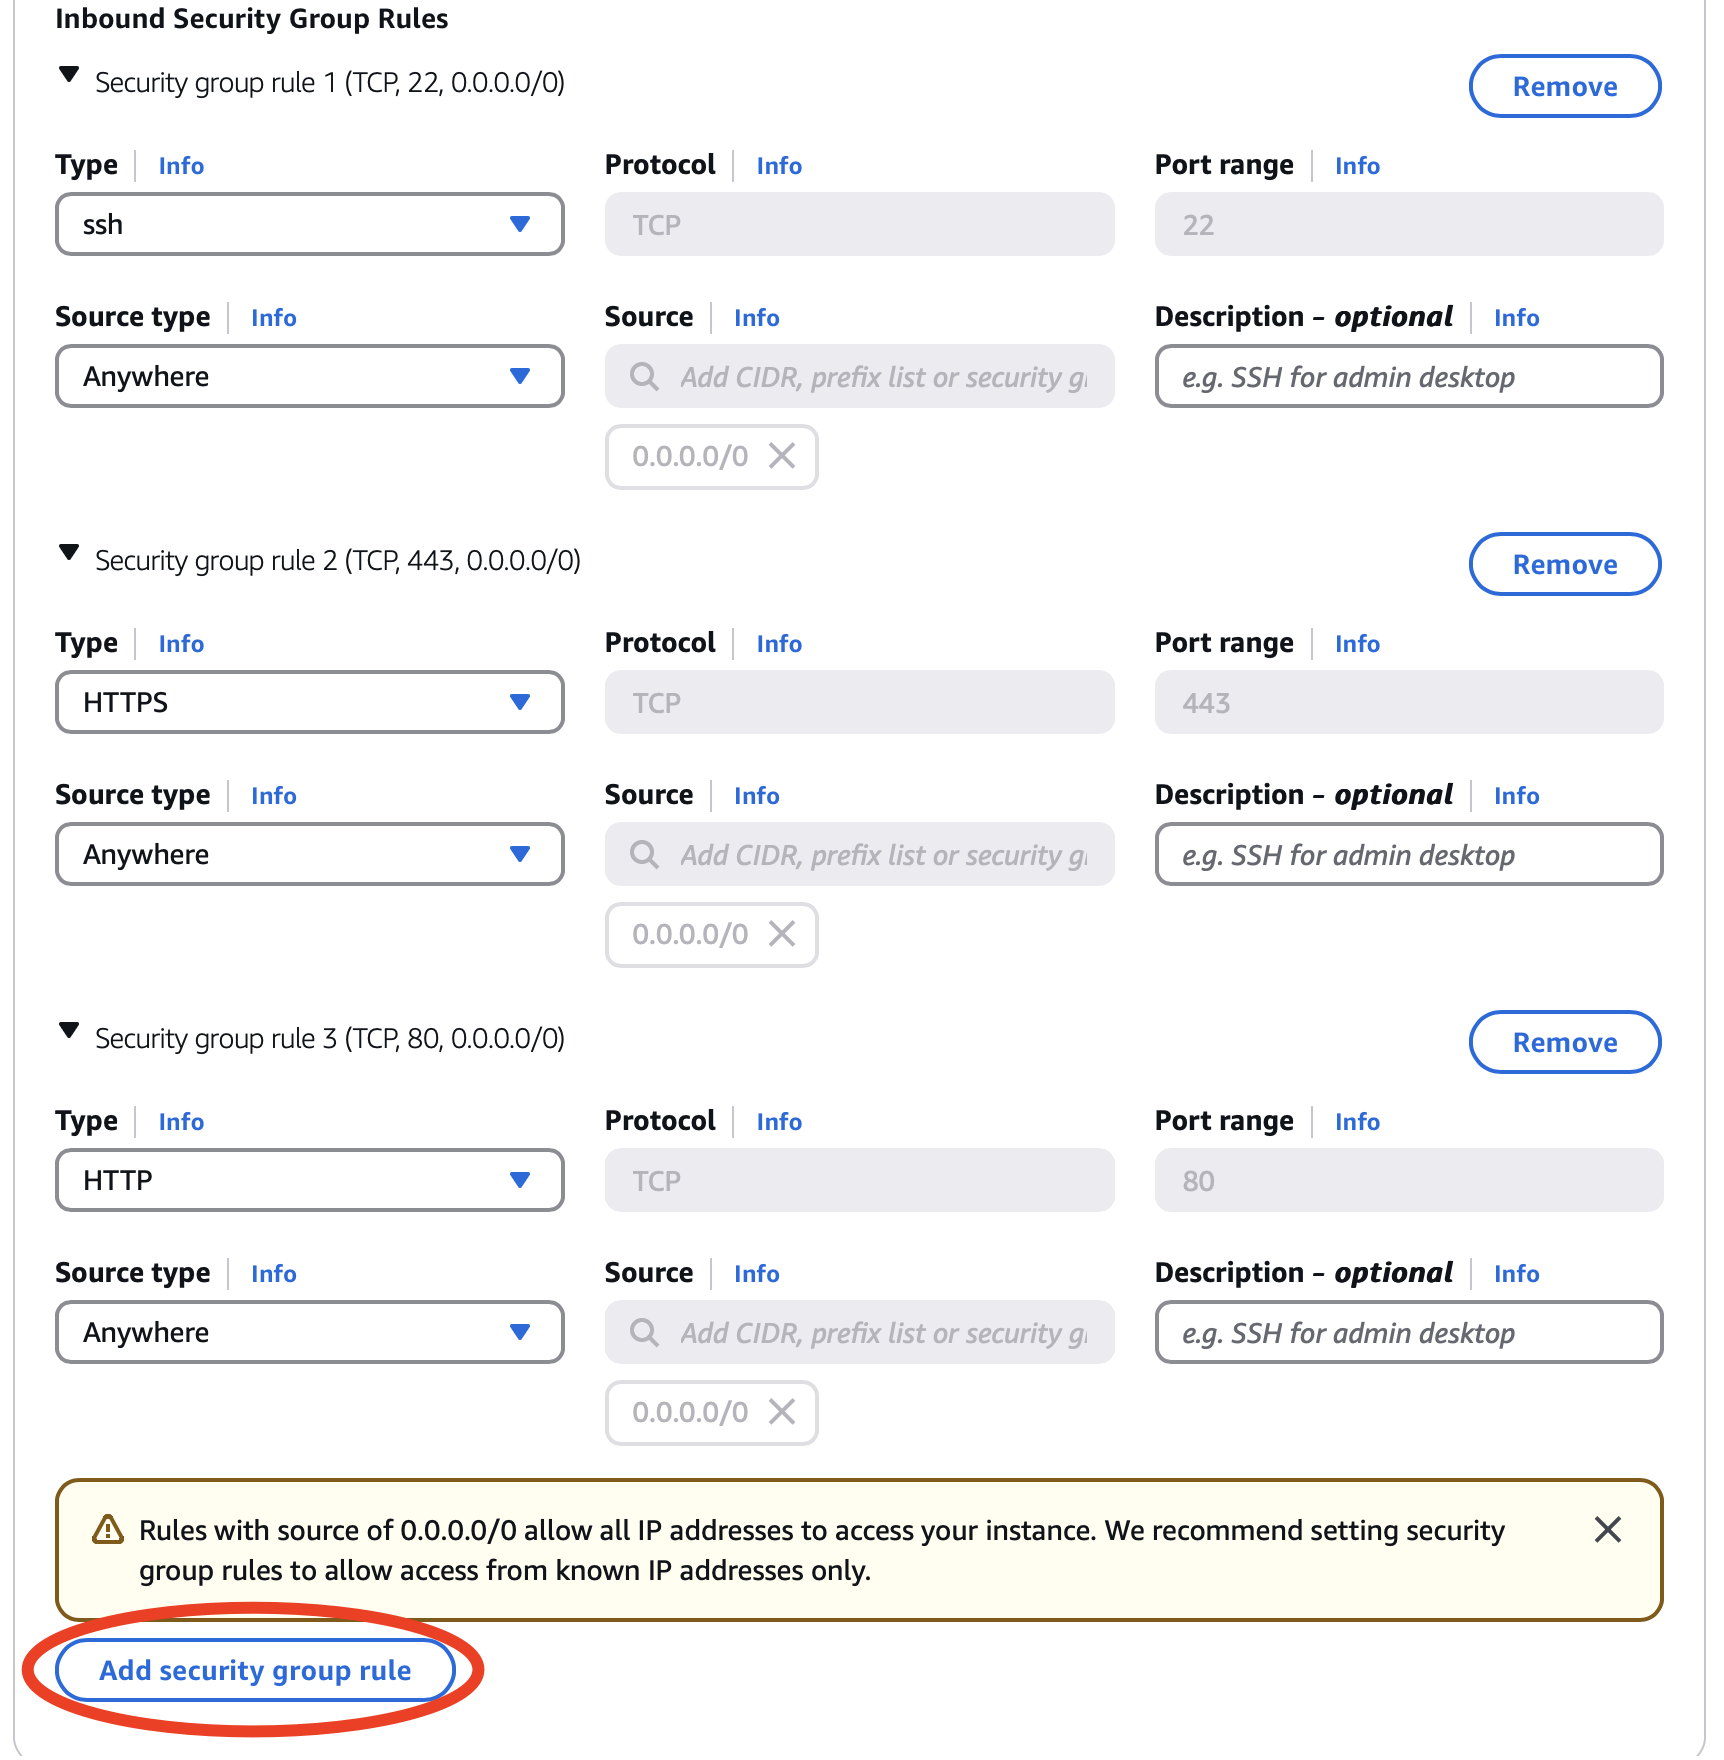
Edit the “Security group rule 4 (TCP, 0)” section, and add “Custom TCP” for port 8000 to allow server traffic in and out of your instance. [Thanks to Z. Liang and R. Nagavardhan ‘23.]

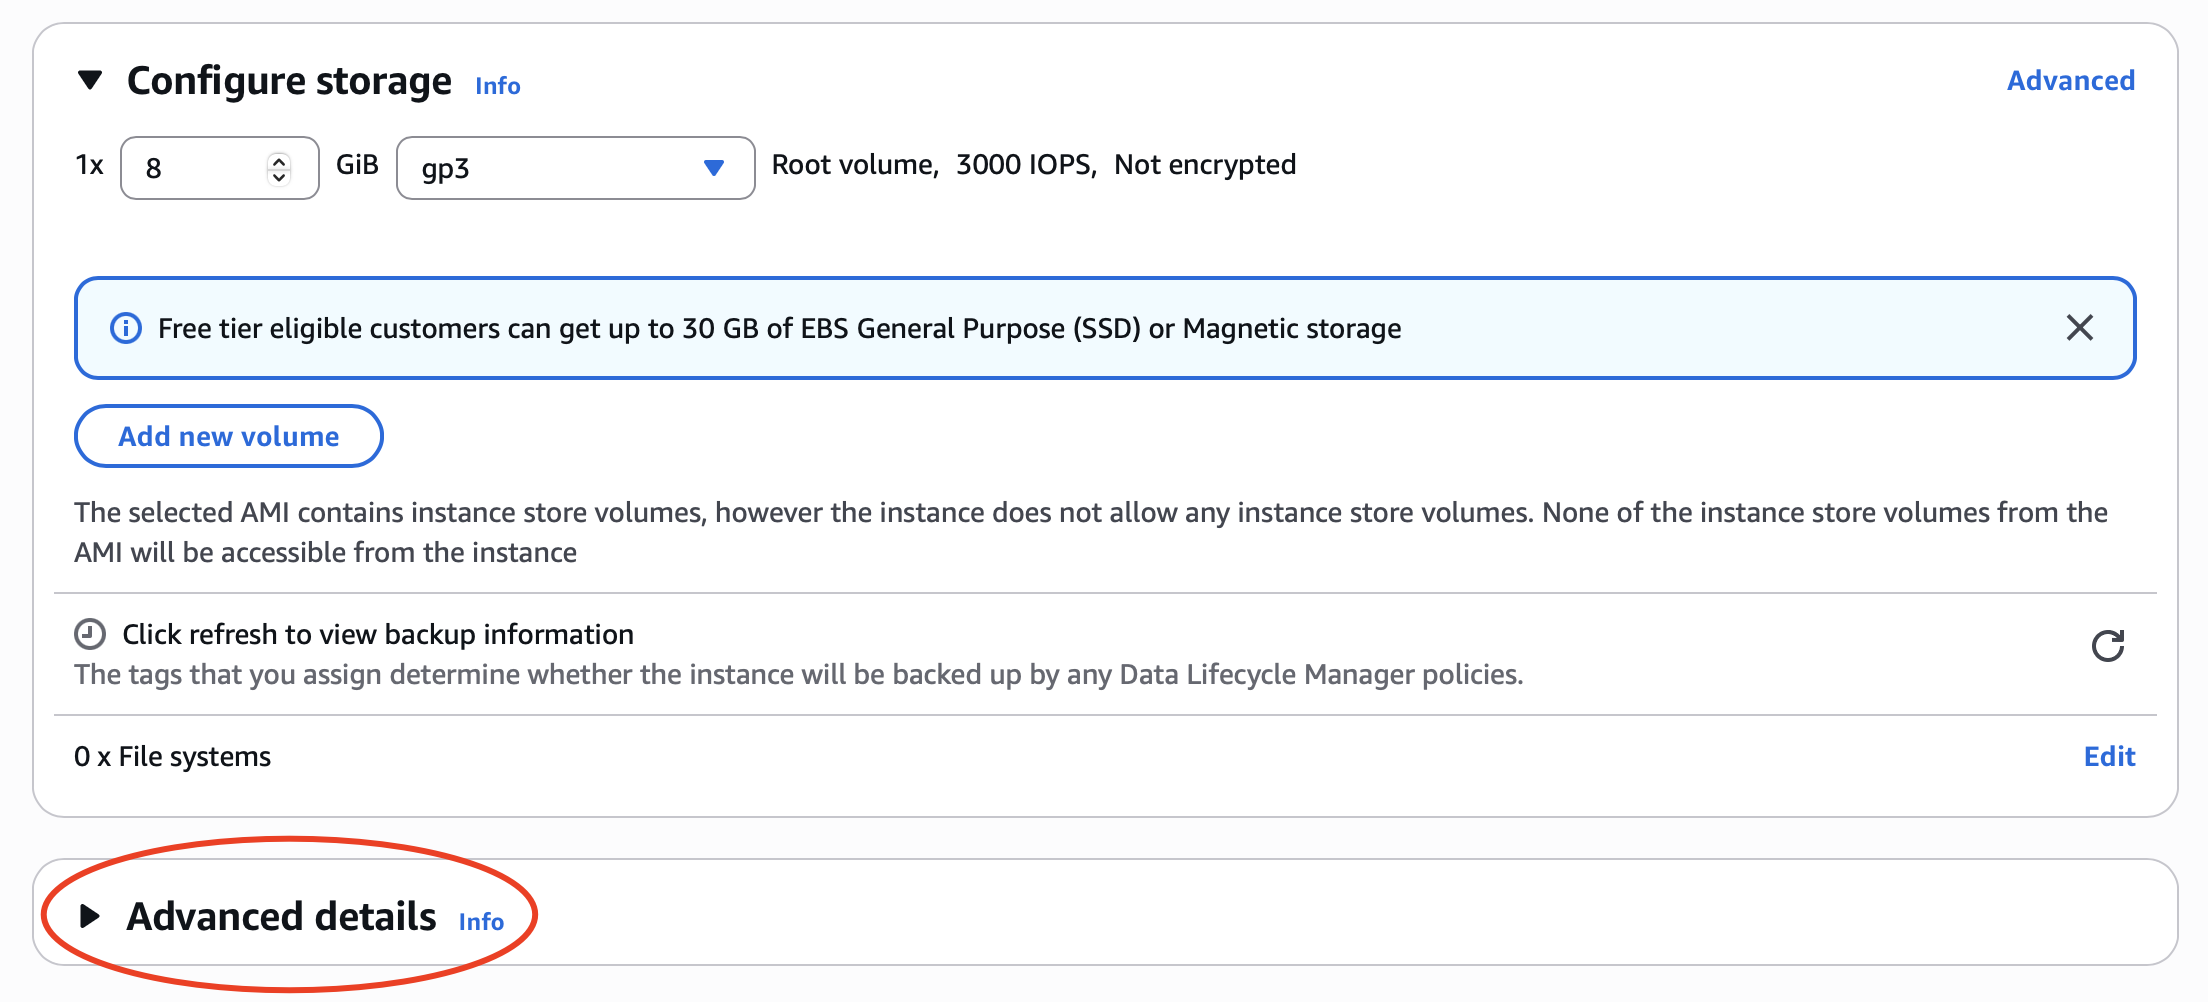
Configure storage
Students have reported that 10GB is not enough to install Ollama. AWS free tier allows up to 30 GB EBS storage per month. However, this 30GB is across all your instances, and you cannot shrink a volume once created, you can only expand it. If you already have a free AWS instance in another course or project, you will likely be billed if your total is above 30 GB.
Set your storage to 30 GB:
Startup Script
At the bottom of the page, click Advanced details.
Scroll down to find User data - optional.
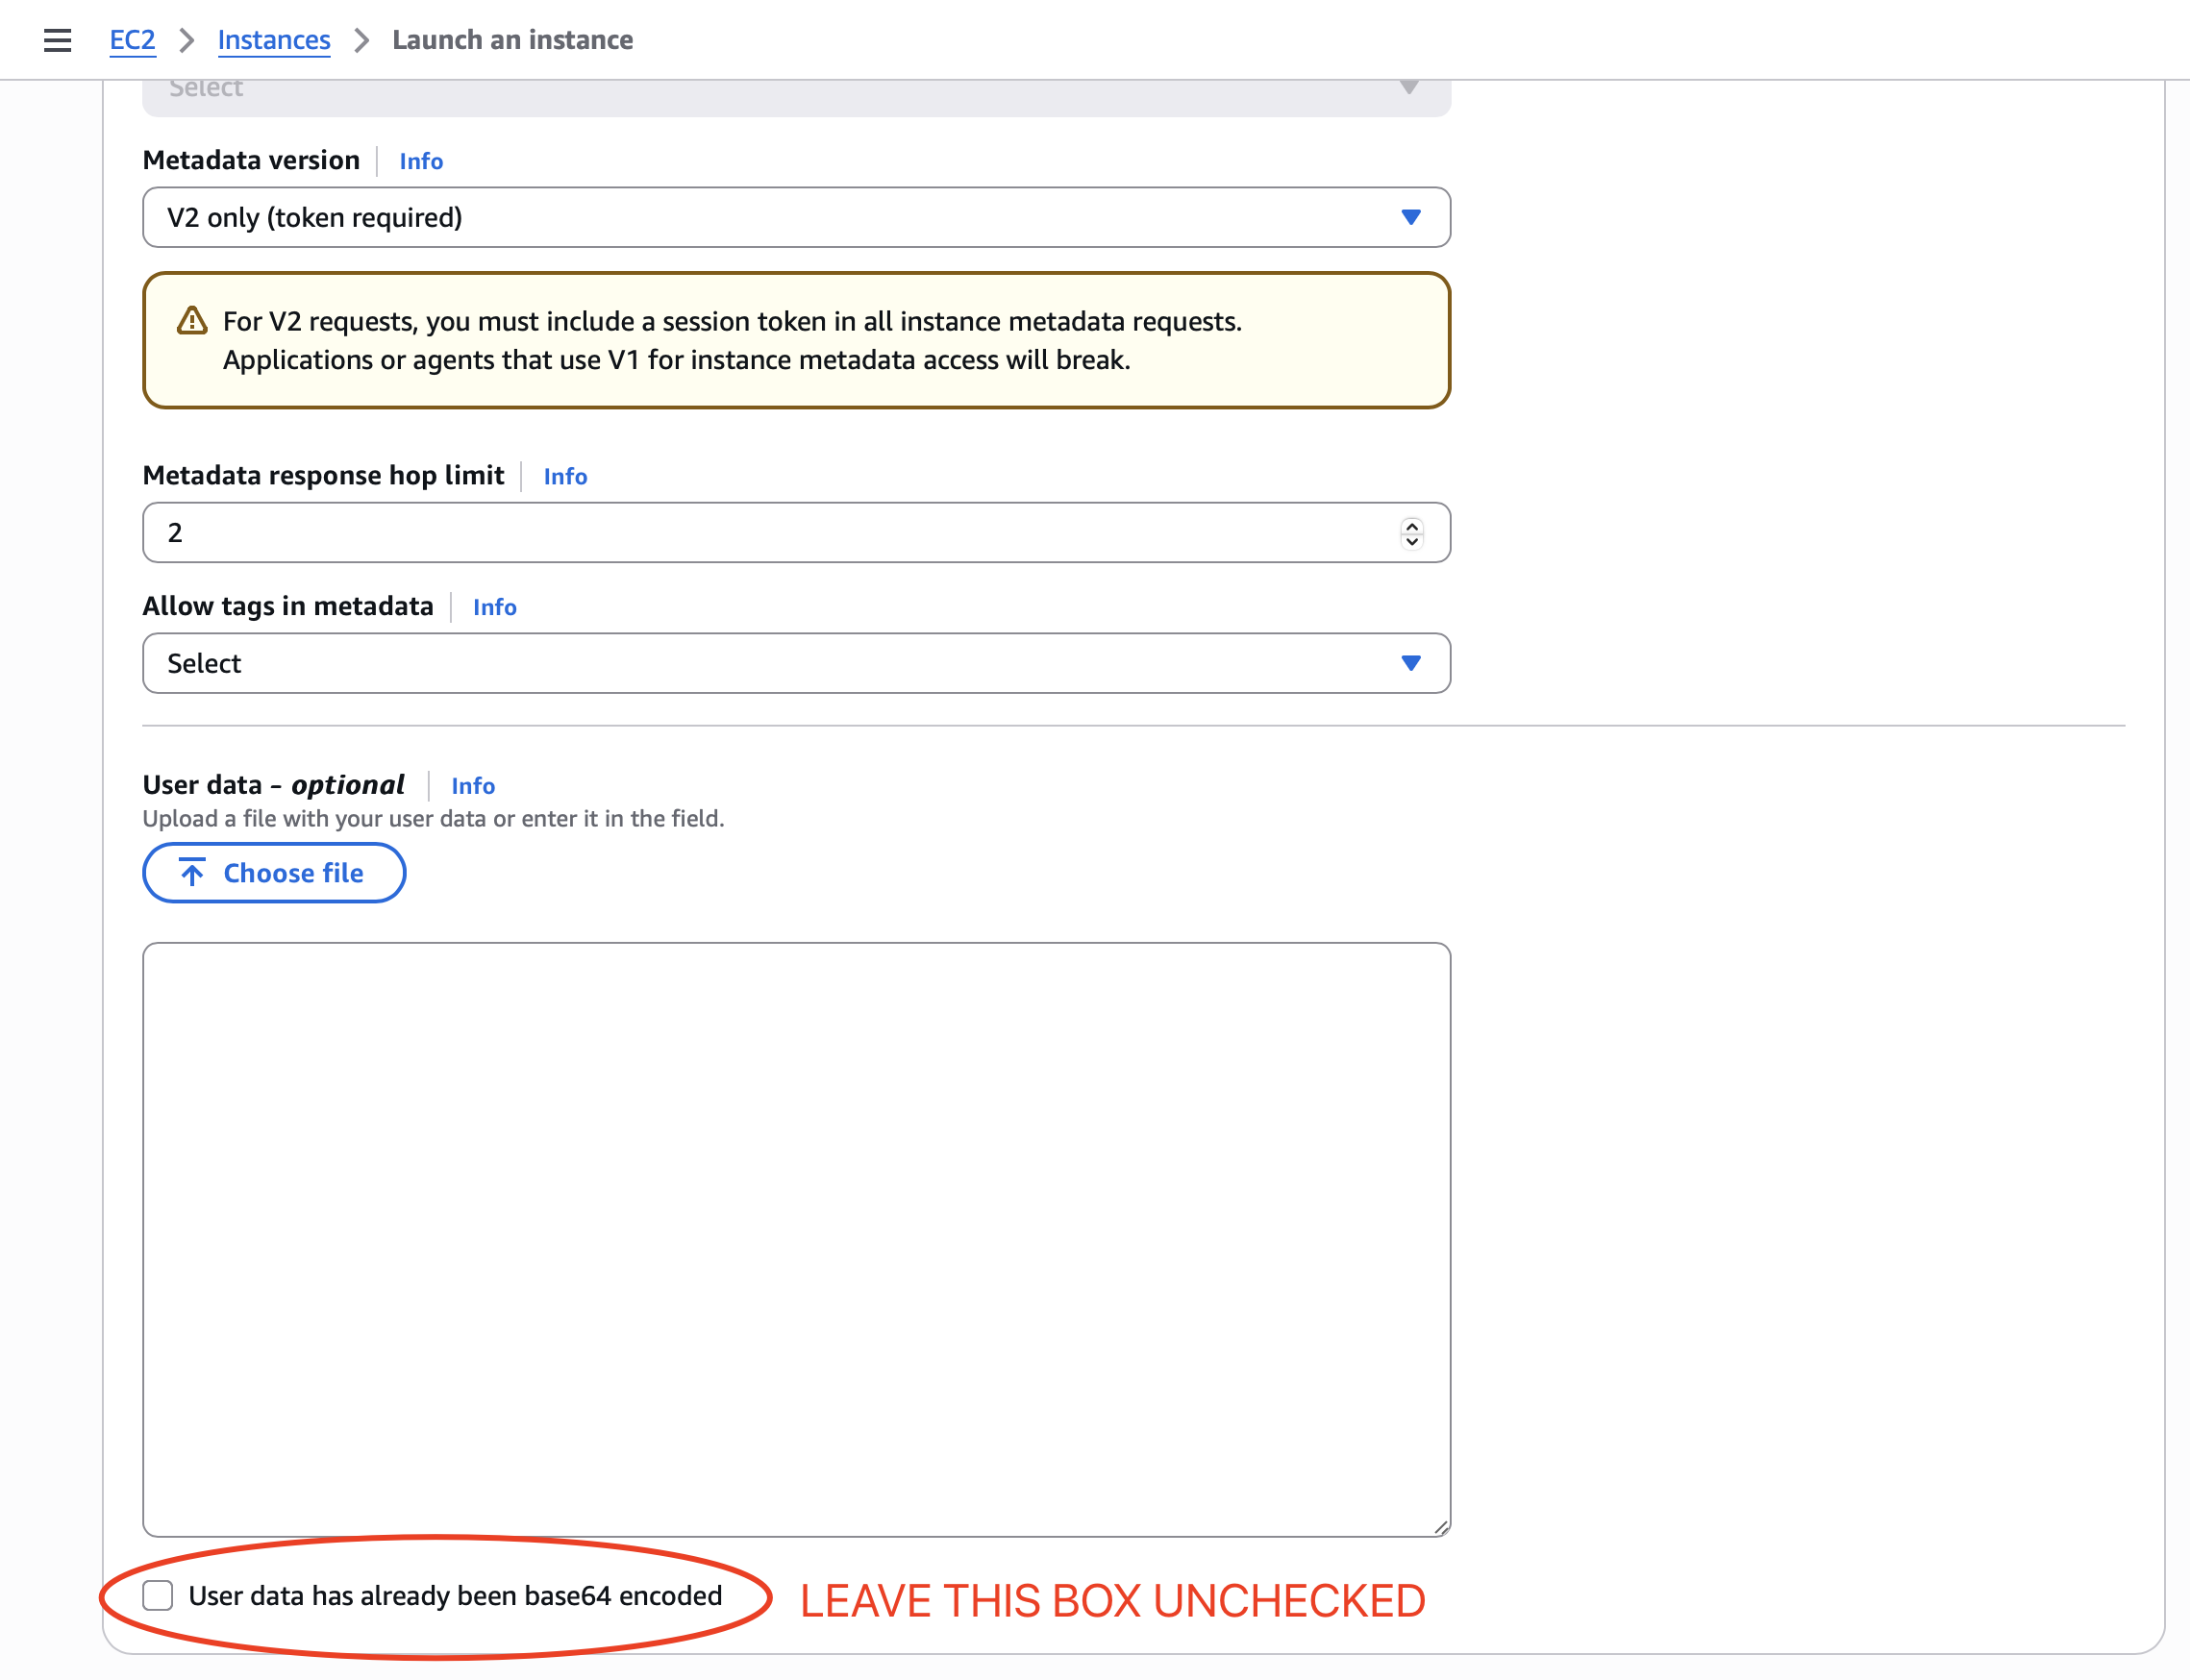
Set up a 4GB swapfile so that your server can survive load spikes. Paste the following script:
#! /usr/bin/env bash

fallocate -l 4G /swapfile  # free -h to see allocated size
chmod 600 /swapfile
mkswap /swapfile
swapon /swapfile
Please keep the box of User data has already been base64 encoded unchecked.
Click “Launch Instance”.
Instance status
Navigate to the AWS Management Console. Select the “Services” dropdown menu, then “EC2”.
Select one of the instances and view its status and Public DNS.
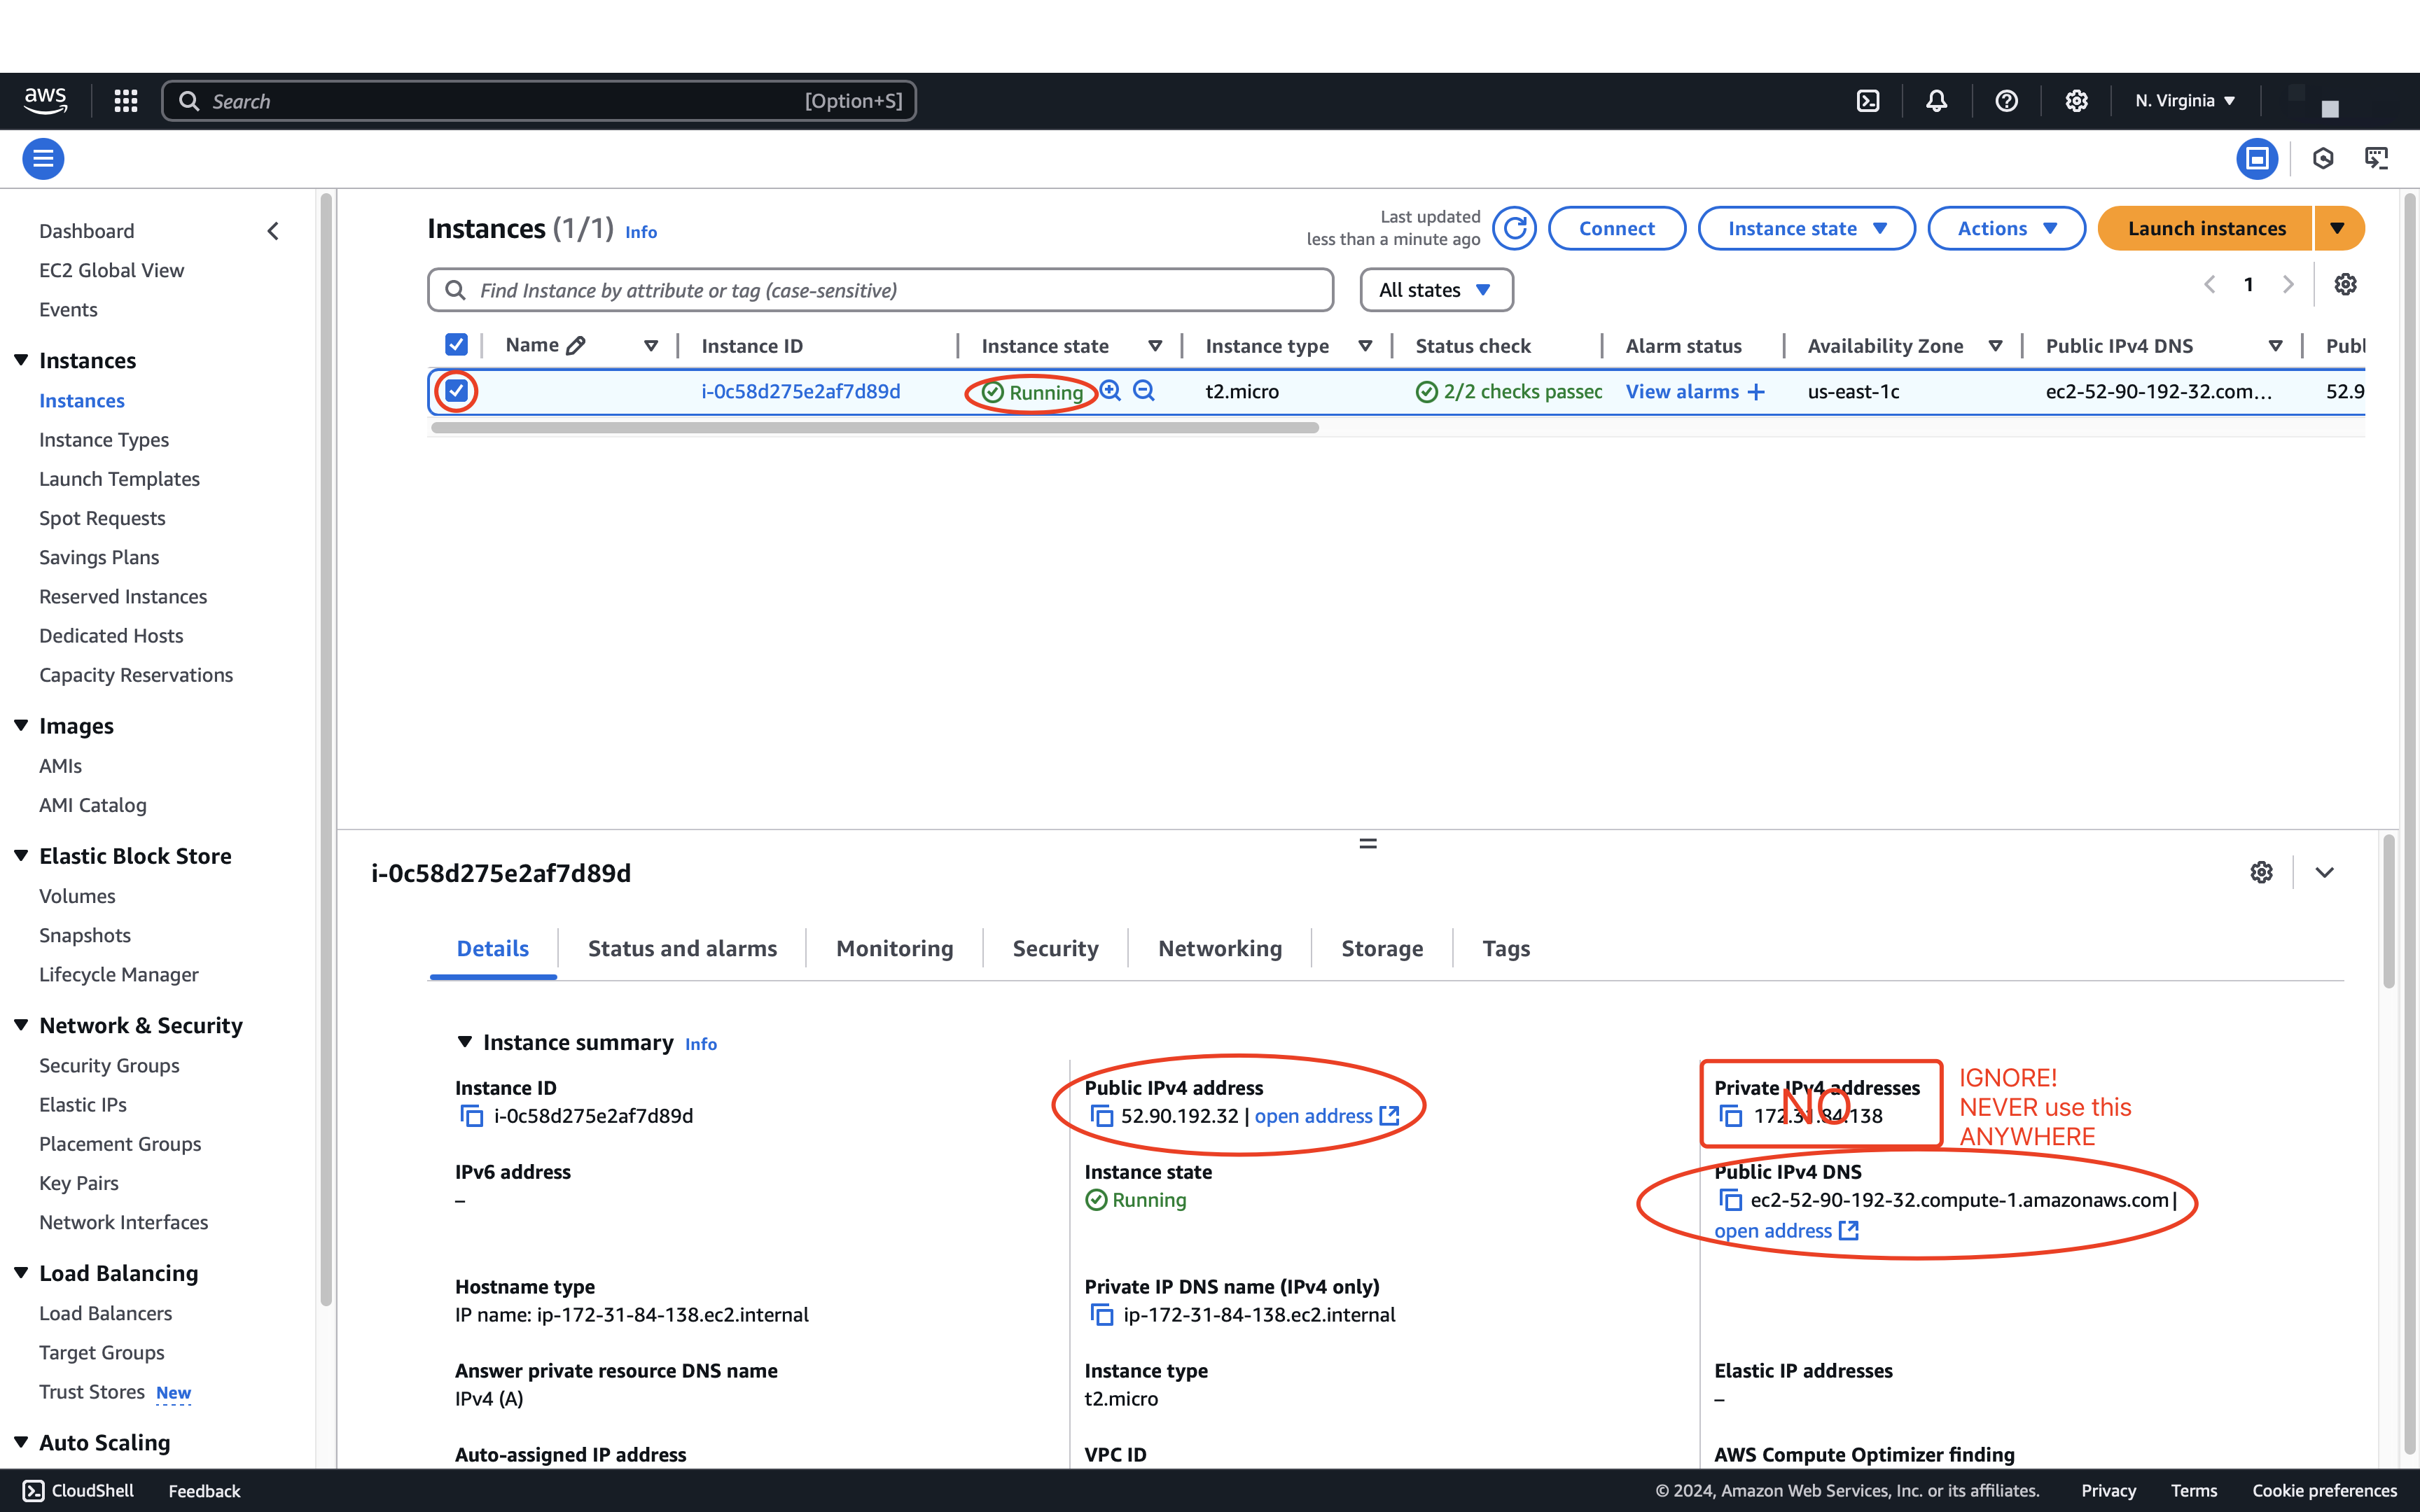
In the remainder of this spec, and this term, we will refer to your “IPv4 Public IP” as YOUR_SERVER_IP (in the image it’s 52.90.192.32).
ssh to instance
On your development host (laptop):
If AWS gave you a
agentic.cerinstead ofagentic.pem, just useagentic.cereverywhere you seeagentic.pemin this spec.
MacOS on Terminal:
In the following, replace /YOUR:TUTORIALS with the name of your tutorials folder.
#          👇👇👇👇👇👇👇👇
laptop$ cd /YOUR:TUTORIALS
laptop$ mv ~/Downloads/agentic.pem agentic.pem
laptop$ chmod 400 agentic.pem
laptop$ ssh -i agentic.pem ubuntu@YOUR_SERVER_IP
#                                 👆👆👆👆👆👆👆
Windows on PowerShell [thanks to Jad Beydoun (F21) for use of icacls]:
#            👇👇👇👇👇👇👇👇
PS laptop> cd /YOUR:TUTORIALS
PS laptop> mv ~\Downloads\agentic.pem agentic.pem
PS laptop> icacls agentic.pem /grant "$($env:username):(r)" /inheritance:r
PS laptop> ssh -i agentic.pem ubuntu@YOUR_SERVER_IP
#                                    👆👆👆👆👆👆👆
Windows on WSL
If you prefer to run Ubuntu shell instead of Windows’ PowerShell, on Ubuntu’s terminal create /etc/wsl.conf:
laptop$ sudo vi /etc/wsl.conf
and put the following content in it:
  [automount]
  options = "metadata"
Exit all Ubuntu shells such that Ubuntu is not running and its icon is not showing in your dock (or sign out and sign back in to your Windows account), restart your Ubuntu terminal, and continue with the steps below:
  #          👇👇👇👇👇👇👇👇
  laptop$ cd /YOUR:TUTORIALS/
  #                       👇👇👇👇👇👇👇👇👇👇
  laptop$ mv /mnt/c/Users/YOUR_WINDOWS_USERNAME/Downloads/agentic.pem agentic.pem
  laptop$ chmod 400 agentic.pem
  laptop$ ssh -i agentic.pem ubuntu@YOUR_SERVER_IP
  #                                 👆👆👆👆👆👆👆
In both cases, what the above does:
- change working directory to
/YOUR:TUTORIALS/ - move the private
sshkey you created and downloaded earlier into/YOUR:TUTORIALS/, - set its permissions to read-only, and
-
sshto your AWS instance as user “ubuntu” using the downloaded private key. (Make sure your instance is running. See Instance status.)
![]() WARNING Students have reported issues trying to run the course backend on VSCode Server or JetBrains Remote Development Gateway. These are meant for maintaining your source files remotely; they may not be set up for long-running services. Always
WARNING Students have reported issues trying to run the course backend on VSCode Server or JetBrains Remote Development Gateway. These are meant for maintaining your source files remotely; they may not be set up for long-running services. Always ssh directly to your server as described in this section to run your server.
Persistent swapfile
To mount the 4G swapfile we created above persistently after each reboot, and also
to ensure that Ubuntu is not too aggressive with swapping, do:
server$ sudo su
server# echo '/swapfile none swap sw 0 0' >> /etc/fstab
server# echo vm.swappiness=10 >> /etc/sysctl.conf
server# sysctl --system
server# exit
Increasing the disk size
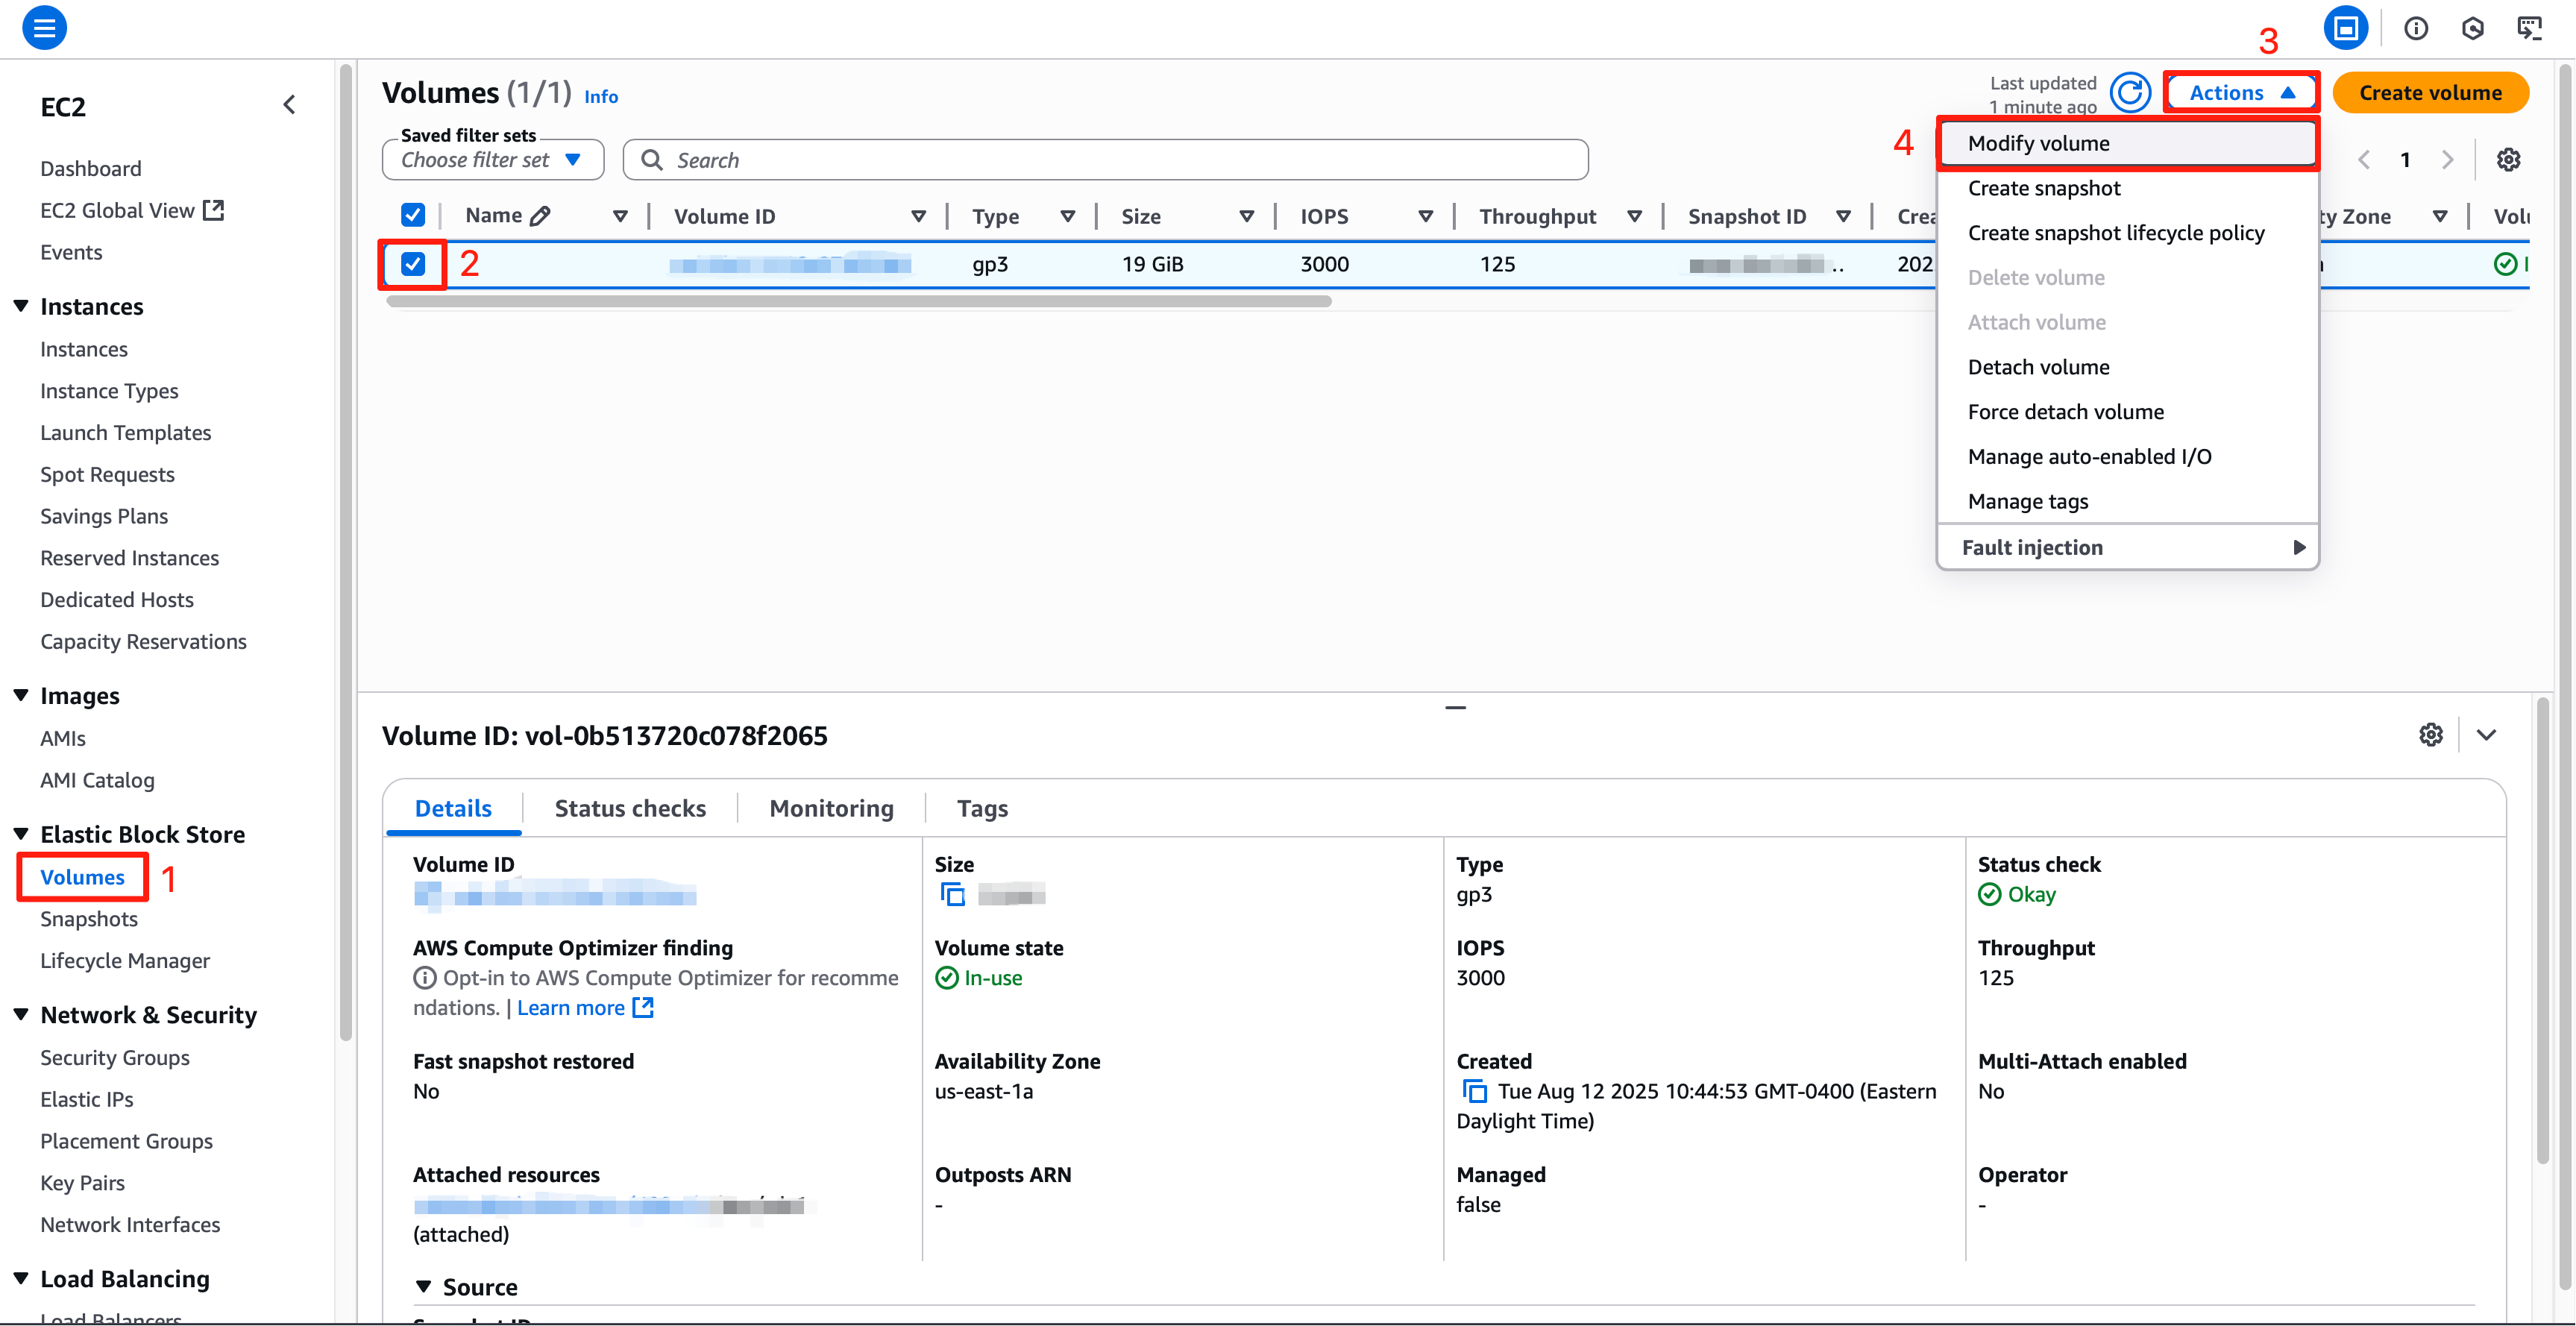
If you have set up your instance with less than the 30 GB suggested above and got an error message that you don’t have enough storage, to increase your storage, go to the EC2 Dashboard, select “Volumes” under “Elastic Block Store”. Select the volume attached to your instance, and click “Actions > Modify Volume”. Note that there’s an upper limit of 30 GB of total free-tier storage across all your AWS instances.
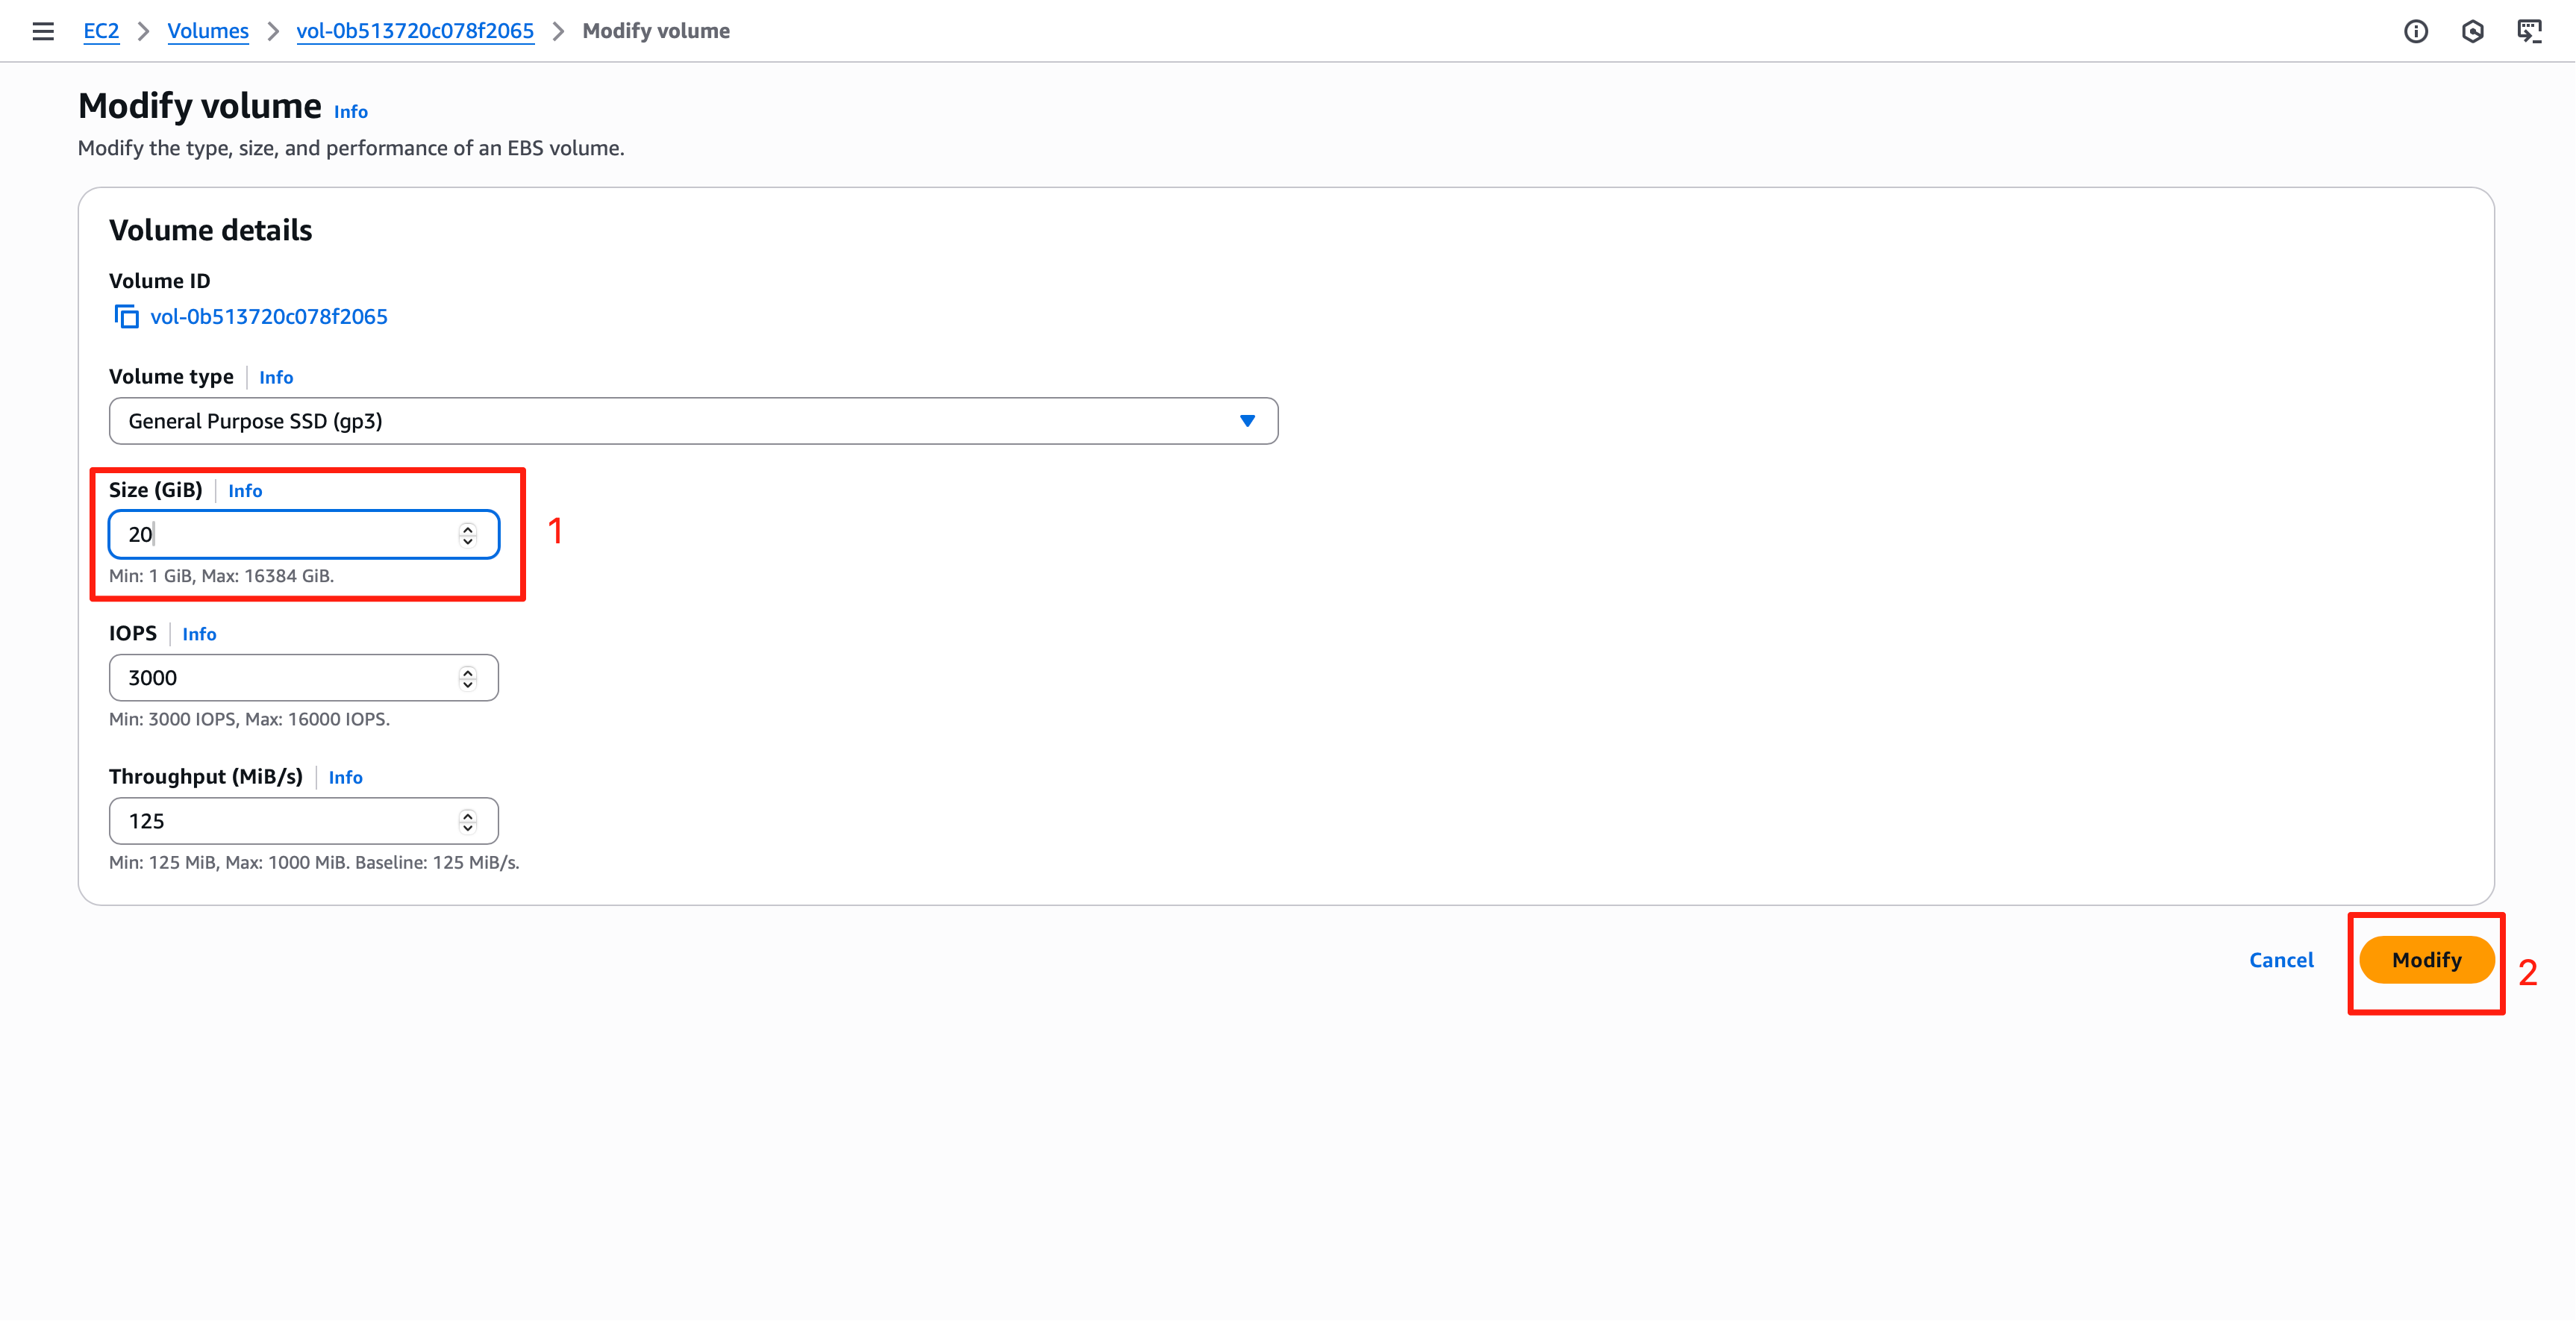
Enter a larger size, e.g., 20 GB, for the volume and click “Modify”. You may need to wait a few minutes for the modification to take effect.
Once the volume size modified, you also need to resize the partition and filesystem inside the VM: ssh to your sever, then check your storage devices (disk, partitions, and logical volumes).
server$ lsblk
From the list of block devices, look for xvda or nvme0n1. This is your disk storage and it should show the modified size (20GB) of your volume. Your root partition would be listed as xvda1 or nvme0n1p1. Expand your root partition (xvda1 or nvme0n1p1) to use all of the free space on the volume (xvda or nvme0n1):
server$ sudo growpart /dev/xvda 1A  # or /dev/nvme0n1
server$ sudo resize2fs /dev/xvda1  # or /dev/nvme0n1p1
The above commands grow the root partition and resize the filesystem.
You can verify the updated partition size by:
server$ df -h
You should see /dev/root mounted at / and that its usable space is as you’ve set.
What's the difference between xvda and nvme0n1?
xvda indicates a Xen-based virtual block device, while nvme0n1 refers to an NVMe-based device.
NVMe provides faster performance and lower latency than Xen. If you created your AWS account
after 07/15/2025, your instance will typically use NVMe!
Stop instance
DO NOT STOP YOUR INSTANCE. Please leave your EC2 instance running for grading purposes. Stopping your instance will change its alloted IP address and undo some of the customizations you’ve done following this spec. When we’re done with all the tutorials and projects, after the last tutorial/project has been graded, in about 2.5 months, and if you don’t need your instance for your course project, then you can stop your instance, to avoid using your AWS credits. ![]()
The AWS free credit refreshes every month. So don’t fret if you get an email from AWS near the end of a month saying you’ve used up 85% of your free credit. It should reset when the new month rolls around.
Stop instance **ONLY AT END OF TERM**
Check your Instance status.
Right click on your instance Instance State > Stop.
You should see that your instance is stopped.
Appendix
Command line tools
To administer AWS EC2 instance from the Ubuntu command line, install the following:
server$ sudo apt install cloud-utils awscli
Useful commands:
server$ ec2metadata
server$ aws configure
server$ aws ec2 help
The command ec2metadata shows the instance’s public-ip and public-hostname.
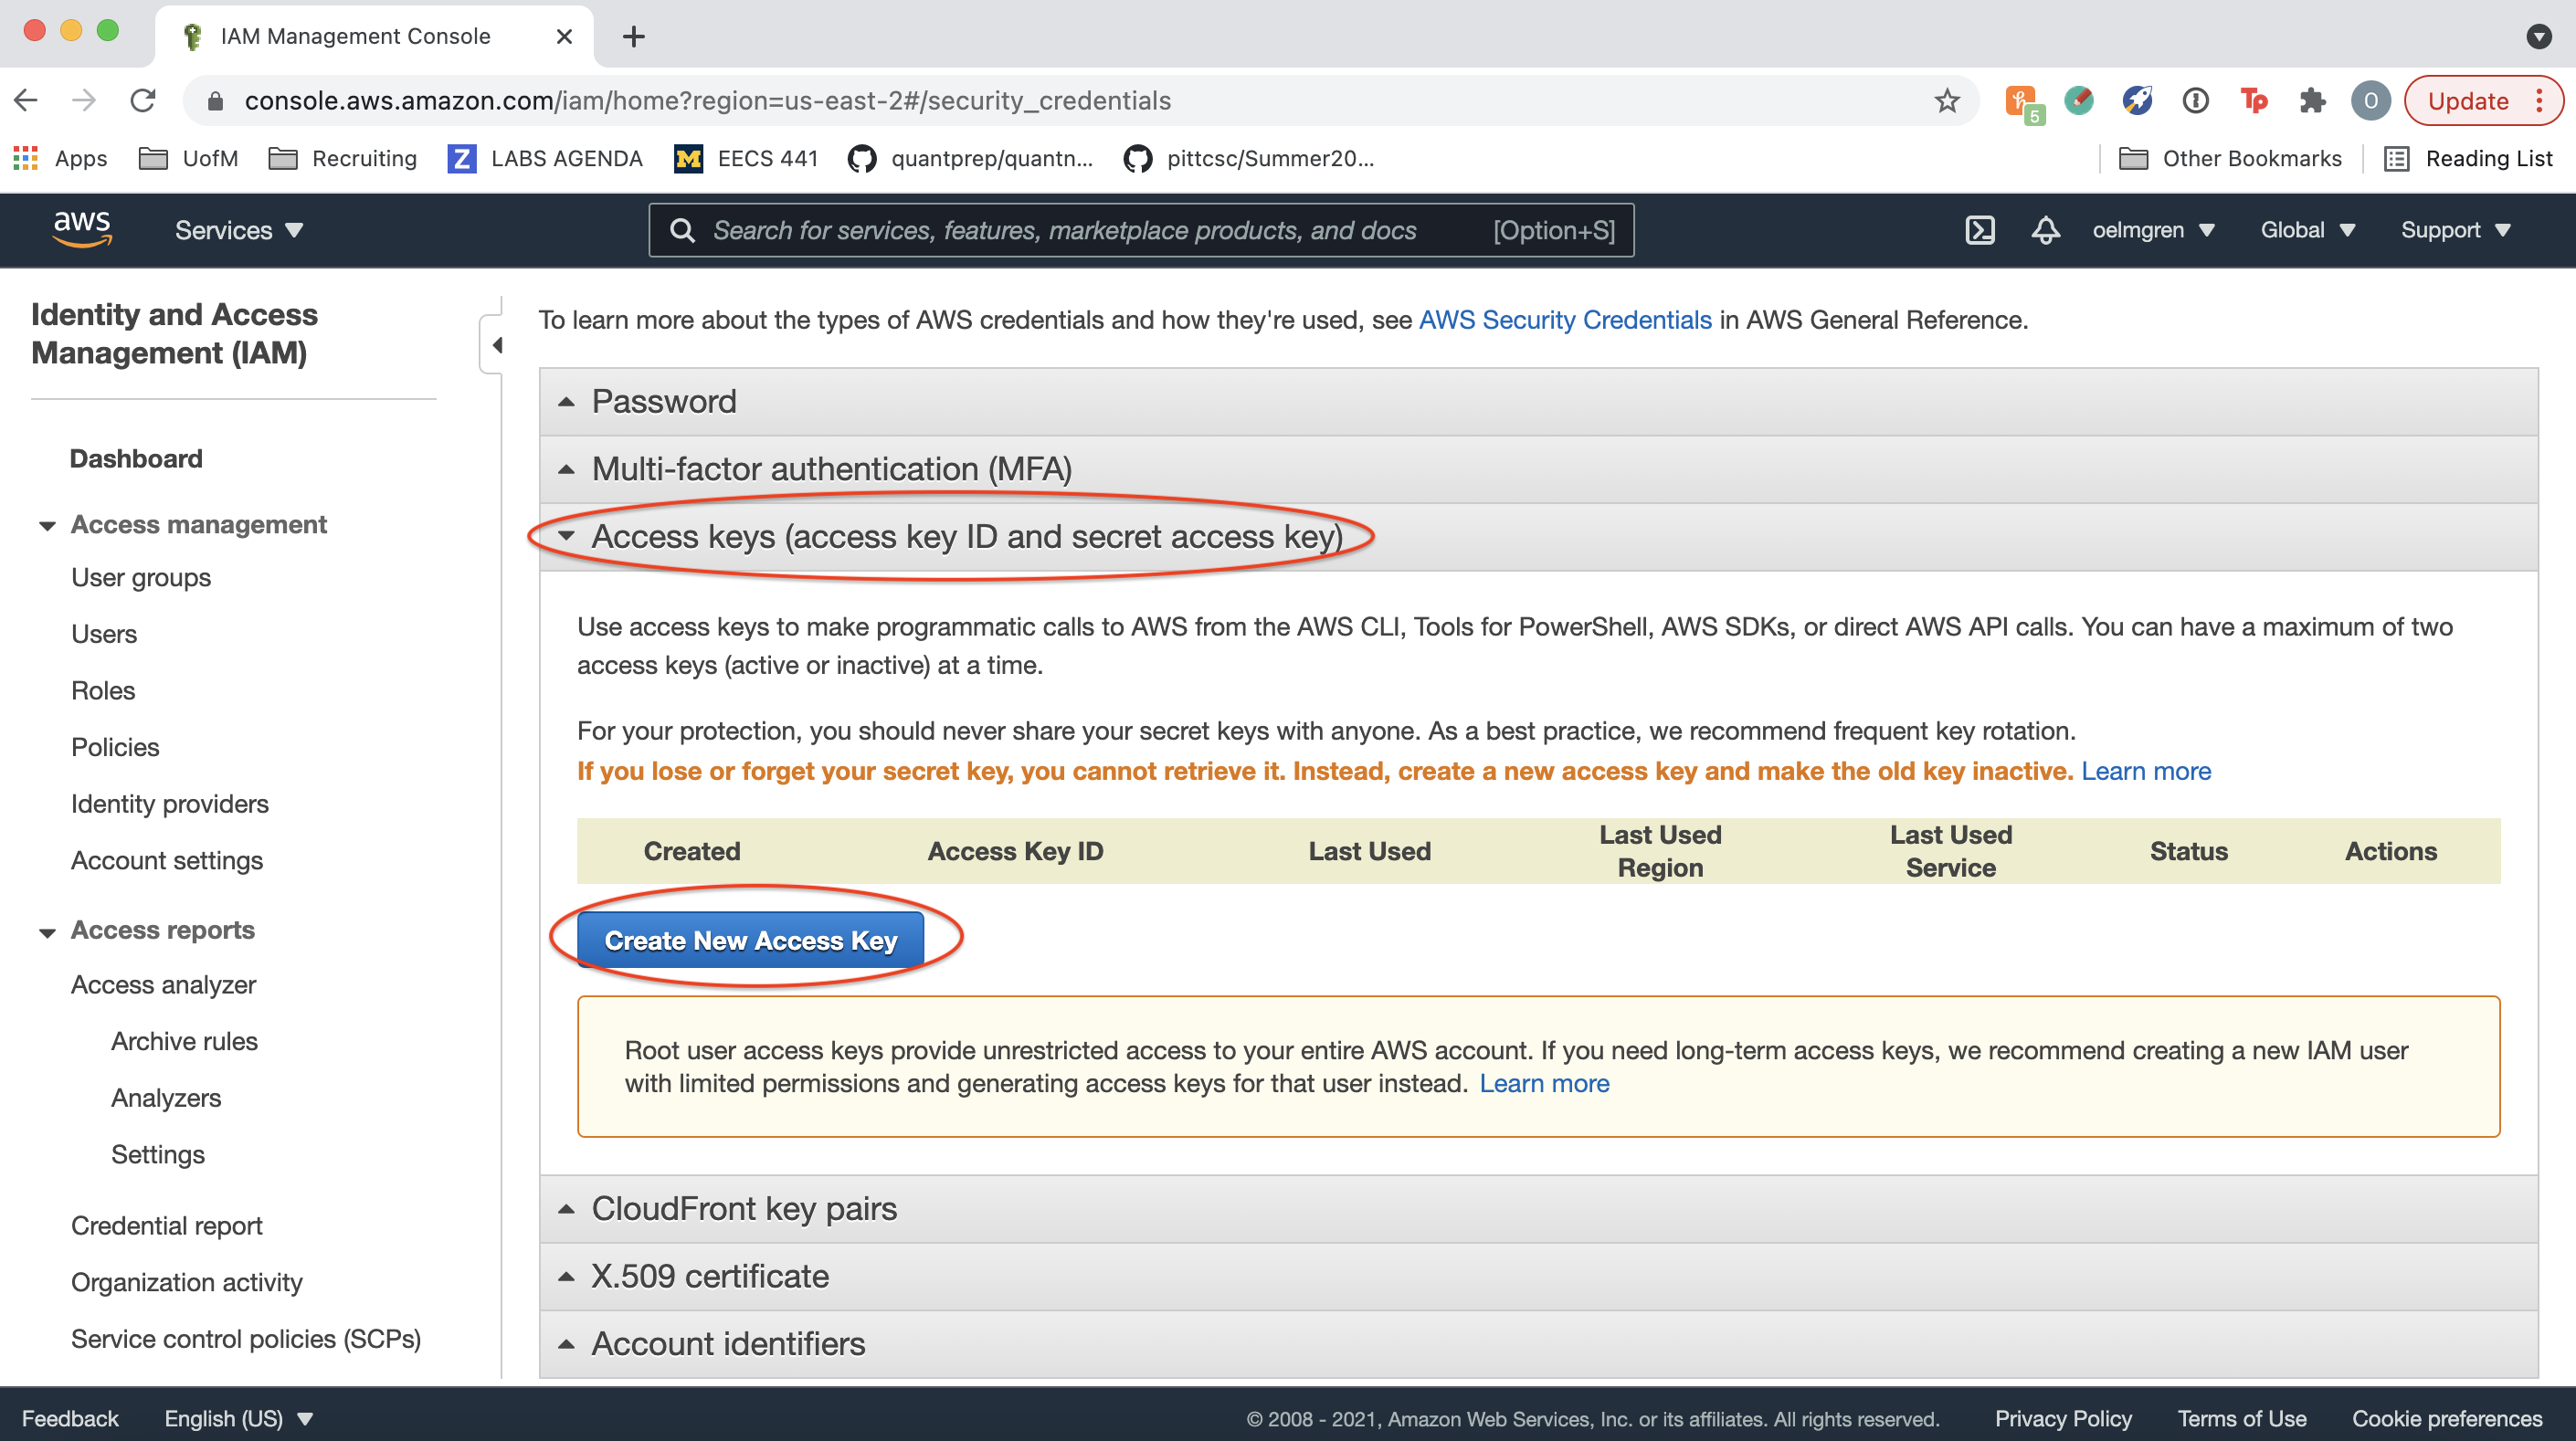
The command aws configure asks for AWS Access Key ID, which can be obtained from:
server$ aws iam list-access-keys
It also asks for AWS Secret Access Key, which is shown only at creation time at the IAM console.
The Default region name is listed in the public-hostname following the public-ip.
The command aws ec2 is the main interface to configure ec2. The help sub-command lists all the sub-commands such as describe-security-groups, from which one can obtain the group name/id needed to run sub-command authorize-security-group-ingress, for example.
To add IPv6 CIDR block use --ip-permissions, e.g.,
server$ aws ec2 authorize-security-group-ingress --group-id YOUR_GROUP_ID --ip-permissions IpProtocol=tcp,FromPort=8000,ToPort=8000,Ipv6Ranges=[{CidrIpv6=::/0}]
| Prepared by Tiberiu Vilcu, Wendan Jiang, Alexander Wu, Benjamin Brengman, Ollie Elmgren, Luke Wassink, Mark Wassink, Nowrin Mohamed, Chenglin Li, Yibo Pi, and Sugih Jamin | Last updated April 9th, 2026 |