Tutorial: llmTools Back End
Cover Page
You will need the HTTPS infrastructure from the llmPrompt tutorial,
the PostgreSQL database set up in the Chatter tutorial, and the
appID setup in the llmChat tutorial.
Install updates
Remember to install updates available to your Ubuntu back end. If N in the following notice you see when you ssh to your back-end server is not 0,
N updates can be applied immediately.
run the following:
server$ sudo apt update
server$ sudo apt upgrade
Failure to update your packages could lead to your solution not performing at all, with no warning that it is because you haven’t updated, and also makes you vulnerable to security hacks.
Any time you see *** System restart required *** when you ssh to your server, immediately run:
server$ sync
server$ sudo reboot
Your ssh session will be ended at the server. Wait a few minutes for the system to reboot before you ssh to your server again.
Tool calling workflow
In addition to providing all the capabilities of the llmChat tutorial’s back end, we add tool
calling infrastructure to chatterd in this tutorial. Ollama, like most cloud-based LLMs, is a
stateless server, meaning that it doesn’t save any state or data from a request/response interaction
with the client. Consequently, each link in a chain of multiple prompt exchanges is considered a
separate and standalone interaction. For example a prompt requiring chained tool calls—first call
get_location then call get_weather—is to Ollama three separate interactions (or HTTP
rounds):
- The first interaction carries the prompt and the definition of the two tools.
This round is completed by Ollama’s returning a tool call for
get_location. This initial round is depicted in the figure below as the red communication lines numbered 1 to 4. - The second interaction carries all messages from the first exchange including Ollama’s
completion and the result of the
get_locationtool call. This round is completed by Ollama’s returning the second tool call forget_weather. In the figure, this round is depicted as the purple communication lines numbered 5 to 7. - The third interaction carries all of the above and the result of the
get_weathertool call. This round is completed by Ollama’s returning the combined results of the two tool calls as the final completion of the original prompt. This final round is depicted in the figure as the green communication lines numbered 8 and 10.
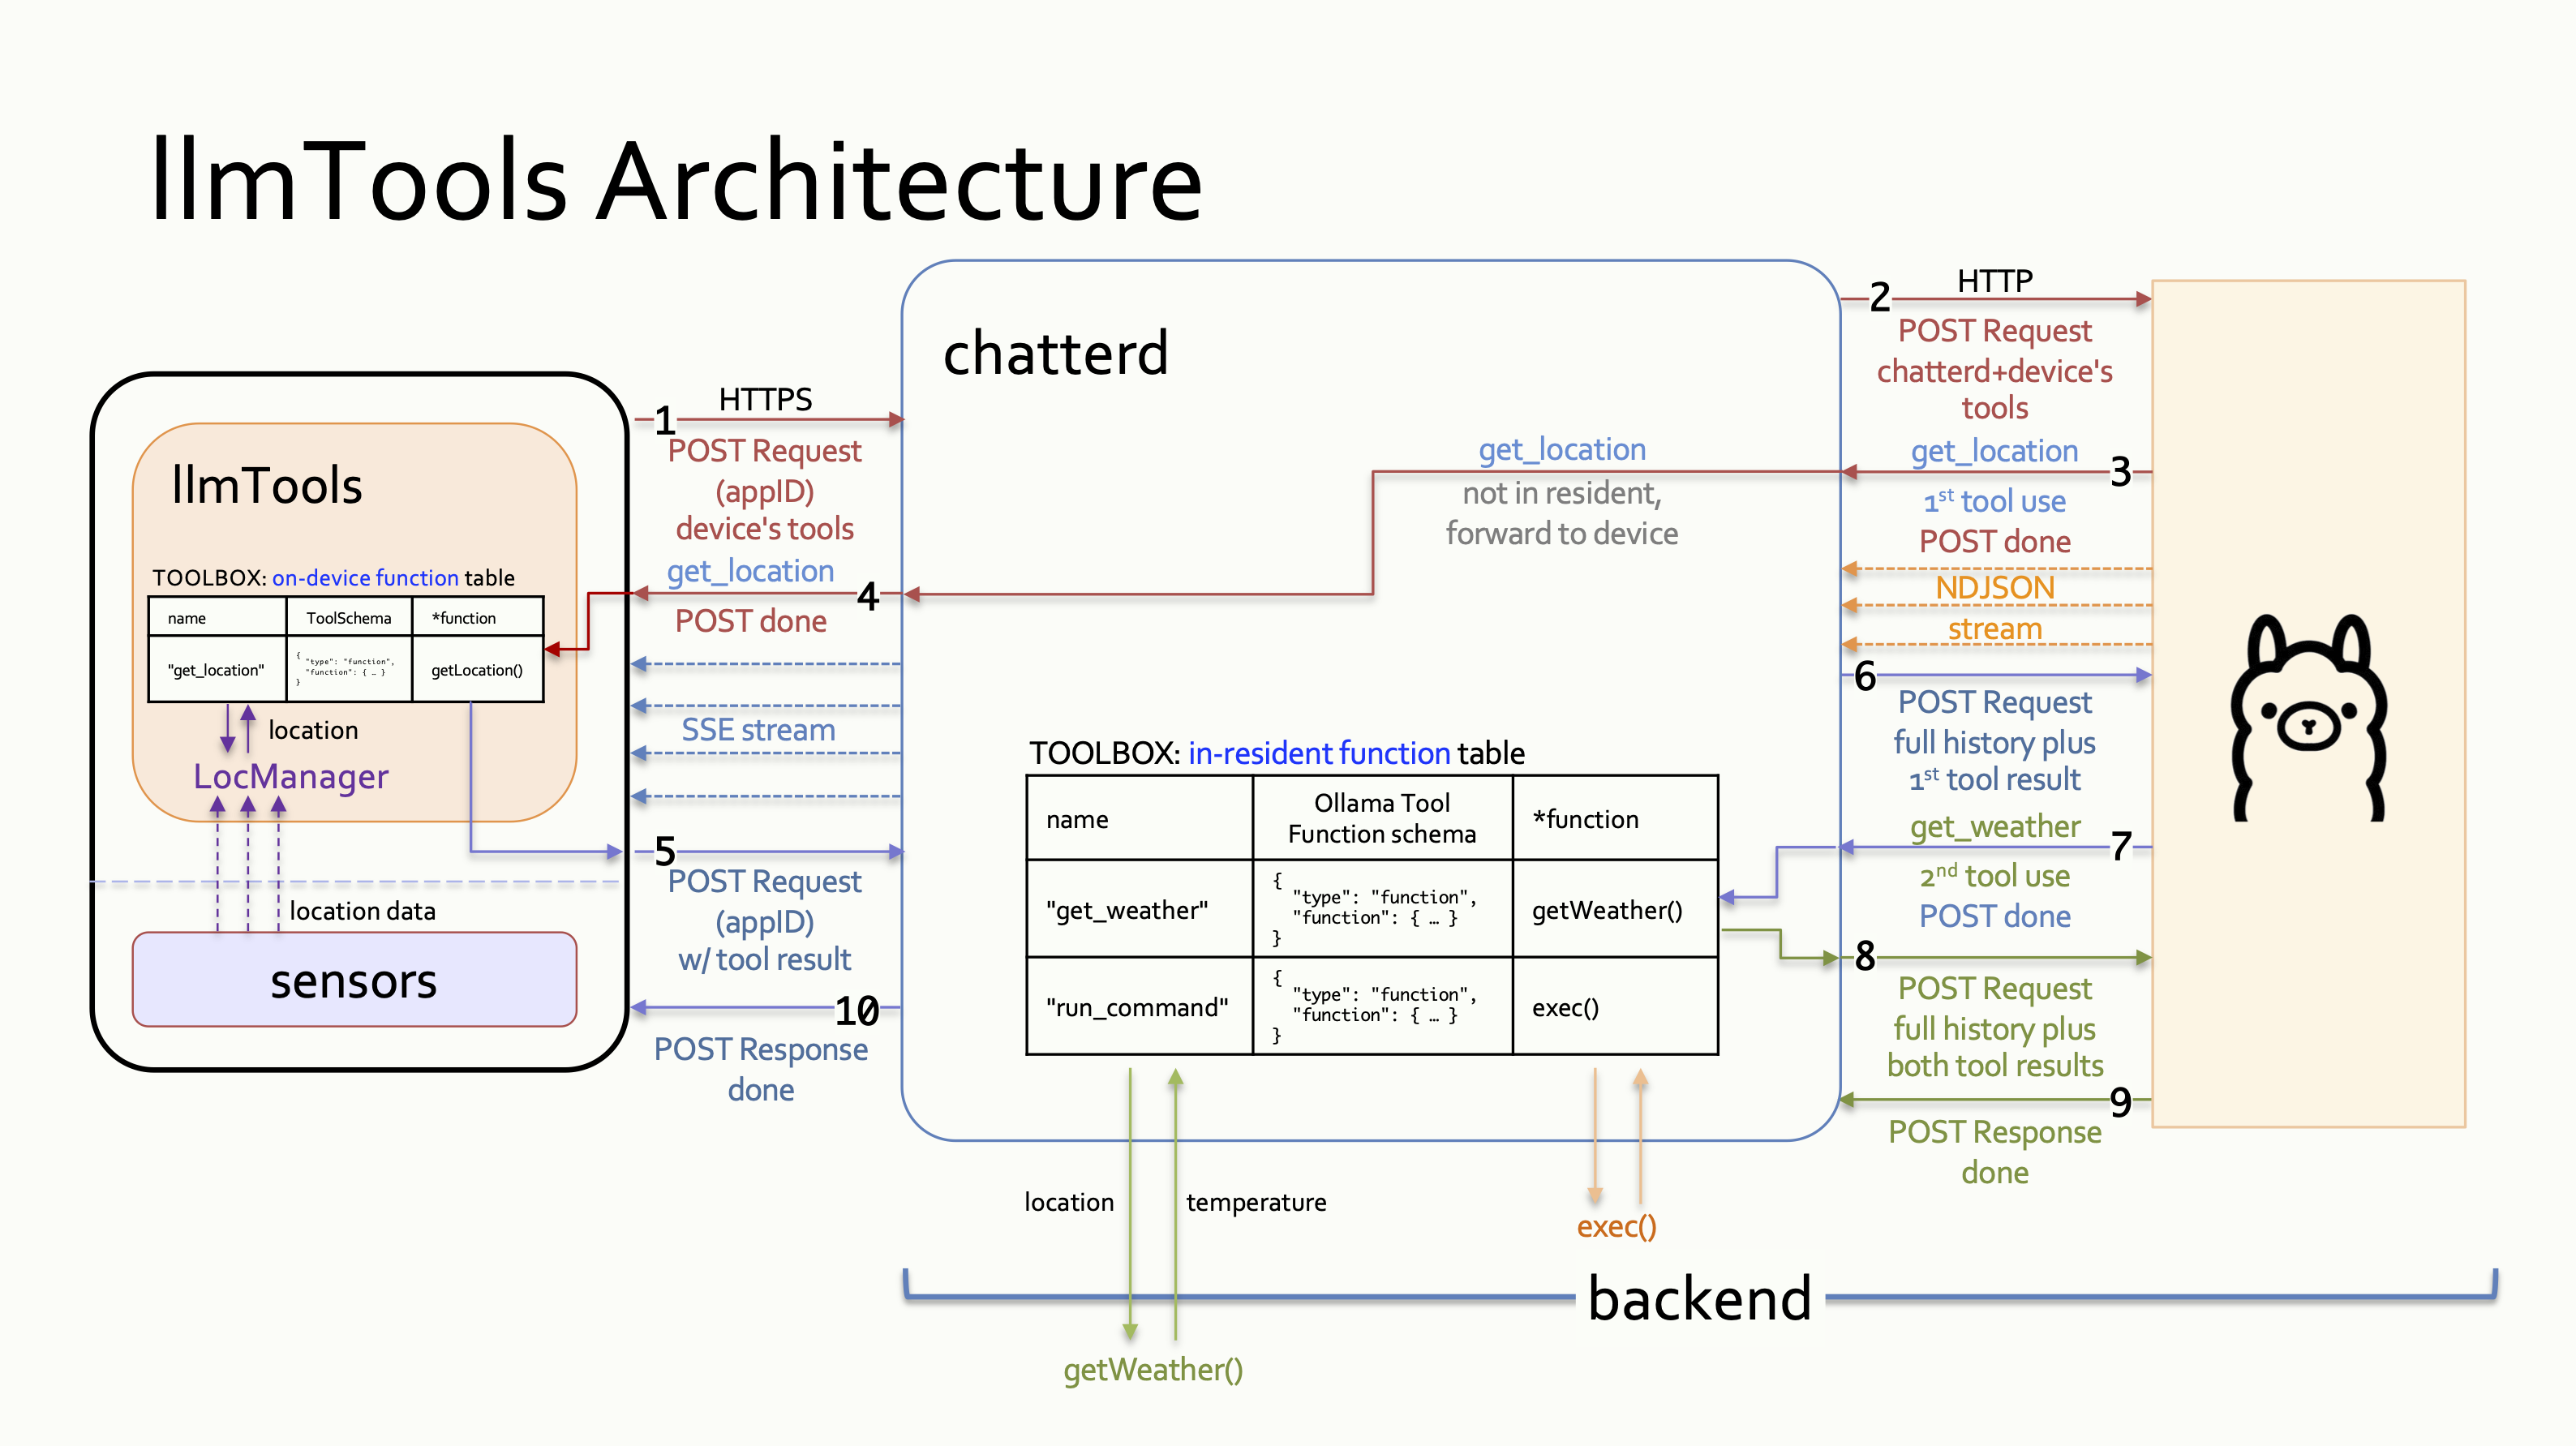
Tool-call Handling: chatterd handling resident and non-resident tool calls from Ollama to address, “What is the weather at my location?” prompt.
The initial request from the client carries the original prompt and the get_location tool
definition (1). Upon receiving this request, chatterd tags on the get_weather
tool and forward it to Ollama (2). When Ollama’s response arrives (3), chatterd inspects
the response for any tool call. If there is a tool call for a non-resident tool,
chatterd forwards the call to the front end (4). This concludes the initial HTTP
request/response interaction.
If the tool exists on the front end, it returns the result as a new HTTP POST connection (5), and
chatterd forwards the results to Ollama (6). If the tool doesn’t exist, the front end informs the
user that Ollama has made an unknown tool call and the full interaction is considered completed.
If the response from Ollama contains a call for a tool resident on the back end, however,
chatterd calls the tool (7) and concludes the ongoing HTTP interaction. Then chatterd
opens a new HTTP POST connection to Ollama to return the result of the resident tool call
(8), “short circuiting” the front end.
Finally, using the result of the two tool calls, Ollama returns a completion to the
original prompt (9), which chatterd forwards to the client (10), completing the final interaction.
From HTTP 1.1 on, the protocol automatically tries to reuse the underlying TCP connections to transfer multiple requests/responses between the same end points, to avoid the overhead of opening new connections. Though incorrect use may still prevent connection reuse.
In summary, our back end’s interaction with LLM with tool use follows this pseudo-code outline:
store front-end prompt and tool definition(s) to appID's context
prepare prompt with appID's context and both back-end and front-end tool definition(s)
do {
  sendNewPrompt = false
  send prompt
  parse LLM's prompt completion {
    while (has tool call) {
      if (back-end tool call) {
        execute back-end tool call
        append tool result to prompt
        store tool result to context
        sendNewPrompt = true
      } else {
        forward tool call to front end
      }
    }
  }
} while (sendNewPrompt)
Results from front-end tool calls will arrive at the back end as a new front-end prompt of the given
appID.
Tool definition JSON files
Make a new directory to store your back-end tool JSON schema files. This directory is different
from the folder with the same name you created earlier. Create your
first schema file, get_weather.json, in this directory:
server$ cd ~/reactive/chatterd
server$ mkdir tools
server$ vi tools/get_weather.json
Put the following JSON schema in your get_weather.json:
{
  "type": "function",
  "function": {
    "name": "get_weather",
    "description": "Get current temperature",
    "parameters": {
      "type": "object",
      "properties": {
        "latitude": {
          "type": "string",
          "description": "latitude of location of interest"
        },
        "longitude": {
          "type": "string",
          "description": "longitude of location of interest"
        }
      },
      "required": [
        "latitude",
        "longitude"
      ]
    }
  }
}
Database table
Add two new columns to the chatts table in your chatterdb database to store the tool calls and tool schemas:
- Log into an interactive PostgreSQL (
psql) session as userpostgres - Connect to the
chatterdbdatabase - Clear your
chattstable of all oldchatts, use the SQL command:TRUNCATE TABLE chatts; - Add two new columns to
chattsto storetoolcallsandtoolschemasboth asTEXT. Type the following:ALTER TABLE chatts ADD COLUMN toolcalls TEXT, ADD COLUMN toolschemas TEXT;Columns of type
TEXTallow the user to store strings of undetermined length. - To verify that you’ve added the new column to the
chattstable, enter:SELECT * FROM chatts;Make sure you get back the following result (though perhaps more stretched out and may include other column(s), such as
appIDif you have completed other tutorial(s)):name | message | id | time | toolcalls | toolschemas | ------+----------+----+------+-----------+-------------+ (0 rows)If so congratulations! You have successfully added the new columns!
- Exit PostgreSQL
Web server
To implement tool calling on chatterd, please click the relevant link for the web framework
of your choice, and return here afterwards to test your server:
| Go | Python | Rust | TypeScript |
Testing llmToos APIs
This is only a limited test of the back-end call to the OpenMeteo API and its handling of resident tools. A full test of tool calling with on-device tool calls would have to wait until your front end is implemented.
As usual, you can use either graphical tool such as Postman or CLI tool such as curl.
/weather API
To test your /weather API, in Postman, point your GET request to
https://YOUR_SERVER_IP/weather with the following Body > raw JSON content:
{
    "lat": "42.29",
    "lon": "-83.71"
}
and click Send.
The same example using curl:
laptop$ curl -X GET -H "Content-Type: application/json" -H "Accept: application/json" -d '{ "lat": "42.29", "lon": "-83.71" }' -kL https://YOUR_SERVER_IP/weather
/llmtools API for resident tools
You can also test your back end’s handling of resident tools. In Postman, point your
POST request to https://YOUR_SERVER_IP/llmtools with this Body > raw JSON:
{
    "appID": "edu.umich.DUMMY_UNIQNAME:getweather",
    "model": "qwen3:0.6b",
    "messages": [
        { "role": "user", "content": "What is the weather at lat/lon 42.29/-83.71?" }
    ],
    "stream": true
}
In all cases, you should see something like “Weather at lat: 42.28831, lon: -83.700775 is 50.5ºF” returned to you. (It’s ok for the lat/lon in the result to not match those in the prompt exactly.)
Once your front end is completed, you can do end-to-end testing, see End-to-end Testing section of the spec.
And with that, you’re done with your back end. Congrats!
![]() WARNING: You will not get full credit if your front end is not set up to work with your back end!
WARNING: You will not get full credit if your front end is not set up to work with your back end!
Everytime you rebuild your Go or Rust server or make changes to either of your JavaScript or Python files, you need to restart chatterd:
server$ sudo systemctl restart chatterd
![]() Leave your
Leave your chatterd running until you have received your tutorial grade.
![]() TIP:
TIP:
server$ sudo systemctl status chatterd
is your BEST FRIEND in debugging your server. If you get an HTTP error code 500 Internal Server Error or if you just don’t know whether your HTTP request has made it to the server, first thing you do is run sudo systemctl status chatterd on your server and study its output, including any error messages and debug printouts from your server.
That’s all we need to do to prepare the back end. Before you return to work on your front end, wrap up your work here by submitting your files to GitHub.
Submitting your back end
We will only grade files committed to the main branch. If you use multiple branches, please merge them all to the main branch for submission.
Navigate to your reactive folder:
server$ cd ~/reactive/
Commit changes to the local repo:
server$ git commit -am "llmtools backend"
and push your chatterd folder to the remote GitHub repo:
server$ git push
If git push failed due to changes made to the remote repo by your tutorial partner, you must run git pull first. Then you may have to resolve any conflicts before you can git push again.
![]() Go to the GitHub website to confirm that your back-end files have been uploaded to your GitHub repo.
Go to the GitHub website to confirm that your back-end files have been uploaded to your GitHub repo.
References
- Sequential Function Calls
- How to Use Ollama for Streaming Responses and Tool Calling
- Streaming responses with tool calling
| Prepared by Xin Jie ‘Joyce’ Liu, Chenglin Li, and Sugih Jamin | Last updated April 9th, 2026 |