Tutorial: Signin Compose
Cover Page
This tutorial may be completed individually or in teams of at most 2. You can partner differently for each tutorial.
Preparing your GitHub repo
In the following, replace /YOUR:TUTORIALS/ with the name of your tutorials folder.
- On your laptop, navigate to
/YOUR:TUTORIALS/ - Unzip your
chatter.zipfile. Double check that you still have a copy of postautzipped file for future reference! - Rename your newly unzipped
chatterfoldersignin - Remove your
signin’s.gradledirectory by running in a shell window:laptop$ cd /YOUR:TUTORIALS/signin/composeChatter laptop$ rm -rf .gradle - Push your local
/YOUR:TUTORIALS/repo to GitHub and make sure there’re no git issues:git push
- Open GitHub Desktop and click on
Current Repositoryon the top left of the interface - Click on your assignment GitHub repo
- Add Summary to your changes and click
Commit to main - If you have pushed other changes to your Git repo, click
Pull Originto synch up the clone on your laptop - Finally click on
Push Originto push changes to GitHub
- Open GitHub Desktop and click on
![]() Go to the GitHub website to confirm that your folders follow this structure outline:
Go to the GitHub website to confirm that your folders follow this structure outline:
  reactive
    |-- chatter.zip
    |-- chatterd
    |-- chatterd.crt
    |-- llmprompt.zip
    |-- signin
        |-- composeChatter
            |-- app
            |-- gradle
    # and other files or folders
If the folders in your GitHub repo does not have the above structure, we will not be able to grade your assignment and you will get a ZERO.
Creating Google OAuth Client
The following instructions are largely based on Authenticate users with Sign in with Google and Set up your Google APIs console project, simplified and elaborated upon.
Dependencies
In your app build file, add Google Credentials and GoogleID libraries as a dependency. Also add the dependency for the biometric package:
    dependencies {
        ...
        implementation("androidx.credentials:credentials:1.5.0")
        implementation("androidx.credentials:credentials-play-services-auth:1.5.0")
        implementation("com.google.android.libraries.identity.googleid:googleid:1.2.0")
        implementation("androidx.biometric:biometric:1.2.0-alpha05")
        implementation("androidx.appcompat:appcompat:1.7.1")
    }
and tap on Sync Now on the Gradle menu strip that shows up at the top of the editor screen.
Creating an OAuth client ID
Go to this link: Set up your Google APIs console project. You’ll see the big blue
Create an OAuth client ID button. Click on the button. If you’re not
signed in to Google, you’ll be prompted to sign in. You will need a gmail account, not
your umich email address, to create an OAuth client ID. Once you’ve
signed in, click the Create an OAuth client ID button again.
The link is for iOS, but it works as well for Android. The Android page is now overly complicated with manual steps, full of legalese. We’ll use the iOS page instead. You just need to get to Create an OAuth client ID button on the page, you can ignore the rest of the page.
- Click the big blue
Create an OAuth client IDbutton - On the
Configure a project for Google Sign-In, enter your project name, for example,composeChatter. - Click
Nextand when prompted toConfigure your OAuth cliententer your project name yet again. - The next step is “Where are you calling from?”. Choose
Android. - This will prompt for a
Package name. Open your app build file and search forapplicationID, for example:defaultConfig { applicationId "edu.umich.YOUR_UNIQNAME.composeChatter" // . . . }where
YOUR_UNIQNAMEwill be your actual uniqname. Copy and paste yourapplicationID. TheapplicationIDof your Android Studio project must match EXACTLY the package name used in the Google API Console, including any capitalization in the package name. -
You also need to enter the
SHA-1 signing certificate. To get your certificate, on your laptop enter:MacOS on Terminal:
laptop$ keytool -v -list -keystore ~/.android/debug.keystore -alias androiddebugkey -storepass android -keypass androidWindows on PowerShell:
PS laptop> keytool -v -list -keystore ~\.android\debug.keystore -alias androiddebugkey -storepass android -keypass androidDon't have keytool or Java Runtime?
On macOS, if
keytoolcomplains that operation couldn’t be completed because it is unable to locate a Java Runtime, download and install it fromwww.java.com.To install
keytoolon Windows natively, you can follow the instructions on “How to fixkeytoolis not recognized as an internal or external command” [thanks to K. Kovalchuk F21].If you’re using WSL as terminal but run Android Studio as a Windows application instead of a Linux application, you must point
keytoolto/mnt/c/users/YOUR_WINDOWS_USERNAME/.android/debug.keystore.If you’re running Linux and don’t have
keytoolinstalled, you can install it with [thanks to D. Wegsman F21]:laptop$ sudo apt install openjdk-17-jre-headlessYou should see amongst the output, three lines that start like this:
Certificate fingerprints:
         SHA1: XX:XX:XX:...:XX
         SHA256: YY:YY:YY:...:YY
Cut and paste the SHA1 certificate to the Google API Console. Click
CREATE. - Copy your
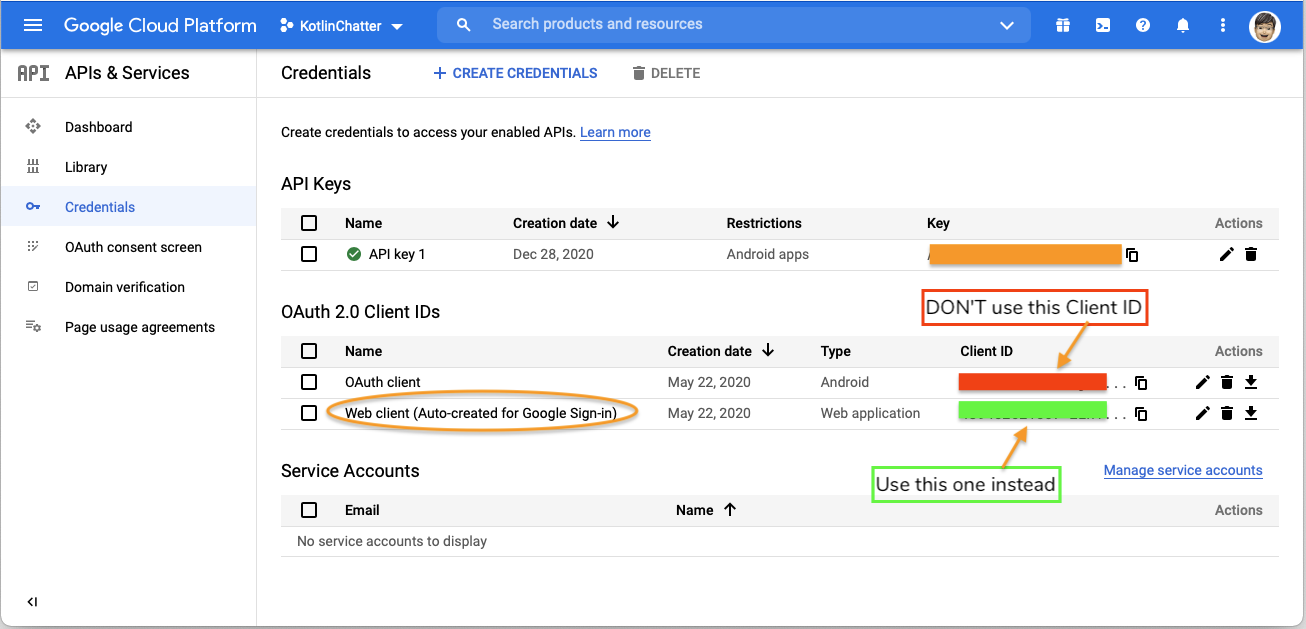
Client ID(ofWeb client) to the clipboard and add it to your/app/res/values/strings.xml, replacingYOUR_WEB_CLIENT_IDbelow with your actual client ID:<resources> ... <string name="clientID">YOUR_WEB_CLIENT_ID</string> </resources>The
credentials.jsonyou downloaded above contains your Google Web client ID. You MUST use this client ID in your app. On your Google API Console, the client ID should be the one listed withWeb client (Auto-created for Google Sign-in), not withOAuth client(screenshot).
And that’s all you need to obtain a Google OAuth client ID.
Obtaining chatterID
We’ll tackle integrating Google Sign-In as two tasks:
- to use Google Sign-In to obtain a
chatterID, - to use Android
SharedPreferencesto store encryptedchatterID, with the encryption/decryption process performed byAndroid KeyStoreand is biometric controlled.
In this section we work on obtaining chatterID. For the tutorial, we will re-use
the files Chatt.kt from the Chatter tutorial unmodified.
ChatterID
Create a new Kotlin source file called ChatterID.kt. We store the chatterID
obtained from the chatterd back end in a singleton called ChatterID:
object ChatterID {
    var creator = ""
    var expiration = Instant.EPOCH // import java.time.Instant
    var id: String? = null
        get() {
            return if (Instant.now() >= expiration) null else field
        }
        set(newValue) {
            field = newValue
        }

    // keystore property

}
ChatterID.id is null when either the user has not obtained a chatterID from
chatterd or the ID has expired.
ChattViewModel
We start with the UI to initiate Google Sign-In so that you can obtain an ID Token to use with and test the back end.
In the MainActivity.kt file, change the onTrailingEnd property of ChattViewModel
to a mutable state and add property showOk:
    val onTrailingEnd = mutableStateOf(app.getString(R.string.username))
    var showOk = mutableStateOf(false)
Follow this up by updating the comparison against vm.onTrailingEnd in ChattScrollView()
to a comparison against vm.onTrailingEnd.value:
ChattView(it, it.name == vm.onTrailingEnd.value)
SubmitButton
When the user clicks the SubmitButton, we first check if we have a valid chatterID.
If we don’t, we try to obtain one before posting the chatt. To your SubmitButton
composable in MainView.kt, add the following local variable:
val context = LocalContext.current
Replace the content of the vm.viewModelScope.launch {} block in the IconButton’s
onClick parameter with:
                if (id == null) {
                    signin(context, vm)
                    vm.onTrailingEnd.value = creator
                }
                if (id != null) {
                    postChatt(Chatt(
                            vm.onTrailingEnd.value,
                            mutableStateOf(vm.message.text.toString())
                        ),
                        vm.errMsg
                    )
                    if (vm.showOk.value || vm.errMsg.value.isEmpty()) {
                        getChatts(vm.errMsg)
                        vm.message.clearText()
                        isSending = false
                        withContext(AndroidUiDispatcher.Main) {
                            listScroll.animateScrollToItem(chatts.size)
                        }
                    // else delete chatterID
                    }
                }
If sign-in is succesful, we update vm.onTrailingEnd to the key creator’s name. This will put the
key creator’s chatts on the trailing/end edge of screen.
If or once we have a valid chatterID, we can post the chatt and then refresh our
trove of chatts from the back end. If posting fails with HTTP status code 401: Unauthorized
however, we suspect the chatterID is somehow invalid and will later delete it from secure storage
so that we can obtain another one afresh the next time the user posts a chatt.
When showing the alert dialog box, we display the title according to whether
vm.showOk is true. Change the title parameter of the AlertDialog in
MainView to be:
                            title = {
                                Text(
                                    if (vm.showOk.value) "Advisory"
                                    else "Error",
                                    fontWeight = FontWeight.Bold
                                )
                            },
Then in the onClick action of the TextButton passed to the confirmButton parameter,
additionally set vm.showOk.value to false.
We added this alert
for better transparency into the workings of the tutorial, in this case to give feedback when
chatterID is retrieved or restored.
signin()
Following Google’s document, Authenticate users with Sign in with
Google, we
first create an instance of the CredentialManager. Then we build a GetCredentialRequest, which
we pass to the getCredential() method of the CredentialManager instance we created. In building
the credential request, we specify the options for credential we are requesting. First we try to get
the credential assuming the phone is already signed in, already has a Google Id, using the
GetGoogleIdOption. If it turns out the phone is not signed in (NoCredentialException), we let
the user sign in using GetSignInWithGoogleOption. Both options require YOUR_WEB_CLIENT_ID you
created earlier with Google Sign-In and had saved to /app/res/values/strings.xml above. It allows
the CredentialManager to authenticate you with Google.
Create a new Kotlin file, call it SignInGoogle.kt and declare the following
suspending function in it:
suspend fun signin(context: Context, vm: ChattViewModel) {
    val clientID = context.getString(clientID) // import PACKAGE_NAME.R.string.clientID
    lateinit var googleIdCredential: GetCredentialResponse

    // define getChatterID()

    try {
        // try signin using existing credential first:
        // phone must already be signed in to a Google account
        googleIdCredential = CredentialManager.create(context)
            .getCredential(
                request = GetCredentialRequest.Builder()
                    .addCredentialOption(
                        GetGoogleIdOption.Builder()
                            .setServerClientId(clientID)
                            .setFilterByAuthorizedAccounts(true) // grab phone account
                            .setAutoSelectEnabled(true)          // restore
                            .build()
                    )
                    .build(),
                context = context.applicationContext,
            )
    } catch (e: NoCredentialException) {
        // signin with Google Signin
        googleIdCredential = CredentialManager.create(context)
            .getCredential(
                request = GetCredentialRequest.Builder()
                    .addCredentialOption(
                        GetSignInWithGoogleOption.Builder(clientID)
                            .build()
                    )
                    .build(),
                context = context.applicationContext,
            )
    } catch (e: GetCredentialException) {
        vm.errMsg.value =
            "Failed Google Sign-In ${e.localizedMessage}\nIs application.id in Module's build.gradle and SHA-1 as registered?"
        return
    }

    getChatterID(googleIdCredential)
}
The getCredential() method is a suspending function. To call it we declare signin() also as a
suspending function and launched it from a coroutine scope in SubmitButton.
GetGoogleIdOption options
-
setServerClientId: theclientIDargument isYOUR_WEB_CLIENT_IDthat you’ve saved to/app/res/values/strings.xmlabove. It allows theCredentialManagerto authenticate you with Google. -
setFilterByAuthorizedAccounts(false): If no authorized Google Accounts has previously been used to sign in to your app on this device/emulator, the user will be prompted to sign up with any accounts currently signed in on device/simulator. If no account is signed in on device/emulator,GetGoogleIdOptioncausesGetCredentialRequestto fail with “Found no credentials” error message. -
setAutoSelectEnabled:truemeans if you have only one account to sign in to,CredentialManagerwill sign you in automatically, without you having to click the account. - (Optional)
setNonce(): to prevent your request being maliciously replayed. It had no effect on me: I was able to make multiple credential requests, back to back, using the same nonce.
Once the user is signed in and we have obtained a credential response, we call
getChatterID() to extract the Google ID Token from the credential and send it
to the chatterd back end to obtain a chatterID. Add the following function
inside your signin() function, before the existing try-catch block,
replacing the // define getChatterID() comment:
    suspend fun getChatterID(result: GetCredentialResponse) {
        when (val credential = result.credential) {
            is CustomCredential -> {
                if (credential.type == GoogleIdTokenCredential.TYPE_GOOGLE_ID_TOKEN_CREDENTIAL) {
                    try {
                        val idTokenCredential = GoogleIdTokenCredential
                            .createFrom(credential.data)

                        if (addUser(clientID,idTokenCredential.idToken, vm.errMsg) != null) {

                            // save chatterID

                        }
                    } catch (e: GoogleIdTokenParsingException) {
                        vm.errMsg.value = "Invalid GoogleIdToken credential: $e"
                    }
                } else {
                    vm.errMsg.value = "Unexpected credential type"
                }
            }

            else -> {
                // Catch any unrecognized credential type here.
                vm.errMsg.value = "Unexpected non-custom credential"
            }
        }
    }
The function getChatterID() calls addUser() to asynchronously add the user to the
chatterd back end and obtain a chatterID. Later when we save the chatterID to
SharedPreferences, we will add a call to the save() method here, replacing the
// save chatterID comment.
That’s all the code we need for the signin() function. Now we work on the networking
code.
The networking
In addition to the getchatts API, we add a new API, adduser. We also modify the postchatt API, which must now carry an authenticated credential to post a chatt. Due
to this change, we will rename the postchatt API to postauth.
addUser()
Add the following addUser() function to your ChattStore class.
The method addUser() creates a JSON object containing (1) the app’s
OAuth 2.0 Client ID you previously created with Google Sign-In and (2) the idToken
user obtained when signing in. It then asynchronously sends the JSON object to the
chatterd back end with an HTTP POST request.
The back-end server verifies the validity of the presented idToken with Google. If
verification is successful, the back end returns a chatterID (a String). Subsequently,
the back end will identify the user by this chatterID, for the lifetime of the chatterID.
If the token cannot be validated for whatever reason, addUser()
returns null. The back end also obtains the name registered with the ID Token and returns
it along with the chatterID. We will use the registered name to align retrieved chatts right (belonging to
the user) or left.
Every now and then Google does not return a registered name. Then we default the “registered name” to
"Profile NA", which messes up our UI, but doesn’t otherwise impact the workings of the app.
    suspend fun addUser(clientID: String, idToken: String?, errMsg: MutableState<String>): String? {

        if (idToken == null) return null

        val apiUrl = "${serverUrl}/adduser"

        val authObj = mapOf(
            "clientID" to clientID,
            "idToken" to idToken,
        )
        val requestBody = JSONObject(authObj).toString()
            .toRequestBody("application/json".toMediaType())

        val request = Request.Builder()
            .url(apiUrl)
            .header("Content-Type", "application/json")
            .post(requestBody)
            .build()

        try {
            val response = client.newCall(request).await()
            if (response.isSuccessful) {

                // obtain username and chatterID from back end

            }
            errMsg.value = "addUser: ${response.body.string()}"
        } catch (e: IOException) {
            errMsg.value = "addUser: ${e.localizedMessage ?: "POSTing failed"}"
        }
        return null
    }
If we did not retrieve a valid chatterID from the back end, the catch block updates the error message and returns null.
Otherwise, we first deserialize the back end’s response
to our POST above, and if the deserialization is successful, we set the creator of the
chatterID in the ChatterID singleton to the registered name returned by Google—note that the creator name cannot be longer than 32 characters.
We also
store the chatterdID returned by the back end along with its computed expiration time
in the ChatterID singleton.
If all goes well, addUser() returns the chatterID.
Replace the // obtain username and chatterID from back end comment above with:
                val chatterObj = JSONObject(response.body.string())
                val creator =
                    try { chatterObj.getString("username") }
                    catch (e: JSONException) { "" }
                if (creator.length > 32) {
                    errMsg.value = "addUser: creator name (${creator}) longer than 32 characters"
                    return null
                }
                ChatterID.creator = creator

                // obtain chatterID from back end
                id = try { chatterObj.getString("chatterID") }
                     catch (e: JSONException) { null }
                expiration = Instant.now().plusSeconds(
                    try { chatterObj.getLong("lifetime") }
                    catch (e: JSONException) { 0L })
                return id
postChatt()
The postauth API, replacing the postchatt API, requires that chatterID be sent along with each
chatt. It first verifies that the chatterID exists in the database and has not expired. If so, the
new chatt, along with the user’s username (retrieved from the database) will be added to the chatts
database. Otherwise, HTTP error 401 is returned to the client.
We need to make two changes to postChatt(_:errMsg:) in ChattStore:
- replace:
"name" to chatt.name,with:
"chatterID" to id, - change
postchattin theapiUrldeclaration topostauth
We can use the rest of postChatt() unmodified.
That’s all we need to do to obtain and use chatterID. Next we will look at how to
store the chatterID in Android SharedPreferences and how to use biometric check
to control access to the chatterID stored in SharedPreferences.
At this point, we suggest you switch gear to work on your back end and return here after you’ve completed your back end. You’ll need the ID Token obtained from Google Sign-In to test your back end, which is why we had you work on the front end up to this point first.
The ID Token is the second argument passed to addUser() above. Put a break point
in addUser() and run your front end to this break point. Or you can have Android
Studio print it out for you using Log.d(), for example.
SharedPreferences with biometric access control
We now store the chatterID obtained from the back end in Android SharedPreferences, encrypted. We use Android Keystore to hold our
keys, with key access protected by biometric authentication. The following instructions are heavily based on Using BiometricPrompt with CryptoObject: how and why. Recall that the only purpose of the biometric check is to control access to the stored chatterID across invocations of the app. It doesn’t make the sign-in process itself any more secure.
The Android KeyStore trusted execution environment
The Android KeyStore is a “trusted execution environment” (TEE), a.k.a. a
“secure enclave.” It’s a piece of hardware dedicated to performing cryptographic
functions and storing secret keys. It has a limited set of APIs. To use it, you ask
it to create a key for you. It returns a handle/alias for the key, but not the key
itself. You can give the hardware plain text to be encrypted using the key it is
holding for you. And you can give it encrypted text to be decrypted using the key
under your name. The key itself never leaves the hardware’s possession and you can
only ask the hardware to do encryption or decryption.
Since ChatterID is not an encryption key, storing it encrypted in
SharedPreferences fits our purpose.
SharedPreferences storage
Create a new Kotlin file called ChattKeyStore.kt, add the following constants, and declare the
ChattKeyStore class:
private const val ID_FILE = "Chatter"
private const val KEY_NAME = "ChatterID"
private const val NUM_LENGTH = 2
private const val IV_LENGTH = 12

private const val KEY_STORE = "AndroidKeyStore"
private const val KEY_ALGORITHM = KeyProperties.KEY_ALGORITHM_AES
private const val KEY_BLOCK_MODE = KeyProperties.BLOCK_MODE_GCM
private const val KEY_PADDING = KeyProperties.ENCRYPTION_PADDING_NONE // GCM requires no padding

class ChatterKeyStore(val authenticate: Boolean) {

    // encryption methods

    // biometric prompt

    // retrieve chatterID

    // save chatterID

}
Encryption methods
We will need two helper encryption methods, getKey() and createCipher(). The method
getkey() asks Android KeyStore to generate a key given your specifications. The build
parameter, .setUserAuthenticationParameters() enables authentication check.
Replace the comment line // encryption methods in your ChattKeyStore class with
the following two methods:
    private fun getKey(keyName: String): SecretKey {
        return KeyStore.getInstance(KEY_STORE)
            .apply {
                load(null)
            }.getKey(keyName, null) as? SecretKey
            ?: KeyGenerator.getInstance(KEY_ALGORITHM, KEY_STORE)
                .apply {
                    init(
                        KeyGenParameterSpec.Builder(keyName,
                            KeyProperties.PURPOSE_ENCRYPT or KeyProperties.PURPOSE_DECRYPT)
                            .setBlockModes(KEY_BLOCK_MODE)
                            .setEncryptionPaddings(KEY_PADDING)
                            .setKeySize(256)
                            .setUserAuthenticationRequired(authenticate)
                            .setUserAuthenticationParameters(0, KeyProperties.AUTH_BIOMETRIC_STRONG or KeyProperties.AUTH_DEVICE_CREDENTIAL)
                            .build()
                    )
                }.generateKey()
    }
Given a key, you can then create a Cipher engine. You need one cipher to perform encryption and, for each decryption operation, you’ll need a different a cipher (due to the need to feed the initialization vector (IV) into the decryptor). Add the following createCipher() function to your ChatterKeyStore class:
    fun createCipher(keyName: String, iv: ByteArray? = null): Cipher {
        return Cipher.getInstance("$KEY_ALGORITHM/$KEY_BLOCK_MODE/$KEY_PADDING")
            .apply {
                iv?.let {
                    init(Cipher.DECRYPT_MODE, getKey(keyName), GCMParameterSpec(128, it))
                } ?: run {
                    init(Cipher.ENCRYPT_MODE, getKey(keyName))
                }
            }
    }
Biometric prompt
Replace the comment line // biometric prompt in ChattKeyStore class with the following code:
    private lateinit var bioAuthPrompt: Class3BiometricOrCredentialAuthPrompt
    private lateinit var authPrompt: AuthPrompt

    private val authPromptExCatcher = CoroutineExceptionHandler { _, error ->
        authPrompt.cancelAuthentication()
        Log.e("AuthPrompt exception", error.localizedMessage ?: "authentication cancelled")
    }

    // import androidx.biometric.BiometricPrompt
    private suspend fun Class3BiometricOrCredentialAuthPrompt.authenticate(host: AuthPromptHost, crypto: BiometricPrompt.CryptoObject): BiometricPrompt.AuthenticationResult? =
        suspendCancellableCoroutine { cont ->
            authPrompt = startAuthentication(host, crypto, object : AuthPromptCallback() {
                override fun onAuthenticationSucceeded(
                    activity: FragmentActivity?,
                    result: BiometricPrompt.AuthenticationResult
                ) {
                    super.onAuthenticationSucceeded(activity, result)
                    // import kotlin.coroutines.resume
                    cont.resume(result)
                }

                override fun onAuthenticationError(activity: FragmentActivity?, @BiometricPrompt.AuthenticationError errorCode: Int, errString: CharSequence) {
                    super.onAuthenticationError(activity, errorCode, errString)
                    if (errorCode == BiometricPrompt.ERROR_USER_CANCELED) {
                        cont.resume(null)
                    }
                }
            })
            cont.invokeOnCancellation { authPrompt.cancelAuthentication() }
        }
The authenticate() extension converts the callback-based startAuthentication() to a suspending function by using suspendCancellableCoroutine(). In the exception handler authPromptExCatcher, we cancel the failed authentication through authPrompt which was populated by startAuthentication() in authenticate().
authenticate()
The Android Biometric SDK has a non-suspending authenticate() extension function provided by Class3BiometricOrCredentialAuthExtensionsKt. As far as I can tell, the authenticate() method provided does not give access to the AuthPrompt returned by startAuthentication() and therefore one can not cancel failed authentication. Not cancelling failed authentication causes my implementation of compose navigation to repeatedly pop the navigation stack on every failed biometric check until it exits the app. Perhaps there’s another way to prevent this, but cancelling authentication works. Besides, it gives us a chance to convert a callback-based API to a suspending API.
open()
We define open() as a suspending method of the ChatterKeyStore class.
The “uninitialized expiration time” of ChatterID defaults to Unix epoch (1/1/70).
When ChatterID’s expiration time is not the default, it indicates that we have previously called open(), opened SharedPreferences, and tried to load previous session’s
chatterID; in which case, we just return from open(). Replace the comment line // retrieve chatterID
in ChattKeyStore with:
    suspend fun open(context: FragmentActivity, errMsg: MutableState<String>, showOk: MutableState<Boolean>) {
        // import java.time.Instant
        if (expiration != Instant.EPOCH) { // this is not first launch
            return
        }

        // prepare biometric prompt

        // search for chatterID

    }
We check that biometric authentication is available on device. If so, we set up
the biometric prompt panel to be used for authentication. Replace // perpare
biometric prompt with:
        // import androidx.biometric.BiometricManager
        // import androidx.biometric.BiometricManager.Authenticators.BIOMETRIC_STRONG
        val status = BiometricManager.from(context).canAuthenticate(BIOMETRIC_STRONG)
        if (status != BiometricManager.BIOMETRIC_SUCCESS) {
            errMsg.value = "ChattKeyStore.open: cannot do biometric authentication ($status)"
            return
        }

        bioAuthPrompt = Class3BiometricOrCredentialAuthPrompt.Builder("Biometric ID")
            .setSubtitle("for kotlinChatter")
            .setDescription("To open and read ChatterID")
            .setConfirmationRequired(false)
            .build()
Class3 biometric prompt allows us to perform biometric authenticated cryptographic operation. We have opted to enable fall-back to PIN or pattern in lieu of biometric authentication by using Class3BiometricOrCredentialAuthPrompt, you could choose to use Class3BiometricAuthPrompt() instead for no fall-back.
We search SharedPreferences for previously encrypted chatterID. Replace the comment,
// search for chatterID with:
        context.getSharedPreferences(ID_FILE, Context.MODE_PRIVATE)
            .getString(KEY_NAME, null)?.let {
                // extract creator from stored string (item)
                val strLen = it.takeLast(NUM_LENGTH).toInt()
                var item = it.dropLast(NUM_LENGTH)
                val idCreator = item.takeLast(strLen)
                item = item.dropLast(strLen)

                // extract expiration from item
                val expLen = item.takeLast(NUM_LENGTH).toInt()
                item = item.dropLast(NUM_LENGTH)
                val idExp = Instant.parse(item.takeLast(expLen))
                item = item.dropLast(expLen)

                // extract chatterID with biometric check
                val iv = item.takeLast(IV_LENGTH).toByteArray(ISO_8859_1)
                item = item.dropLast(IV_LENGTH)
                val idEnc = item.toByteArray(ISO_8859_1)
                val decryptor = keystore.createCipher(KEY_NAME, iv)

                // perform biometric prompt and decryption

            }
If the search is succesul, we perform biometric prompt and with the user
authenticated, decrypt the stored chatterID. Replace // perform biometric
prompt and decryption with the following code:
                val cryptoObject = BiometricPrompt.CryptoObject(decryptor)
                withContext(authPromptExCatcher) {
                    val authResult = bioAuthPrompt.authenticate(
                        AuthPromptHost(context),
                        cryptoObject
                    )
                    authResult?.cryptoObject?.cipher?.run {
                        creator = idCreator
                        if (Instant.now() >= idExp) {
                            errMsg.value = "ChatterID from last session expired. Will get a new one when you post."
                        } else {
                            errMsg.value = "ChatterID available from last session."
                            id = String(doFinal(idEnc))
                            expiration = idExp
                        }
                        showOk.value = true
                    } ?: run {
                        errMsg.value = "ChattKeyStore.open: biometric authentication failed"
                    }
                }
Loading chatterID from ChatterKeyStore
Add a new property to your ChatterID singleton, replacing the comment line // keystore property:
var keystore = ChatterKeyStore(authenticate = true) // true means we're doing encryption with biometric authentication
In your MainActivity.kt, change the declaration of your MainActivity class to inherit
from FragmentActivity() instead of ComponentActivity(). The AuthPrompt() interface requires the context to be FragmentActivity(). It is not (yet?) compatible with ComponentActivity() and your app will crash if you add biometric authentication without changing MainActivity to inherit from FragmentActivity().
Add the following property to your MainActivity class:
private val viewModel: ChattViewModel by viewModels()
In the onCreate method of MainActivity class, load the previous session’s chatterID from SharedPreferences by calling ChattKeyStore’s open()
method. If the stored chatterID has an associated creator’s name, update the name shown on the trailing/end edge of the screen. We call open() with structured concurrency, to wait until open() completes before proceeding with the
rest of the code. Add the following code to your onCreate, before calling
setContent{ }:
        viewModel.viewModelScope.launch {
            withContext(Dispatchers.Main.immediate) {
                keystore.open(this@MainActivity, viewModel.errMsg, viewModel.showOk)
                if (!creator.isEmpty()) {
                    viewModel.onTrailingEnd.value = creator
                }
            }
        }
save()
Back in the ChatterKeyStore.kt file, define save() as a method of the ChatterKeyStore class.
Replace the comment // save chatterID with:
    suspend fun save(context: Context, errMsg: MutableState<String>, showOk: MutableState<Boolean>) {
        // prepare biometric prompt

        // encrypt and store chatterID
    }
We check that biometric authentication is available on device. If so, we set up
the authentication prompt. Replace // perpare biometric prompt with:
        val status = BiometricManager.from(context).canAuthenticate(BIOMETRIC_STRONG)
        if (status != BiometricManager.BIOMETRIC_SUCCESS) {
            errMsg.value = "ChattKeyStore.save: cannot do biometric authentication ($status)"
            return
        }

        bioAuthPrompt = Class3BiometricOrCredentialAuthPrompt.Builder("Biometric ID")
            .setSubtitle("for kotlinChatter")
            .setDescription("To save persistent ChatterID")
            .setConfirmationRequired(false)
            .build()
Then if we have a valid chatterID, first we encrypt it. Replace // encrypt and
store chatterID with:
        id?.let {
            val encryptor: Cipher by lazy { keystore.createCipher(KEY_NAME) }
            val cryptoObject = BiometricPrompt.CryptoObject(encryptor)
            withContext(authPromptExCatcher) {
                val authResult = bioAuthPrompt.authenticate(
                    AuthPromptHost(context as FragmentActivity),
                    cryptoObject
                )
                authResult?.cryptoObject?.cipher?.run {
                    val idEnc = doFinal(it.toByteArray(ISO_8859_1))
                    val expStr = expiration.toString() // INSTANT_LENGTH
                    val idVal = String(idEnc + iv, ISO_8859_1) +
                            expStr + expStr.length.toString(10) +
                            creator + creator.length.toString(10)

                    // store chatterID

                } ?: run {
                    errMsg.value = "ChattKeyStore.save: biometric authentication failed"
                }
            }
        }
Unlike open(), which we run only once upon app launch, we could run save() multiple times, once
for every chatterID lifetime, during the lifetime of the app. Since we only need one instance of
the encryptor cipher, we create it using the lazy() delegate.
<summary><tt>by lazy()</tt> delegation</summary>
The lazy() delegate defers initialization of a variable until its first use and, like singleton, there will only be one instance of it and its creation is thread-safe.
ByteArray to String
Without going into the workings and interfacing of the cryptographic operations, one programmatic detail you want to be careful about is the conversion of ByteArray to String and back. Since encrypted byte array contains non-printable characters, the encoding that can preserve every byte intact is ISO-8859-1 used here (which, incidentally, is also used by Android’s Base64.encodeToString, in case you were tempted to use Base64 encoding instead).
And then we store the encrypted chatterID. Replace // store chatterID with:
                    context.getSharedPreferences(ID_FILE, Context.MODE_PRIVATE)
                        .edit { putString(KEY_NAME, idVal) }
                    showOk.value = true
                    errMsg.value = "ChatterID saved."
SharedPreferences update
Every time we obtain a new chatterID from the back end, we update the entry associated
with KEY_NAME in our SharedPreferences. In the getChatterID() function of your
SignInGoogle.kt, replace the comment, // save chatterID, with the following lines:
                            withContext(Dispatchers.Main.immediate) {
                                keystore.save(context, vm.errMsg, vm.showOk)
                                if (vm.errMsg.value.isEmpty()) {
                                    vm.showOk.value = true
                                    vm.errMsg.value = "ChatterID refreshed."
                                }
                            }
That’s all the changes we need to make to store chatterID in the SharedPreferences! You can now test your implementation of SharedPreferences storage by closing your Chatter app after making a post, re-launching it within your chatterID lifetime (which you set in the back end), and it should allow you to post without requiring you to sign in again.
delete()
Finally, add the following method to the ChatterKeyStore class to delete your SharedPreferences
entry. Useful when the back end lost your signin information
and you need to force delete non-expiring chatterID:
    fun delete(context: Context) {
        val folder = File((context.filesDir.parent ?: "") + "/shared_prefs/")
        val files = folder.list()
        files?.forEach {
            context.getSharedPreferences(it.replace(".xml", ""), Context.MODE_PRIVATE)
                .edit { clear() } // clear each preference file from memory
            File(folder, it).delete()   // delete the file
        }
    }
Deleting chatterID
In your SubmitButton() in mainView.kt, replace the comment // else delete chatterID with:
                    } else if (vm.errMsg.value.contains("401")) {
                        // delete potentially invalid chatterID from ChattKeyStore
                        keystore.delete(context)
You can also clear your SharedPreferences completely by long holding the app icon in your app drawer, choose App info > Storage & cache > Clear storage. Note that this will also clear your Google Signin state in addition to your SharedPreferences. You may also want to play with shorter or longer chatterID lifetime in the back end and see whether you’re asked to login again when expected.
Congratulations! You’re done with the front end! And with that, you’re also done with this tutorial!
Run and test to verify and debug
To use biometric check, make sure that you have enabled screen lock and you have enrolled your biometric info with your device. For the Android emulator, follow the instructions in Getting Started with Android Development.
Once you have your back end setup, run your front end against your back end—mada.eecs.umich.edu is not available for this tutorial. You will not get full credit if your front end is not set up to work with your back end!
You may need to sign out from your Google account on your device to test Google Sign-In. On your development host (not on your device), open up your browser and go to a Google property, e.g., Gmail. At the upper right corner of your browser, click on your avatar icon and tap on Manage your Google Account button on the drop-down menu. Once in your Google Account, click on the Security menu on the left. In Security, scroll down until you see Your devices card. At the bottom of the card, click on Manage your devices. Find your device and click on the 3-vertical dot menu and select Sign out.
Front-end submission guidelines
![]() Unlike in previous tutorials and projects, there are a CRUCIAL couple of extra steps to do before you push your lab to GitHub:
Unlike in previous tutorials and projects, there are a CRUCIAL couple of extra steps to do before you push your lab to GitHub:
- Copy
debug.keystorein (~/.android/on Mac Terminal and Windows PowerShell) to yoursigninlab folder. - Put a copy of the
SHA1 certificate(in the format ofxx:xx:xx:...) you used to obtain your Client ID in theREADME.mdfile at your repo’s top level folder.
Without these we won’t be able to run your app.
We will only grade files committed to the main branch. If you use multiple branches, please merge them all to the main branch for submission.
Push your front-end code to the same GitHub repo you’ve submitted your back-end code:
- Open GitHub Desktop and click on
Current Repositoryon the top left of the interface - Click on the GitHub repo you created at the start of this tutorial
- Add Summary to your changes and click
Commit to mainat the bottom of the left pane - If you have pushed code to your repo, click
Pull Originto synch up the repo on your laptop - Finally click
Push Originto push all changes to GitHub
![]() Go to the GitHub website to confirm that your front-end files have been uploaded to your GitHub repo and that your repo has a folder structure outline similar to the following. If your folder structure is not as outlined, our script will not pick up your submission and, further, you may have problems getting started on latter tutorials. There could be other files or folders in your local folder not listed below, don’t delete them. As long as you have installed the course
Go to the GitHub website to confirm that your front-end files have been uploaded to your GitHub repo and that your repo has a folder structure outline similar to the following. If your folder structure is not as outlined, our script will not pick up your submission and, further, you may have problems getting started on latter tutorials. There could be other files or folders in your local folder not listed below, don’t delete them. As long as you have installed the course .gitignore as per the instructions in Preparing GitHub for Reactive Tutorials, only files needed for grading will be pushed to GitHub.
  reactive
    |-- README.md       # <- should contain your app's SHA1 certificate
    |-- chatter.zip
    |-- chatterd
    |-- chatterd.crt
    |-- llmprompt.zip
    |-- signin
        |-- composeChatter
            |-- app
            |-- gradle
        |-- debug.keystore
    # and other files or folders
Verify that your Git repo is set up correctly: on your laptop, grab a new clone of your repo and build and run your submission to make sure that it works. You will get ZERO point if your tutorial doesn’t build, run, or open.
IMPORTANT: If you work in a team, put your team mate’s name and uniqname in your repo’s README.md (click the pencil icon at the upper right corner of the README.md box on your git repo) so that we’d know. Otherwise, we could mistakenly think that you were cheating and accidentally report you to the Honor Council, which would be a hassle to undo. You don’t need a README.md if you work by yourself.
Review your information on the Tutorial and Project Links sheet. If you’ve changed your teaming arrangement from previous tutorial’s, please update your entry. If you’re using a different GitHub repo from previous tutorial’s, invite eecsreactive@umich.edu to your new GitHub repo and update your entry.
References
- Add Google Sign-in to Your Android App
- GoogleSignIn.silentSignIn
- The overall Google Identity Platform
- JWT (JSON Web Token) (in)security
- Object (Singleton)
- Instant Android instantaneous point on the time-line.
Android Keystore and Credential Manager
SharedPreferences
- SharedPreferences is your answer to simple storage
- Shared Preferences
- getSharedPreferences
- Shared Preferences Editor
- EncryptedSharedPreferences isUserAuthenticationRequired not working properly
Biometric Authentication
- Using BiometricPrompt with CryptoObject: how and why
- Show a biometric authentication dialog
- What is the difference between CBC and GCM mode?
- What exactly does the “NoPadding” parameter do in the Cipher class?
- Class3BiometricOrCredentialAuthPrompt.authenticate
- BiometricPrompt in android is not supporting exit on back button
Appendix: imports
| Prepared by Benjamin Brengman, Alexander Wu, Ollie Elmgren, Wendan Jiang, Nowrin Mohamed, Chenglin Li, Xin Jie ‘Joyce’ Liu, Yibo Pi, and Sugih Jamin | Last updated: March 15th, 2026 |