Tutorial: Signin Back End
Cover Page
We extend our chatterd back end to (1) receive a Google ID Token from the front end for authentication and (2) to verify users when they post a chatt.
Do NOT start work on your back end until you have worked on the front-end spec to the point where you can obtain an ID Token from Google. You’ll need your ID Token to test your back end.
Install updates
Remember to install updates available to your Ubuntu back end. If N in the following notice you
see when you ssh to your back-end server is not 0,
N updates can be applied immediately.
run the following:
server$ sudo apt update
server$ sudo apt upgrade
Failure to update your packages could lead to your solution not performing at all, with no warning that it is because you haven’t updated, and also makes you vulnerable to security hacks.
Any time you see *** System restart required *** when you ssh to your server, immediately run:
server$ sync
server$ sudo reboot
Your ssh session will be ended at the server. Wait a few minutes for the system to reboot before you ssh to your server again.
APIs and protocol handshakes
When a user signs in and submits their ID Token from Google, in the handler function for
adduser we verify with Google that the token hasn’t expired, and generate a new
chatterID. From Google we obtained a name registered with the given ID Token.
We also compute a lifetime for the new chatterID. We then store the
chatterID, the name registered with Google, and the chatterID’s expiration
time into our database and also return all three pieces of data to the client. If the
ID Token verification failed, we return an error with HTTP status code 501, “Network
Authentication Required.”
Every now and then, Google is not able to return the “registered” name associated with an otherwise valid ID Token. We do not treat this as an error case, but simply use
"Profile NA"as theusername. Unfortunately this messes up our UI but doesn’t otherwise impact the workings of the app.
To post a chatt, users will send their chatterID as their name in
the Chatt message. The back end first verifies that the chatterID exists in the
database and its lifetime has not expired. If so, the new chatt, along with the
user’s username (retrieved from our database) and message sent, are added to the
database. Otherwise, an error with HTTP status code 401, “Unauthorized,” will be
returned to the front end.
In a production app, we would probably remove the user from the back-end database and add a button to revoke Google SignIn on the app. In this tutorial, we don’t do any revocation upon sign out.
Database table
You will be using two tables in this lab: the original chatts table from previous
tutorials/projects and a new chatters table to keep track of authorized users. Both
tables will be part of your chatterdb database.
- Log into an interactive PostgreSQL (
psql) session as userpostgres - Connect to the
chatterdbdatabase - Clear your
chattstable of all oldchatts, use the SQL command:TRUNCATE TABLE chatts; - Create a
chatterstable and grant PostgreSQL userchatteraccess to it by:CREATE TABLE chatters (chatterid CHAR(256) NOT NULL, username VARCHAR(32) NOT NULL, expiration BIGINT NOT NULL); GRANT ALL PRIVILEGES ON ALL TABLES IN SCHEMA public TO chatter;We will use
SHA256to computechatterID, so it should be of fixed size, 256 bytes. - To verify that you’ve added the new
chatterstable, enter:SELECT * FROM chatters;Make sure you get back the following result:
 chatterid | username | expiration
-----------+----------+------------
(0 rows)
If so congratulations! You have successfully added the new table!
- Exit PostgreSQL
Web server
We now prepare the chatterd back end to handle authenticated users. Please click
the relevant link for the web framework of your choice:
| Go | Python | Rust | TypeScript |
and return here to resume the server setup once you have your web framework set up.
Testing Signin
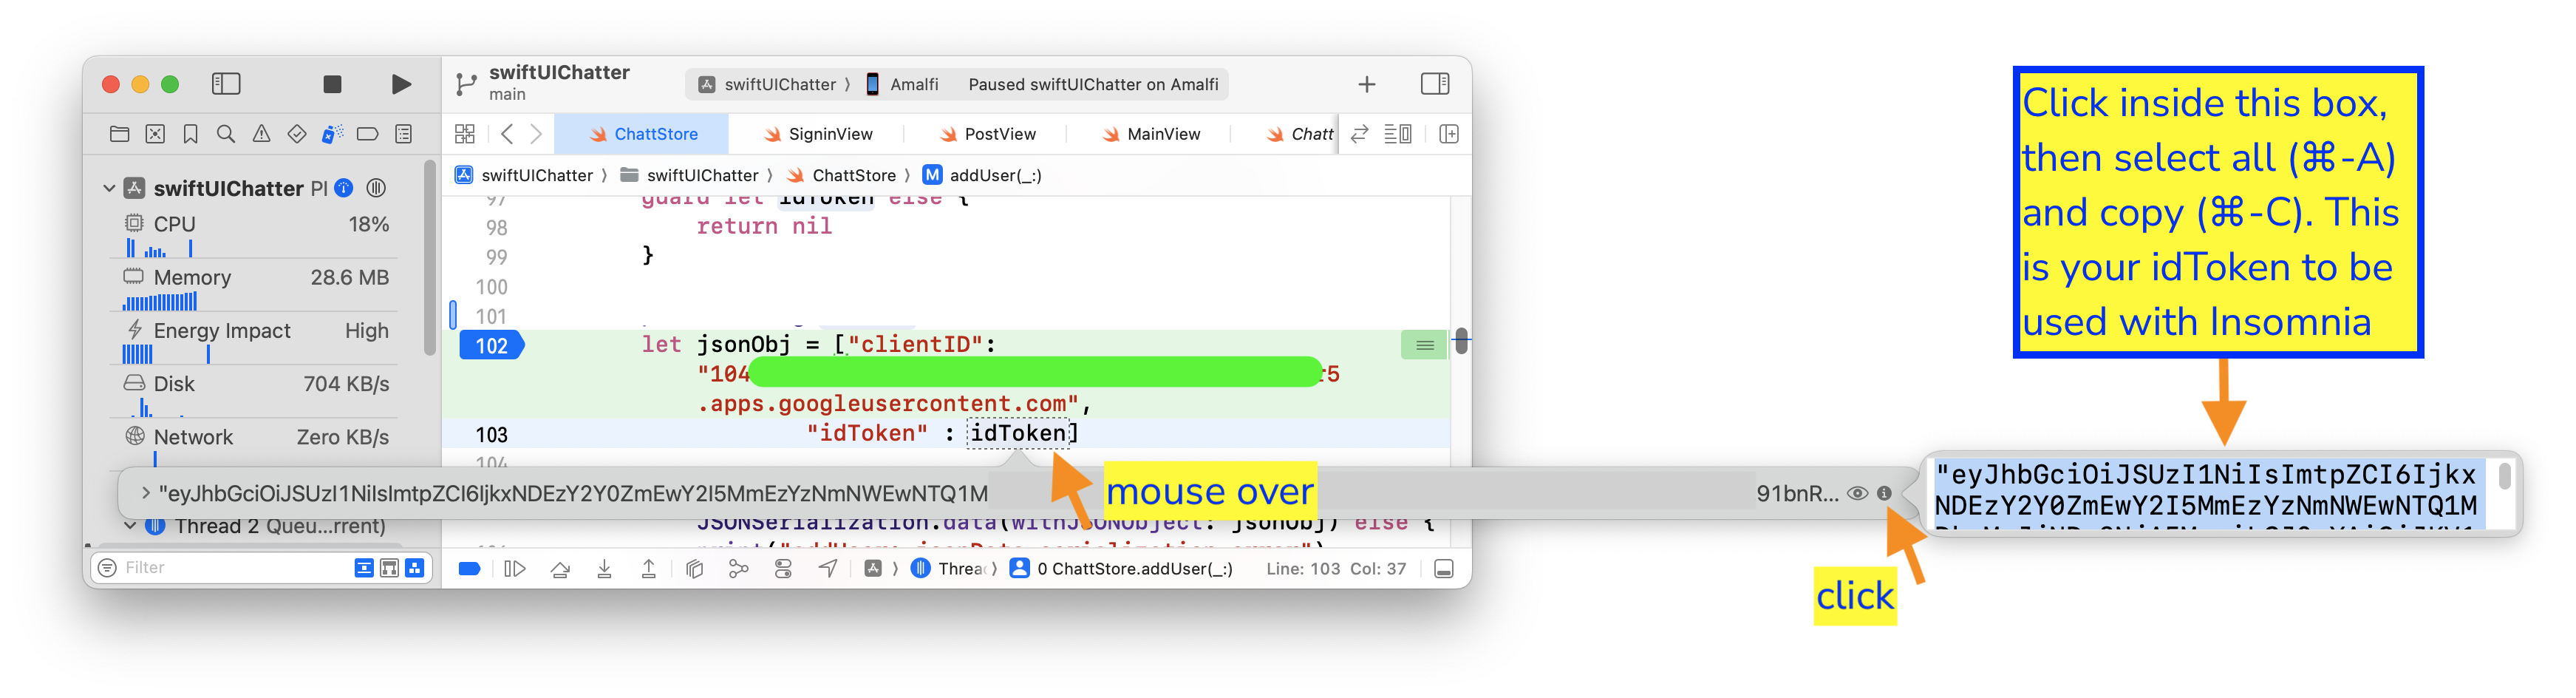
To test your implementation, you’d need your idToken. Put a debugging breakpoint at the start of your front end’s ChattStore.addUser() function. The idToken parameter passed to ChattStore.addUser() is your idToken.
ID Token on iOS
For iOS, on Xcode, mouse over the idToken variable inside the addUser(_:username:errMsg:) function, then click on the i icon on the extreme right of the box that pops up. The idToken will be displayed as plain text on yet another pop up box. Click in the box, then select all and copy (⌘-A, ⌘-C). This is your idToken to be used with Postman below.
Create a new HTTP POST request to adduser with your Google ID Token (idToken) and your front end’s Google Client ID (clientID):
{
    "clientID": "YOUR_APP'S_CLIENT_ID",
    "idToken": "YOUR_GOOGLE_ID_TOKEN"
}
Adding users with an invalid token results in HTTP status code 401: Unauthorized error, while a valid Google ID Token results in HTTP status code 200 with a payload body with a chatterID and its lifetime. You can use this chatterID in place of YOUR_CHATTER_ID below to POST a message to postauth:
{
    "chatterID": "YOUR_CHATTER_ID",
    "message": "Chitt chatts"
}
You should get a 200 server response in return.
That’s it! You’re now all set up on the back end for Signin!
![]() WARNING: You will not get full credit if your front end is not set up to work with your back end!
WARNING: You will not get full credit if your front end is not set up to work with your back end!
Everytime you rebuild your Go or Rust server or make changes to either of your JavaScript or Python files, you need to restart chatterd:
server$ sudo systemctl restart chatterd
![]() Leave your
Leave your chatterd running until you have received your tutorial grade.
![]() TIP:
TIP:
server$ sudo systemctl status chatterd
is your BEST FRIEND in debugging your server. If you get an HTTP error code 500 Internal Server Error or if you just don’t know whether your HTTP request has made it to the server, first thing you do is run sudo systemctl status chatterd on your server and study its output, including any error messages and debug printouts from your server.
That’s all we need to do to prepare the back end. Before you return to work on your front end, wrap up your work here by submitting your files to GitHub.
Submitting your back end
We will only grade files committed to the main branch. If you use multiple branches, please
merge them all to the main branch for submission.
Navigate to your reactive folder:
server$ cd ~/reactive/
Commit changes to the local repo:
server$ git commit -am "signin back end"
and push your chatterd folder to the remote GitHub repo:
server$ git push
If git push failed due to changes made to the remote repo by your tutorial partner, you must run
git pull first. Then you may have to resolve any conflicts before you can git push again.
![]() Go to the GitHub website to confirm that your back-end files have been uploaded to your
GitHub repo.
Go to the GitHub website to confirm that your back-end files have been uploaded to your
GitHub repo.
Congratulations! You’ve completed the back end modifications necessary to support authenticated users!
| Prepared by Benjamin Brengman, Ollie Elmgren, Wendan Jiang, Alexander Wu, and Sugih Jamin | Last updated August 29th, 2025 |