Tutorial: Maps SwiftUI
Cover Page
The goals of this tutorial are threefold: first, to introduce you to on-device asynchronous event stream
in the form of Swift’s AsyncSequence and the AsyncStream generator. Second, to introduce you to Apple’s
CoreLocation API, which is part of the MapKit SDK. And third, to implement navigation between multiple
screens, including the use of swipe gesture for navigation. We will build on the code base from the second
tutorial, Chatter.
Reading the magnetometer part of this tutorial requires access to a physical device. While the iPhone simulator can simulate location data, it cannot simulate the magnetometer used to determine facing.
This tutorial may be completed individually or in teams of at most 2. You can partner differently for each tutorial.
Expected behavior
In the map-augmented Chatter app, we will add a Map View. On the map, there will be one or more markers.
Each marker represents a posted chatt. If you click on a marker, it displays the poster’s name, message,
timestamp, and their geodata, consisting of their geolocation and velocity (compass-point facing and
movement speed), captured at the time the chatt was posted. If a chatt was posted with the user’s geodata,
the timeline now shows the chatt with a pin. Clicking this pin brings user to the MapView with the chatt’s
posted location marked on the map.
We will also implement a swiping gesture to allow users to switch from the main timeline view to the map view.
When a user swipes left to transition from the timeline view to the map view, each retrieved chatts will be
displayed as an individual marker on the map. From the map view, users can not post a chatt; they can only
return to the timeline view using the back arrow. User also cannot initiate a new retrieval of chatts in
the map view.
Post a new chatt and view chatts on MapView:
DISCLAIMER: the video demo shows you one aspect of the app’s behavior. It is not a substitute for the spec. If there are any discrepancies between the demo and the spec, please follow the spec. The spec is the single source of truth. If the spec is ambiguous, please consult the teaching staff for clarification.
Preparing your GitHub repo
In the following, replace /YOUR:TUTORIALS/ with the name of your tutorials folder.
- On your laptop, navigate to
/YOUR:TUTORIALS/ - Unzip your
chatter.zipfile. Double check that you still have a copy of the zipped file for future reference! - Rename your newly unzipped
chatterfoldermaps - Push your local
/YOUR:TUTORIALS/repo to GitHub and make sure there’re no git issues:git push
- Open GitHub Desktop and click on
Current Repositoryon the top left of the interface - Click on your assignment GitHub repo
- Add Summary to your changes and click
Commit to main - If you have pushed other changes to your Git repo, click
Pull Originto synch up the clone on your laptop - Finally click on
Push Originto push changes to GitHub
- Open GitHub Desktop and click on
![]() Go to the GitHub website to confirm that your folders follow this structure outline:
Go to the GitHub website to confirm that your folders follow this structure outline:
  reactive
    |-- chatterd
    |-- chatterd.crt
    |-- maps
        |-- swiftUIChatter
            |-- swiftUIChatter.xcodeproj
            |-- swiftUIChatter
    # and other files or folders
/YOUR:TUTORIALS/ folder on your laptop should contain the chatter.zip file in addition.
If the folders in your GitHub repo does not have the above structure, we will not be able to grade your assignment and you will get a ZERO.
Working with location data as an asynchronous stream
We first look at how to get user’s geolocation information (latitude (lat), longitude (lon), and velocity data (facing and speed)).
We can get continuous updates of the device’s location and heading from Apple’s CoreLocation API. The
location updates are delivered as an AsyncSequence stream. The heading updates API, however, still relies
on delegated callback: we have to provide a function that CoreLocation calls whenever there’s any heading
update. We will create an AsyncStream that takes the delivered headings to feed an AsyncSequence stream.
Requesting permission
To get device’s location, we must first request user’s permission and explain why we need the location data.
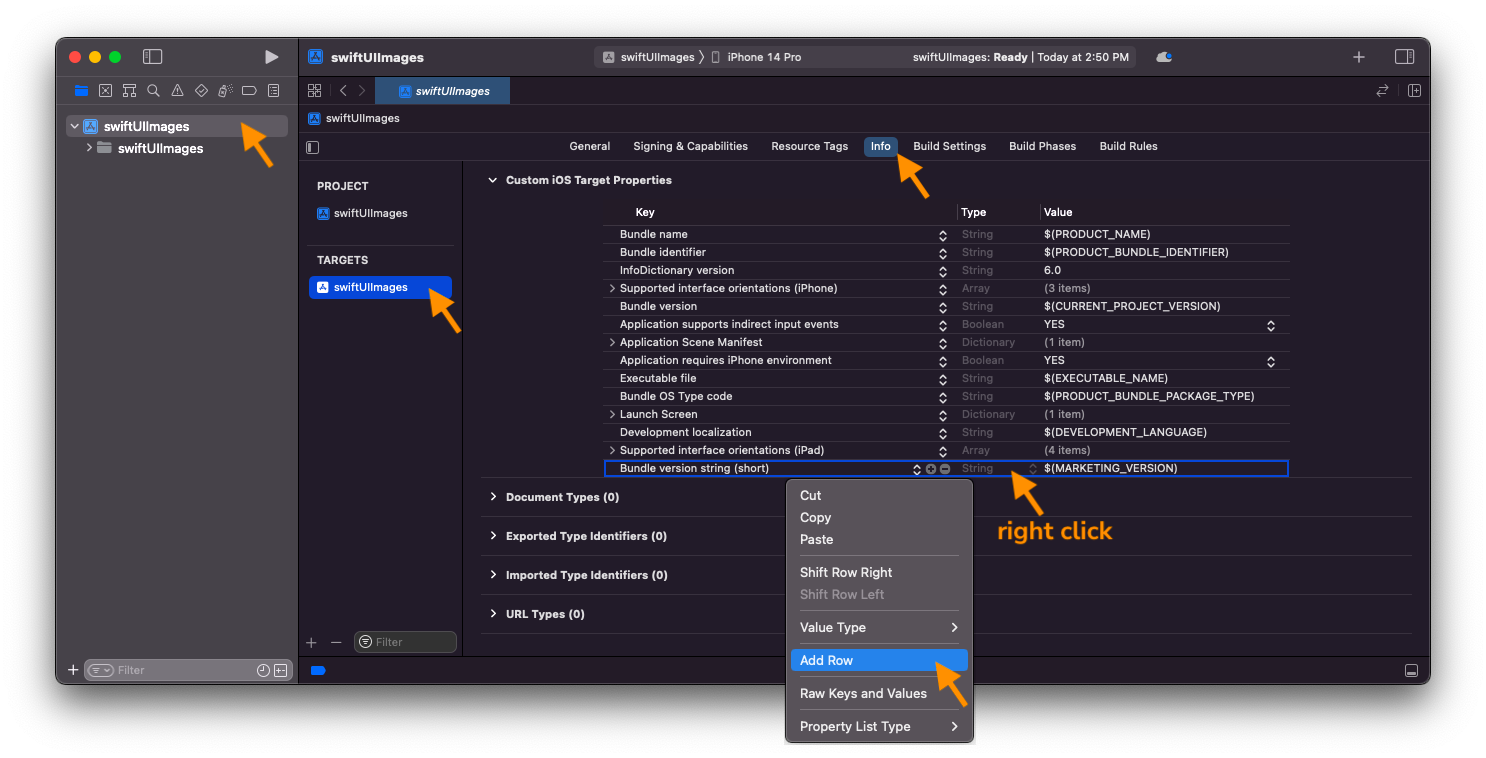
To provide justification for access to the Info list, click on your project name (first item in your left/navigator pane), then click on the project in the TARGETS section, and then the Info tab. In the Custom iOS Target Properties section, right click (or ctl-click) on any row in the table and choose Add Row (screenshot). Select Privacy - Location When In Use Usage Description (you can search by type-to-match) and in the Value field to the right enter the reason you want to access location, for example, “to post chatt poster’s location”. What you enter into the value field will be displayed to the user when seeking their permission.
On app’s launch, we will prompt the user for permission to access the device’s location, but let’s implement the location manager first.
If you accidentally choose “Allow Once” or “Don’t Allow” when your app requests permission, go to
Settings > Privacy > Location Services, select your app and tap “Ask Next Time” to reset it.
Location Manager
Create a new empty file and name it LocManager.swift. At the top of the file, import MapKit and Observation
and create the following Location struct:
import MapKit
import Observation

struct Location {
    var lat: CLLocationDegrees
    var lon: CLLocationDegrees
    var speed: CLLocationSpeed
}
We store information from
MapKit’s legacyCLHeadingclass in thisstructso that we can pass it between tasks without the compiler complaining thatCLHeadingis notSendable.
We now create an observable LocManagerViewModel singleton that SwiftUI can observe and react to:
@Observable
final class LocManagerViewModel {
    static let shared = LocManagerViewModel()
    private init() {}

    private(set) var location = Location(lat: 0.0, lon: 0.0, speed: 0.0)

    @ObservationIgnored
    var speed: String {
        switch location.speed {
            case 0.5..<5: "walking"
            case 5..<7: "running"
            case 7..<13: "cycling"
            case 13..<90: "driving"
            case 90..<139: "in train"
            case 139..<225: "flying"
            default: "resting"
        }
    }

    func setLocation(lat: CLLocationDegrees, lon: CLLocationDegrees, speed: CLLocationSpeed) {
        location.lat = lat
        location.lon = lon
        location.speed = speed
    }

    @ObservationIgnored
    private(set) var heading: CLLocationDirection? = nil
    private let compass = ["North", "NE", "East", "SE", "South", "SW", "West", "NW", "North"]

    @ObservationIgnored
    var compassHeading: String {
        return if let heading {
            compass[Int(round(heading.truncatingRemainder(dividingBy: 360) / 45))]
        } else {
            "unknown"
        }
    }

    func setHeading(_ newHeading: CLLocationDirection?) {
        heading = newHeading
    }
}
The stored property location holds the latest location reported by the device. With each location update, we also get a speed update from the device. The computed property speed returns a descriptive text of the latest movement speed. The stored property heading holds the latest heading reported by the device. The computed property compassHeading returns the heading in a human-friendly compass reading.
For thread safety, we would ideally create an actor to host the location and heading states. But the
CLLocationManagerDelegate protocol and CLLocationManager class being legacy API make it simpler to
host them in a class instead:
final class LocManager: NSObject, CLLocationManagerDelegate {
    static let shared = LocManager()
    private let locManager = CLLocationManager()

    override private init() {
        super.init()

        // configure the location manager
        locManager.desiredAccuracy = kCLLocationAccuracyBest
        locManager.delegate = self
    }

    // start updates
}
Inside the class we create an instance of CLLocationManager, specify our desired location accuracy, and assign self as the delegate to handle CLLocationManagerDelegate callbacks. To be the delegate, the class must adopt CLLocationManagerDelegate, which requires that the class must be a subtype of NSObject, which means its designated initializer must override that of NSObject and it must call super.init() to initialize NSObject.
To retrieve the location updates provided by MapKit, add the following code to your LocManager class, replacing
the comment // start updates above:
    func startUpdates() {
        if locManager.authorizationStatus == .notDetermined {
            // ask for user permission if undetermined
            // Be sure to add 'Privacy - Location When In Use Usage Description' to
            // Info.plist, otherwise location read will fail silently, with (lat/lon = 0)
            locManager.requestWhenInUseAuthorization()
        }

        Task {
            do {
                for try await update in CLLocationUpdate.liveUpdates() {
                    if let loc = update.location {
                        LocManagerViewModel.shared.setLocation(
                            lat: loc.coordinate.latitude,
                            lon: loc.coordinate.longitude,
                            speed: loc.speed)
                    }
                }
            } catch {
                print(error.localizedDescription)
            }
        }

        // start heading updates also
    }

    // update headings
To prompt the user for location permission, we first
call CLLocationManager.requestWhenInUseAuthorization() to present the prompt. You can use either requestWhenInUseAuthorization() or requestAlwaysAuthorization(), corresponding to the permission key-value pair you listed in Info earlier.
After obtaining user’s permission, we use for try await to collect updates from the AsyncSequence returned by CloLocationUpdate.liveUpdates(). With each update, we call setLocation in LocManagerViewModel to update its observable location with the lat/lon and speed information in the latest update.
Unlike for location, MapKit does not provide an API to read heading updates as an AsyncSequence, instead it still relies on delegated callback to return heading updates. We now use the delegated callback mechanism to yield an event stream using AsyncStream. Add the following to your LocManager class, replacing // update headings
comment above:
    var feeder: ((CLLocationDirection) -> Void)?

    func locationManager(_ manager: CLLocationManager, didUpdateHeading newHeading: CLHeading) {
        feeder?(newHeading.magneticHeading)
    }

    var headings: AsyncStream<CLLocationDirection> { // getter
        AsyncStream(bufferingPolicy: .bufferingNewest(1)) { cont in
            feeder = { cont.yield($0) } // initialize feeder
            cont.onTermination = { @Sendable _ in
                Task { @MainActor in
                    self.locManager.stopUpdatingHeading()
                    self.feeder = nil
                }
            }
            locManager.startUpdatingHeading()
        }
    }
The property feeder() bridges the delegated callback mechanism to AsyncStream. We initialize
it with a closure to yield the next stream element the callback mechanism delivers to the continuation
that emits the next AsyncStream element.
We set AsyncStream to buffer only the latest element if updates arrive faster than we can read them (the default is “unbounded”). The elements emitted by AsyncStream comprises the AsyncSequence that we can loop through with for-await (in startUpdates in our case).
In the initialization closure, we also call CLLocationManager.startUpdatingHeading() to start receiving heading updates from the device driver. We stop the updates when the stream is terminated, using the continuation’s onTermination callback.
In this app, we have an endless supply of heading updates until we call stopUpdatingHeading(). If there is
only a finite number of events, we can communicate end of stream to the continuation by calling cont.finish().
Add another Task to your startUpdates() method, right after the existing Task block, replacing the comment,
// start heading updates also, to store the latest heading update to the headings property:
        Task {
            for await newHeading in headings {
                LocManagerViewModel.shared.setHeading(newHeading)
            }
        }
We will be needing location information in both MainView, to post a chatt, and when swiping left to MapsView, we therefore start collecting location updates upon app launch in swiftUIChatterApp, and
do not stop for the lifetime of the app. Add the following code to your swiftUIChatterApp, inside
the struct, before the body property:
    init() {
        LocManager.shared.startUpdates()
    }
Apple’s Map has its own mechanism to start and stop location and heading updates when the MapUserLocationButton is toggled and does not rely on our AsyncSequence.
Posting geodata
We can now obtain the user’s lat/lon and heading from iOS’s CLLocationManager.
We can post this geodata information with each chatt to an updated Chatter
back end that can handle the new APIs.
GeoData
Create a new GeoData struct to store the additional geodata in a new empty file you name GeoData.swift.
Import MapKit to this file. You need to annotate MapKit with @preconcurrency to make the compiler more lenient towards the legacy MKReverseGeocodingRequest() API:
@preconcurrency
import MapKit

struct GeoData: Hashable {
    var lat: Double = 0.0
    var lon: Double = 0.0
    var facing: String = "unknown"
    var speed: String = "unknown"

    // do reverse geocoding
}
GeoData adopts the Hashable protocol because we use it in Chatt, which must be Hashable due to its use as a tag for map marker in MapView.
Reverse geocoding
In addition to lat/lon data, we use Apple’s MKReverseGeocodingRequest to perform reverse-geocoding to obtain human-friendly place names from the lat/lon data. Add the following place computed property to your GeoData struct, replacing the comment // do reverse geocoding:
    var place: String {
        get async {
            if #available(iOS 26.0, *) {
                if let revGeocoder = MKReverseGeocodingRequest(
                    location: CLLocation(latitude: lat, longitude: lon)),
                  let geolocs = try? await revGeocoder.mapItems,
                  let address = geolocs.first?.address {
                    return address.shortAddress ?? (address.fullAddress.isEmpty ? "place unknown" : address.fullAddress)
                }
            } else {
                if let geolocs = try? await CLGeocoder().reverseGeocodeLocation(CLLocation(latitude: lat, longitude: lon)) {
                    return geolocs[0].locality ?? geolocs[0].administrativeArea ?? geolocs[0].country ?? "place unknown"
                }
            }
            return "place unknown"
        }
    }

    // pretty print place
Note that we provide backward compatibility to iOS earlier than version 26.0 here.
We will call setPlace() before posting a chatt to compute and include the place name in the posted chatt.
To present the geodata in a nicely formatted string, add the following computed property to your GeoData
struct, replacing the comment, // pretty print place. We will use this property to display the geodata
information to the user.
    var postedFrom: AttributedString  {
        get async {
            let place = await self.place
            var posted = try! AttributedString(markdown: "Posted from **\(place)** while facing **\(facing)** moving at **\(speed)** speed.")
            ["\(place)", "\(facing)", "\(speed)"].forEach {
                if !$0.isEmpty {
                    posted[posted.range(of: $0)!].foregroundColor = .blue
                }
            }
            return posted
        }
    }
Chatt
Add a new stored property geodata to the Chatt struct, as the last property in the list, to hold the geodata associated with each
chatt. We also make the struct conforms to the Hashable protocol, as required by the MapKit SDK,
so that we can use it as a tag to identify selected map marker in MapView later.
struct Chatt: Identifiable, Hashable {
    // ...
    var geodata: GeoData?

    // ...
}
ChattStore
We update postChatt(_:errMsg) to handle geodata. First, update apiURL to use the postmaps API.
Next we serialize geodata into a JSON Array. Put the following code in your postChatt(_:errMsg) right
after the declaration of apiUrl before chattObj:
        var geoObj: Data?
        if let geodata = chatt.geodata {
            geoObj = try? JSONSerialization.data(withJSONObject: [geodata.lat, geodata.lon, geodata.facing, geodata.speed])
        }
then we serialize the chatt to be posted, with the serialized geoObj inside it. Replace your
let chattObj = declaration line with:
        let chattObj = ["name": chatt.name,
                       "message": chatt.message,
                       "geodata": (geoObj == nil) ? nil : String(data: geoObj!, encoding: .utf8)]
The rest of the function to create and post the request remains the same. Keep the existing code.
Next we update getChatts(errMsg:). First update apiURL to use the getmaps API.
Then replace the call to chatts.append() with:
                    let geoArr = chattEntry[4]?.data(using: .utf8).flatMap {
                        try? JSONSerialization.jsonObject(with: $0) as? [Any]
                    }
                    chatts.append(Chatt(name: chattEntry[0],
                                         message: chattEntry[1],
                                         id: UUID(uuidString: chattEntry[2] ?? ""),
                                         timestamp: chattEntry[3],
                                         geodata: geoArr.map {
                        GeoData(lat: $0[0] as! Double,
                                lon: $0[1] as! Double,
                                facing: $0[2] as! String,
                                speed: $0[3] as! String)
                    }))
The rest of the function remains the same. Keep the existing code.
The UI
Now we tackle the UI.
Posting geodata
To remind user that their location information will be sent along with their chatt, we
display the user’s lat/lon alongside the text input box. In ContentView, wrap your
TextField in a VStack so that the lat/lon is displayed below the TextField. At
the same time, set the alignment parameter of the outer HStack() to .top, so that
SubmitButton is aligned to the top of the TextField. Replace your TextField() View
and modifiers with:
                VStack(alignment: .trailing) {
                    TextField(vm.instruction, text: Bindable(vm).message)
                        .focused($messageInFocus) // to dismiss keyboard
                        .textFieldStyle(.roundedBorder)
                        .cornerRadius(20)
                        .shadow(radius: 2)
                        .background(Color(.clear))
                        .border(Color(.clear))
                        .padding(.leading, 20)
                    Text("lat/lon: \(LocManagerViewModel.shared.location.lat)/\(LocManagerViewModel.shared.location.lon)")
                        .font(.caption)
                        .foregroundColor(Color(.systemGray3))
                        .padding(.trailing, 20)
                }
Then in your SubmitButton View, replace the call to postChatt(_:errMsg:) with the following:
                let geodata = GeoData(lat: LocManagerViewModel.shared.location.lat, lon: LocManagerViewModel.shared.location.lon, facing: LocManagerViewModel.shared.compassHeading, speed: LocManagerViewModel.shared.speed)

                await ChattStore.shared.postChatt(Chatt(name: vm.onTrailingEnd, message: vm.message, geodata: geodata), errMsg: Bindable(vm).errMsg)
Displaying geodata
We need to add some map-related view states to our viewmodel. Add import MapKit to the top of your swiftUIChatterApp.swift file:
import MapKit
Then add the following properties to ChattViewModel:
    var cameraPosition: MapCameraPosition = .userLocation(fallback: .automatic)
    var selected: Chatt? = nil
    var showMap = false
We don’t display geodata information directly on the text bubble. Instead, if a chatt has geodata
information, we display a map pin in its bubble, next to the message. Due to the alternating alignment
display of text bubbles, depending on whether the user is the poster, we put the map pin icon on
the right or left of the message, to go with the text bubble alignment. In ChattScrollView.swift,
add import MapKit to the top of the file:
import MapKit
Then in the ChattView struct, add a property to grab the ChattViewModel from the
SwiftUI environment:
@Environment(ChattViewModel.self) private var vm
and wrap the Text displaying the chatt message in an HStack so that a map pin icon is
displayed either to its left (onTrailingEnd) or right (!onTrailingEnd). Keep the
modifiers for the text bubble so that they become modifiers for the whole HStack. Replace
your call to the Text() View displaying the chatt message with:
                HStack(alignment: .top, spacing: 10) {
                    if onTrailingEnd && chatt.geodata != nil {
                        PinView()
                            .foregroundStyle(.white)
                    }

                    Text(msg)

                    if !onTrailingEnd && chatt.geodata != nil {
                        PinView()
                            .foregroundStyle(.blue)
                    }
                }
Add the following PinView function inside your ChattView, making it a
method of ChattView:
    @ViewBuilder
    func PinView() -> some View {
        Image(systemName: "mappin.and.ellipse")
            .font(.caption)
            .padding(.top, 3)
            // tap to show geodata on map
    }
When user taps the map pin icon, we want to navigate to another screen showing a map with
the poster’s location as pin on the map. To achive that, we add a tap gesture recognizer to
the map pin icon. Replace // tap to show geodata on map with:
            .onTapGesture {
                if let geodata = chatt.geodata {
                    vm.selected = chatt
                    vm.cameraPosition = .camera(MapCamera(
                        centerCoordinate: CLLocationCoordinate2D(latitude: geodata.lat, longitude: geodata.lon), distance: 500, heading: 0, pitch: 60))
                    vm.showMap.toggle()
                }
            }
When the user taps on the map pin icon a chatt bubble, we say that the chatt is selected and
store the selection in our viewmodel, then we set the cameraPosition in the viewmodel to that of
the selected chatt’s location, and we tell SwiftUI to show it on the map.
To actually navigate to the screen showing the map, in your ContentView, add the following
as a modifier to your outermost VStack, e.g., before navigationTitle():
        .navigationDestination(isPresented: Bindable(vm).showMap) {
            MapView()
        }
MapView
We use MapView to show a poster’s location when the user clicked on the map pin as described.
But we want MapView to also be able to show the locations of all the chatts retrieved
from the back end.
Create a new empty file, name it MapView.swift, and put the following imports and MapView struct
in the file. We first implement putting a marker at the selected poster’s location:
import MapKit
import SwiftUI

struct MapView: View {
    @Environment(ChattViewModel.self) private var vm
    @State private var selection: Chatt?

    var body: some View {
        Map(position: Bindable(vm).cameraPosition, selection: $selection) {
            if let chatt = vm.selected {
                if let geodata = chatt.geodata {
                    Marker(chatt.name!, systemImage: "figure.wave",
                           coordinate: CLLocationCoordinate2D(latitude: geodata.lat, longitude: geodata.lon))
                    .tint(.red)
                    .tag(chatt)
                }
            // or positions of all chatts
            }

            // show chatt associated with clicked marker

            UserAnnotation() // shows current user's location
        }
    }
}
If no particular chatt were selected, we show the position of all retrieved chatts.
We loop through the chatts array in ChattStore and display a marker for each chatt,
at the coordinates (lat/lon) the chatt was posted from. Replace // or positions of all chatts
with:
            } else {
                ForEach(ChattStore.shared.chatts, id: \.self) { chatt in
                    if let geodata = chatt.geodata {
                        Marker(chatt.name!, systemImage: "figure.wave",
                               coordinate: CLLocationCoordinate2D(latitude: geodata.lat, longitude: geodata.lon))
                        .tint(.mint)
                    }
                }
If the user further taps on a marker shown, we display an info window showing the chatt
associated with that marker. Replace // show chatt associated with clicked marker with:
            if let chatt = selection, let geodata = chatt.geodata {
                Annotation(chatt.name!, coordinate: CLLocationCoordinate2D(latitude: geodata.lat, longitude: geodata.lon), anchor: .topLeading
                ) {
                    InfoView(chatt: chatt)
                }
                .annotationTitles(.hidden)
            }
In rendering the Map, we center the map where the cameraPosition is pointing at (lat/lon),
at the given zoom level (distance and height), and pitch (angle) of the camera.
Additionally, UserAnnotation() shows the current user’s current location.
The following modifiers of Map add:
- a button to center on the user’s location,
- a compass on the map, and
- a scale control
     .mapControls {
         MapUserLocationButton()
         MapCompass()
         MapScaleView()
     }
Here’s the definition of the InfoView to display a chatt on the map. Place it outside MapView:
struct InfoView: View {
    let chatt: Chatt
    @State private var postedFrom: AttributedString = ""

    var body: some View {
        VStack(alignment: .leading) {
            HStack {
                if let username = chatt.name, let timestamp = chatt.timestamp {
                    Text(username).padding(EdgeInsets(top: 4, leading: 8, bottom: 0, trailing: 0)).font(.system(size: 16))
                    Spacer()
                    Text(timestamp).padding(EdgeInsets(top: 4, leading: 8, bottom: 0, trailing: 4)).font(.system(size: 12))
                }
            }
            if let message = chatt.message {
                Text(message).padding(EdgeInsets(top: 1, leading: 8, bottom: 0, trailing: 4)).font(.system(size: 14)).lineLimit(2, reservesSpace: true)
            }
            if let geodata = chatt.geodata {
                Text(postedFrom)
                    .task { postedFrom = await geodata.postedFrom }
                    .padding(EdgeInsets(top: 0, leading: 8, bottom: 10, trailing: 4)).font(.system(size: 12)).lineLimit(2, reservesSpace: true)
            }
        }
        .background {
            Rectangle()
                .fill(.ultraThinMaterial)
                .cornerRadius(4.0)
        }
        .frame(width: 300)
    }
}
Displaying the geodata of all chatts
To display the geodata of all chatts, we add a map button to the title bar of the
timeline screen. Add import MapKit to the top of your ContentView.swift:
import MapKit
Then add the following modifier to the outermost VStack of your ContentView, e.g., after
navigationBarTitleDisplayMode():
        .toolbar {
            ToolbarItem(placement: .navigationBarTrailing) {
                Image(systemName: "map")
                    .foregroundStyle(.blue)
                    .onTapGesture {
                        vm.selected = nil
                        vm.cameraPosition = .camera(MapCamera(
                            centerCoordinate: CLLocationCoordinate2D(latitude: LocManagerViewModel.shared.location.lat, longitude: LocManagerViewModel.shared.location.lon), distance: 500, heading: 0, pitch: 60))
                        vm.showMap.toggle()
                    }
            }
        }
the action when user clicks on this button is similar the action for the other top gestures above,
though here we specify that no chatt has been selected and we place the cameraPosition at the
user’s current location.
To allow user to swipe left, in lieu of clicking the map button, to view all chatts, add the
following modifier to ChattScrollView(), inside the ScrollViewReader() block of your ContentView,
e.g., under the .refreshable() modifier:
                    .gesture(DragGesture(minimumDistance: 3.0, coordinateSpace: .local)
                        .onEnded { value in
                            if case (...0, -100...100) = (value.translation.width, value.translation.height) {

                                vm.selected = nil
                                vm.cameraPosition = .camera(MapCamera(
                                    centerCoordinate: CLLocationCoordinate2D(latitude: LocManagerViewModel.shared.location.lat, longitude: LocManagerViewModel.shared.location.lon), distance: 500, heading: 0, pitch: 60))
                                vm.showMap.toggle()
                            }
                        }
                    )
Congratulations! You’re done with the front end! (Don’t forget to work on the back end!)
Run and test to verify and debug
Once you have your back end setup, run your front end against your back end. Due to location privacy
concerns mada.eecs.umich.edu is not available for this tutorial. You will not get full credit if your front end is not set up to work with your back end!
Simulating locations
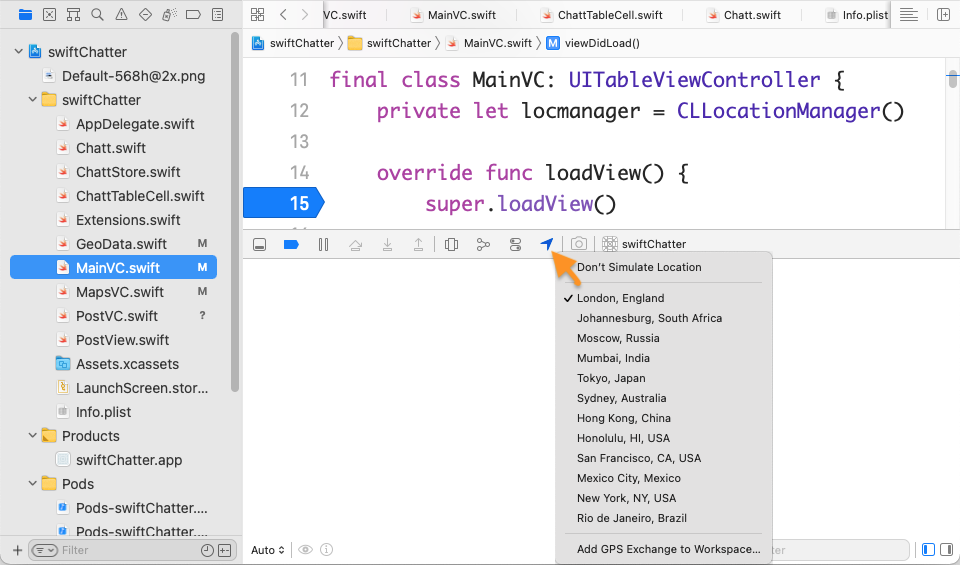
While running your project in Xcode by clicking the location arrow button in the debug console menu (screenshot) or access the feature from the main menu Debug > Simulate Location. When you post a chatt, or when you view all chatts, the user’s current location should be the simulated location. You can select a different location in Xcode and it should again be reflected in Chatter. Simulating location on Xcode effects only code run from, and still attached to, Xcode. The code can be running on device, attached to Xcode though a USB cable or WiFi, or it can be running
on the simulator.
Front-end submission guidelines
We will only grade files committed to the main branch. If you use multiple branches, please merge them all to the main branch for submission.
Push your front-end code to the same GitHub repo you’ve submitted your back-end code:
- Open GitHub Desktop and click on
Current Repositoryon the top left of the interface - Click on the GitHub repo you created at the start of this tutorial
- Add Summary to your changes and click
Commit to mainat the bottom of the left pane - If you have pushed code to your repo, click
Pull Originto synch up the repo on your laptop - Finally click
Push Originto push all changes to GitHub
![]() Go to the GitHub website to confirm that your front-end files have been uploaded to your GitHub repo under the folder
Go to the GitHub website to confirm that your front-end files have been uploaded to your GitHub repo under the folder maps. Confirm that your repo has a folder structure outline similar to the following. If your folder structure is not as outlined, our script will not pick up your submission and, further, you may have problems getting started on latter tutorials. There could be other files or folders in your local folder not listed below, don’t delete them. As long as you have installed the course .gitignore as per the instructions in Preparing GitHub for Reactive Tutorials, only files needed for grading will be pushed to GitHub.
  reactive
    |-- chatterd
    |-- chatterd.crt
    |-- maps
        |-- swiftUIChatter
            |-- swiftUIChatter.xcodeproj
            |-- swiftUIChatter
    # and other files or folders
Verify that your Git repo is set up correctly: on your laptop, grab a new clone of your repo and build and run your submission to make sure that it works. You will get ZERO point if your tutorial doesn’t build, run, or open.
IMPORTANT: If you work in a team, put your team mate’s name and uniqname in your repo’s README.md (click the pencil icon at the upper right corner of the README.md box on your git repo) so that we’d know. Otherwise, we could mistakenly think that you were cheating and accidentally report you to the Honor Council, which would be a hassle to undo. You don’t need a README.md if you work by yourself.
Review your information on the Tutorial and Project Links sheet. If you’ve changed your teaming arrangement from previous tutorial’s, please update your entry. If you’re using a different GitHub repo from previous tutorial’s, invite eecsreactive@umich.edu to your new GitHub repo and update your entry.
References
- Discover streamlined location updates
- AsyncStream
- Using AsyncSequence in Swift
- Observing model data
- Meet MapKit for SwiftUI
- CLLocationCoordinate2D
- CLGeodocer
- CLPlacemark
- MKReverseGeocodingRequest
- Refactoring the callback-based code
- Creating Attributed Strings with Markdown
- AttributedStrings – Making Text More Beautiful Than Ever
- DragGesture
Prepared by Wendan Jiang, Alexander Wu, Benjamin Brengman, Ollie Elmgren, Nowrin Mohamed, Chenglin Li, Xin Jie ‘Joyce’ Liu, Yibo Pi, and Sugih Jamin | Last updated: February 2nd, 2026