Tutorial: llmChat
Course Schedule
Prompt context: when interacting with users, LLMs are usually memoryless. Each prompt is standalone. If you want to keep a continuing back-and-forth “conversation” with an LLM, you must send a transcript (“context”) of your on-going “conversation” up to the current point. In this tutorial, we store each prompt from the user and the reply (“completion”) from the LLM (“assistant”) in our back-end PostgreSQL database. With each new prompt from the user, we send the full transcript of the user’s conversation with the LLM, in chronological order, over to the LLM before sending the new prompt.
Server-sent event streaming: while Ollama uses NDJSON to stream its reply, commercial LLMs, such as ChatGPT, and tool use protocol, such as MCP’s “Streaming HTTP”, often use server-sent event (SSE) to stream replies. The advantage of SSE over NDJSON is that you can have multiple streams interleaved into one connection. In this tutorial, we see how error messages can be tagged as such and sent alongside normal messages, so that the front end can identify and handle them separately. We will have another use of stream interleaving in subsequent tutorials and projects.
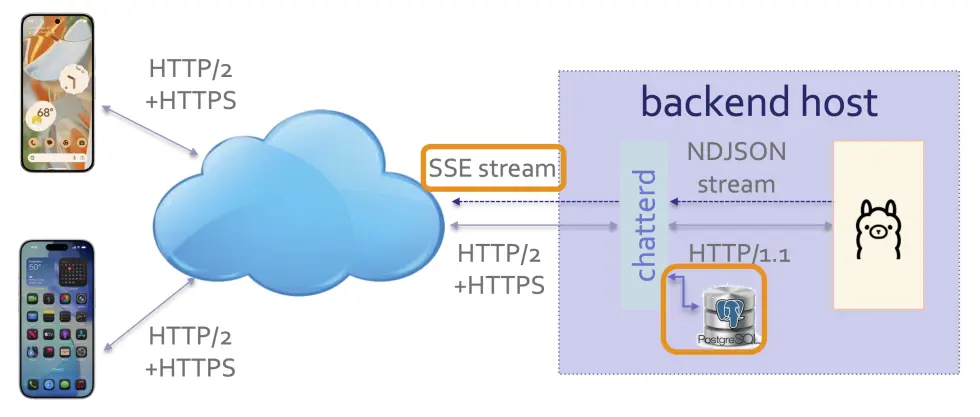
chatterd serving as SSE proxy and providing context for Ollama
About the tutorials
This tutorial may be completed individually or in teams of at most 2. You can partner differently for each tutorial.
Treat messages you send to chatterd and Ollama as public utterances with no reasonable expectation
of privacy and know that these are recorded for grading purposes and provided to Ollama For
contextual interactions.
Objectives
Front end:
- To handle SSE stream
- To set up LLM system prompt under separate cover (TODO)
Back end:
- To store and forward user interactions with LLM
- To convert NDJSON stream to SSE stream
- To create a new API for LLM system prompt set up (TODO)
TODO
There is a TODO item at the end of both the front-end and back-end specs that you must complete as part of the tutorial.
API and protocol handshakes
In this tutorial, we add two new APIs to Chatter:
llmchat: uses HTTP POST to post user’s prompt for Ollama’schatAPI as a JSON Object and to receive Ollama’s response as a SSE stream.llmprep: uses HTTP POST to send LLM system instructions tochatterd.
Using this syntax:
url-endpoint
-> request: data sent to Server
<- response: data sent to Client followed by HTTP Status
The protocol handshakes consist of:
/llmchat
-> HTTP POST { appID, model, messages, stream=true }
<- { SSE event-stream lines } 200 OK

/llmprep
-> HTTP POST { appID, model, messages, stream=false }
<- { system prompt or error message } 200 OK or HTTP error status code
Data formats
To post a prompt to Ollama with either the llmchat or llmprep API, the front-end client sends
a JSON Object consisting of an appID field, to uniquely identify this client app for PostgreSQL
database sharing; a model field, for the LLM model we want Ollama to use, a messages field for the
prompt itself (more details below), and a stream field to indicate whether we want Ollama to stream its
response (true) or to batch and send it in one message (false). For example:
{
    "appID": "edu.umich.reactive.postman",
    "model": "gemma3:270m",
    "messages": [
        { "role": "user", "content": "Where is Agra?" }
    ],
    "stream": true
}
The messages field is a JSON Array with one or more JSON Object as its element. In the example above
there is only one JSON Object in the messages array. Each element of messages consists of a role field,
which can be "system", to give instructions (“prompt engineering”) to the model, "user", to carry user’s
prompt, "assistant", to indicate reply (“prompt completion”) from the model, etc. For the /llmprep API,
the "role" of message(s) should be "system"; whereas for the /llmchat API, the "role" of message(s)
should be "user". The content field hold the actual instruction, prompt, reply, etc. from the entity
listed in role. Remember to separate each element with a comma if you have more than one elements in
the array. The "stream" field should be set to false for /llmprep and true for /llmchat. When
"stream" is true, response from chatterd is streamed using Server-Sent Event (SSE) streaming.
SSE stream
Server-Sent Event (SSE) stream consists of text strings in a specific format:
event: EventName
data: a line of info associated with EventName event

event: ANewEvent
data: a line of ANewEvent info
data: another line of ANewEvent info

data: a line of info implicitly associated with the default Message event

data: another line also of the Message event
Each event is tagged with an event line followed by the event’s name. An event line is delimited
with a newline ('\n' or, for streams from a Python server or on Windows, "\r\n"). Then follow
one or more lines of data associated with that event. Each data line is also delimited with a newline.
An empty line (equivlently, two consecutive newlines "\n\n") denotes the end of an event block.
When no event is explicitly specified prior to a data line, as in the last two data lines in
the above example, the data line is assumed to be associated with the default Message event.
To put it another way, a data line after an empty line is assumed to be part of the default
Message event.
An SSE stream returning from an /llmchat POST would look like the following on curl:
data: {"model":"gemma3:270m","created_at":"2025-08-08T20:35:52.586157Z","message":{"role":"assistant","content":"Ab"},"done":false}
data: {"model":"gemma3:270m","created_at":"2025-08-08T20:35:52.603345Z","message":{"role":"assistant","content":"sol"},"done":false}
data: {"model":"gemma3:270m","created_at":"2025-08-08T20:35:52.620774Z","message":{"role":"assistant","content":"utely"},"done":false}
. . . .
data: {"model":"gemma3:270m","created_at":"2025-08-08T20:35:53.814197Z","message":{"role":"assistant","content":"!"},"done":false}
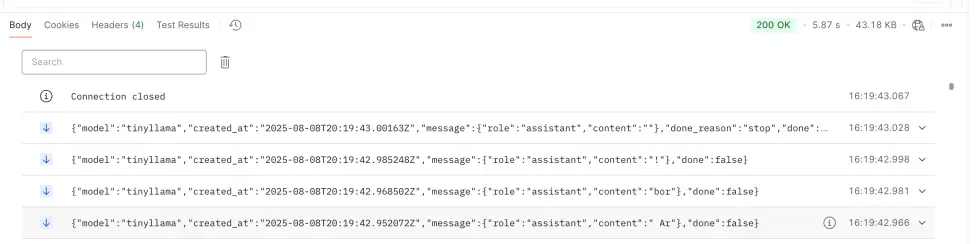
data: {"model":"gemma3:270m","created_at":"2025-08-08T20:35:53.832383Z","message":{"role":"assistant","content":""},"done_reason":"stop","done":true,"total_duration":1554222000,"load_duration":24007209,"prompt_eval_count":581,"prompt_eval_duration":272983000,"eval_count":71,"eval_duration":1247892000}
On Postman, the data tag will not be shown, only the data lines (here the model used is tinyllama):
On error, an error event will be returned by an /llmchat POST:
event: error
data: {"error": "<error message>"}
Specifications
As in previous tutorials, you only need to build one front end, AND one of the alternative back-end stacks. Until you have a working backend of your own, you can use mada.eecs.umich.edu to test your front end. To receive full credit, your front end MUST work with your own back end.
The balance of work in this tutorial is more heavily weighted towards the backend:
| Prepared by Sugih Jamin | Last updated: January 14th, 2026 |