Tutorial: Images SwiftUI
Cover Page
Accessing the camera requires access to a physical device. The iPhone simulator does not simulate the camera.
Preliminaries
Preparing your GitHub repo
In the following, replace /YOUR:TUTORIALS/ with the name of your tutorials folder.
- On your laptop, navigate to
/YOUR:TUTORIALS/ - Unzip your
chatter.zipfile. Double check that you still have a copy of the zipped file for future reference! - Rename your newly unzipped
chatterfolderimages - Push your local
/YOUR:TUTORIALS/repo to GitHub and make sure there’re no git issues:git push
- Open GitHub Desktop and click on
Current Repositoryon the top left of the interface - Click on your assignment GitHub repo
- Add Summary to your changes and click
Commit to main - If you have pushed other changes to your Git repo, click
Pull Originto synch up the clone on your laptop - Finally click on
Push Originto push changes to GitHub
- Open GitHub Desktop and click on
![]() Go to the GitHub website to confirm that your folders follow this classure outline:
Go to the GitHub website to confirm that your folders follow this classure outline:
  reactive
    |-- chatter.zip
    |-- chatterd
    |-- chatterd.crt
    |-- images
        |-- swiftUIChatter
            |-- swiftUIChatter.xcodeproj
            |-- swiftUIChatter
    |-- llmprompt.zip
    # and other files or folders
If the folders in your GitHub repo does not have the above classure, we will not be able to grade your assignment and you will get a ZERO.
Alamofire and Swift Package Manager (SPM)
We add Alamofire networking library to help with uploading multipart/form-data using Apple’s
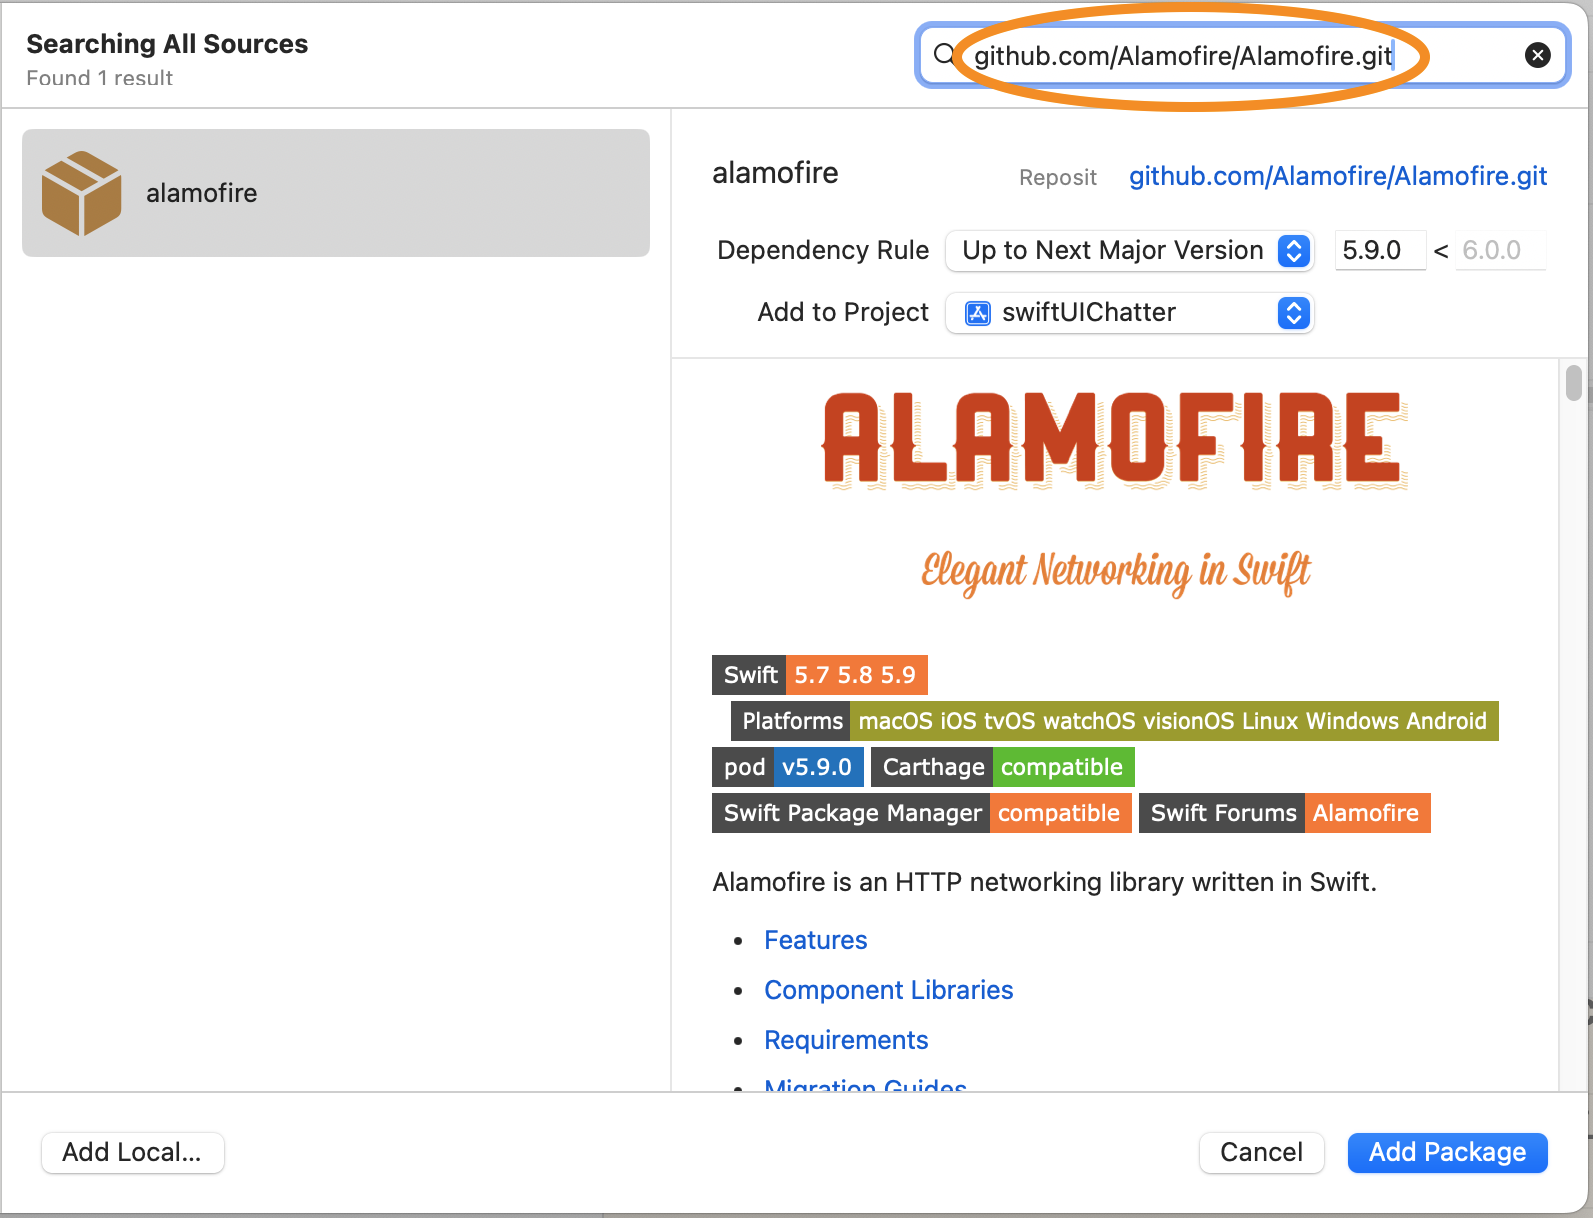
Swift Package Manager. In Xcode, with your project loaded, select File > Add Package Dependencies....
In the search box at the upper left of the dialog box, enter the URL:
https://github.com/Alamofire/Alamofire.git and click the Add Package button
(screenshot).
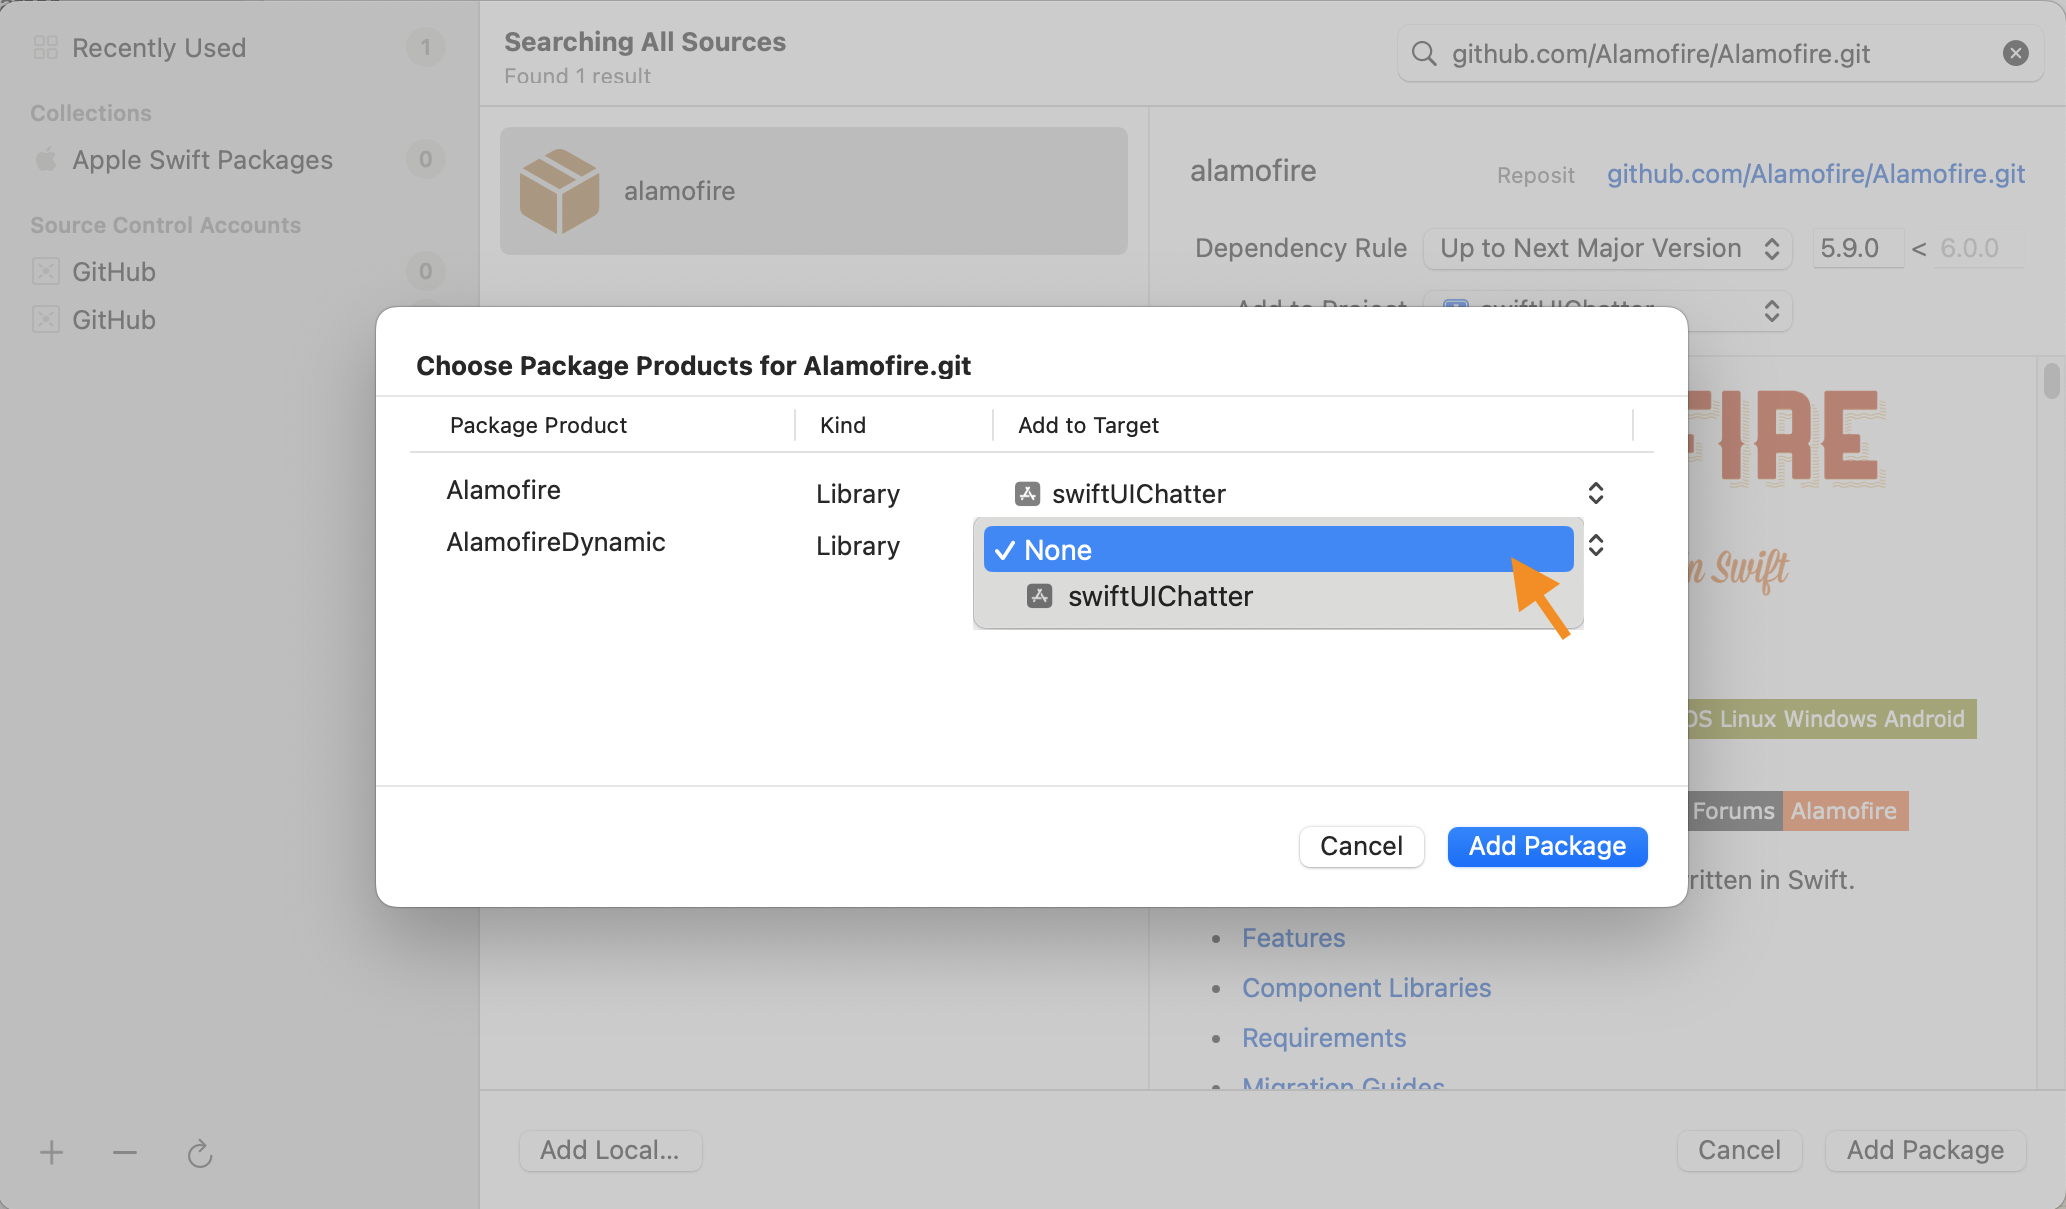
![]() WARNING: When the
WARNING: When the Choose Package Products for Alamofire.git window pops up, for AlamofireDynamic, choose None under the Add to Target (third) column (screenshot) [thanks to A. Kovalenko ‘W24]
and click Add Package.
Alamofire is added to your project!
To remove a package and No such file or directory: AlamofireDynamic.framework
Occasionally Xcode loses track of installed package and pops up a No such module <PackageName>. Or your project fails to build or crashes with the error message, No such file or directory: '/Users/YOURUSERNAME/Library/Developer/Xcode/DerivedData/swiftUIChatter-SOMERANDOMSTRING/Build/Products/Debug-iphoneos/PackageFrameworks/AlamofireDynamic.framework/AlamofireDynamic'.
First remove the package (e.g., Alamofire) from your project (screenshot):
- On the left navigator pane, click on your project.
- In the project editor that shows up, on the left side under
PROJECT, click your project, - Select the
Package Dependenciestab, - Select the package to delete,
- Click the minus (
-) sign below the list of packages, and - Click the
Removebutton on the dialog box that shows up.
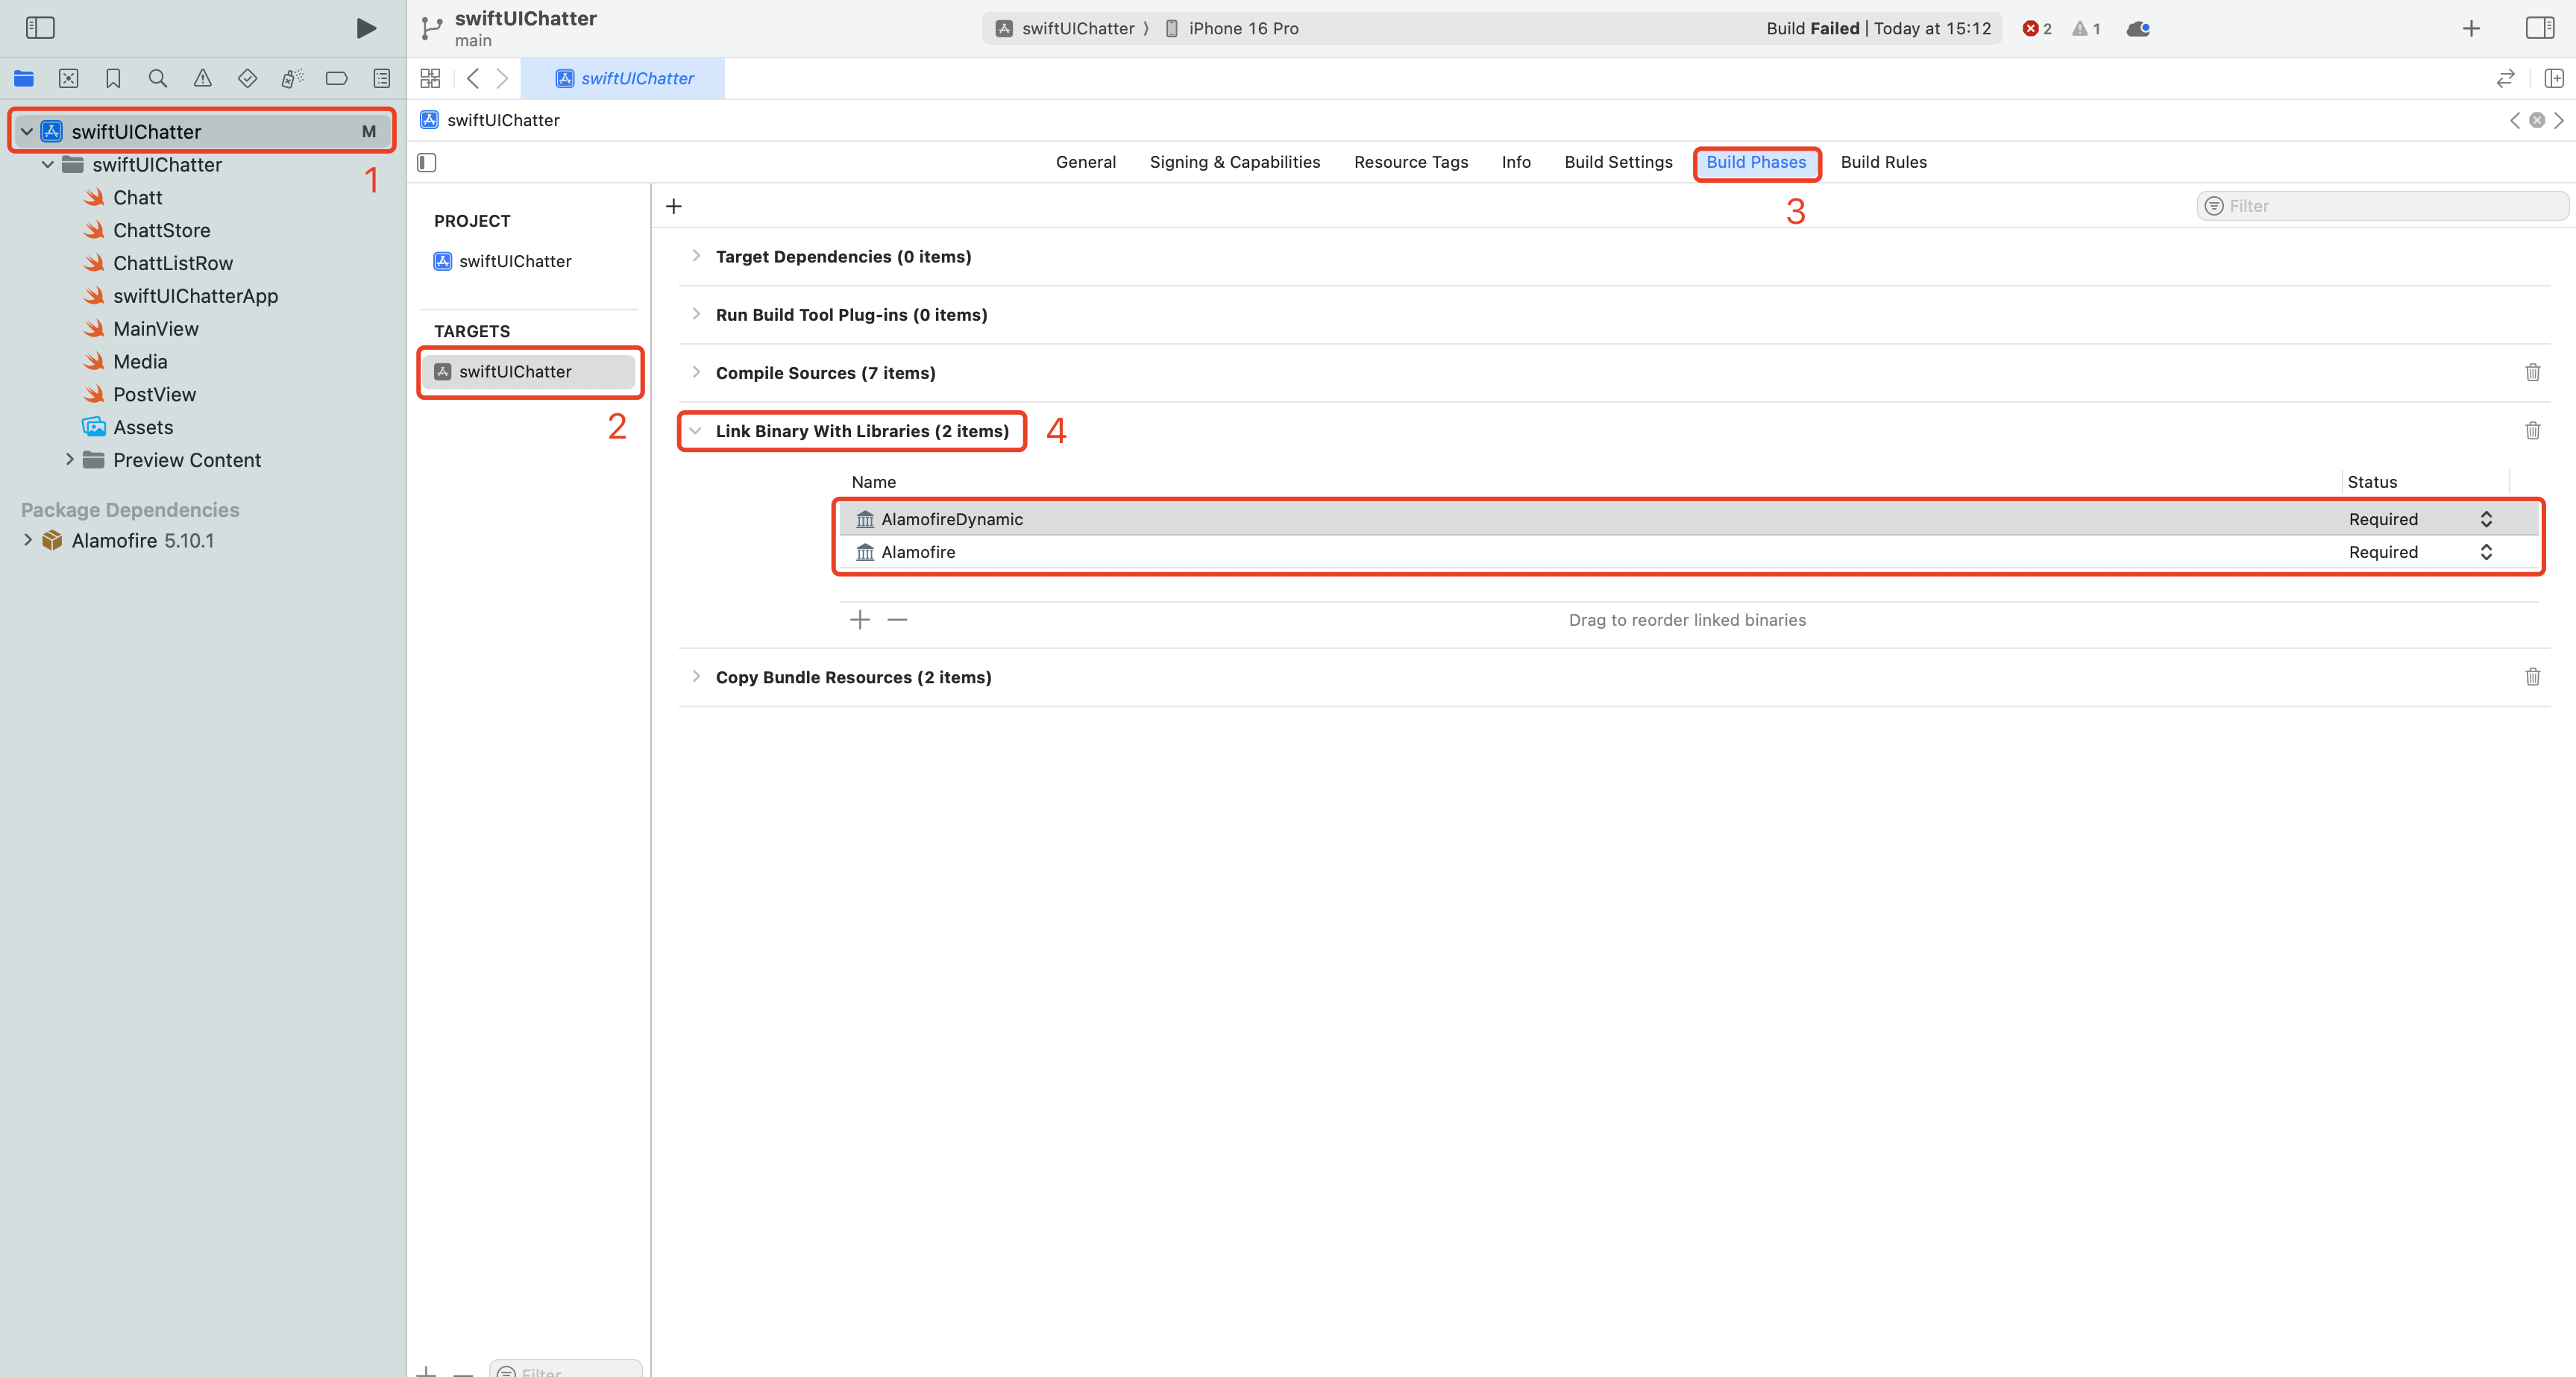
Then remove any linked libraries associated with the package (e.g., Alamofire & AlamofireDynamic) (screenshot):
- Staying on the project editor pane, on the left side under
TARGET, click your project, - Select the
Build Phasestab, - Expand the
Link Binary With Librariesdrop down menu item. - Select the linked libraries, e.g.,
AlamofireorAlamofireDynamic, to delete, - Click the minus (
-) sign below the list of libraries, - Click the
Removebutton on the dialog box that shows up. -
Repeat steps 5 to 7 until all linked libraries, e.g., all
Alamofireand allAlamofireDynamiclibraries, are deleted.
From Xcode’s top menu bar, select Product > Clean Build Folder.
Then reinstall the package.
![]() In the case of Alamofire, be sure to choose
In the case of Alamofire, be sure to choose None for AlamofireDynamic when the Choose Package Products for Alamofire.git shows up.
Requesting permissions
Your app must first request user’s permission to access the device’s camera, photo library, and mic.
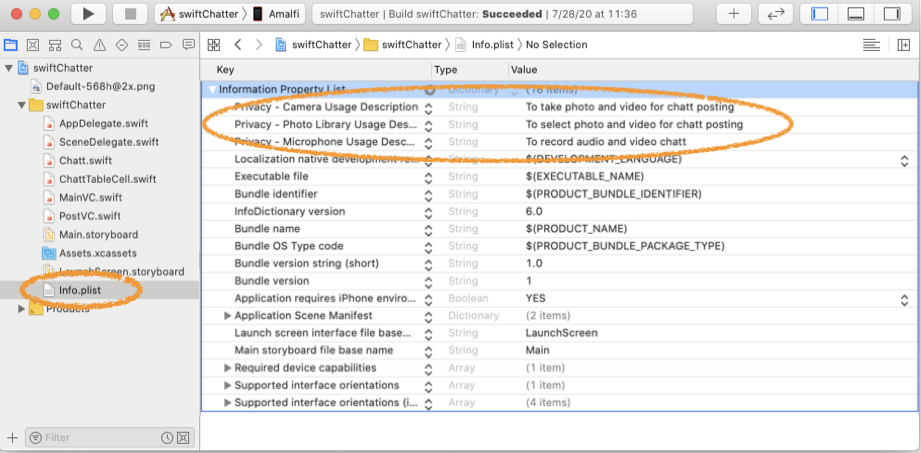
As you did in the Audio tutorial, add justifications for requesting the following three permissions
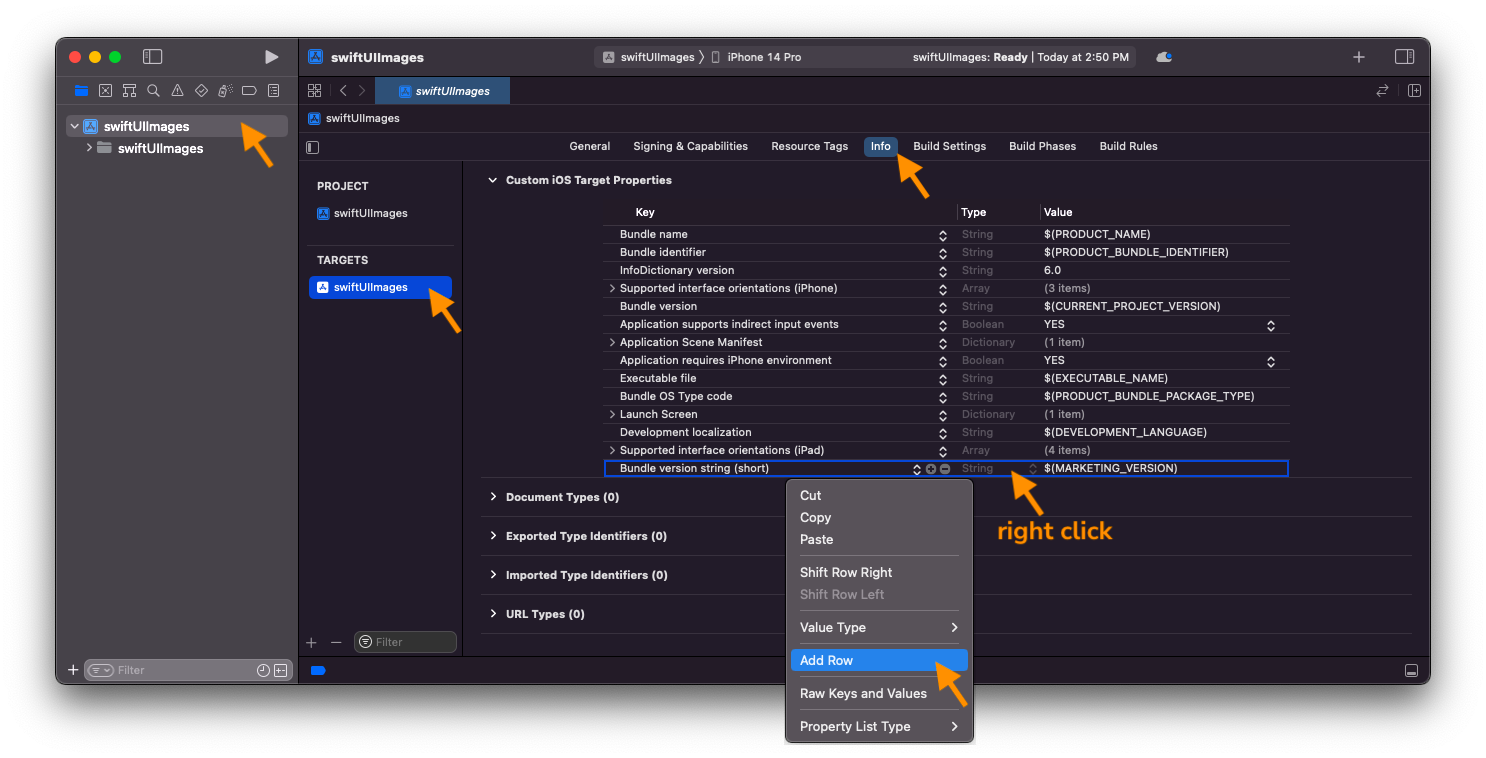
to your Info list. Click on your project name (first item in your left/navigator pane), then click
on the project in the TARGETS section, and then the Info tab. In the Custom iOS Target
Properties section, right click (or ctl-click) on any row in the table and choose Add Row
(screenshot). In the drop down menu,
select all of the following, one at a time:P
-
Privacy - Camera Usage Description, -
Privacy - Microphone Usage Description, and -
Privacy - Photo Library Usage Description.
In the Value field to the right, enter the reason you want to be granted access. What you enter into the value field will be displayed to the user when seeking their permission
(screenshot).
As with the audio tutorial, when you try to access the photo library, camera, or mic, iOS will automatically check for access permission and, if it is your app’s first attempt to access any of these, iOS will automatically prompt the user for permission.
Working with images and videos
Images and videos can be uploaded to the server either by picking one from the device’s photo album or by taking a picture/video with the device’s camera. When posting a chatt, we will want a button to access the album, another to access the camera, and a preview of the images to be posted. On the chatt timeline, we will want posted images and videos to be downloaded and displayed alongside their corresponding chatts.
We break our work down into these parts:
- Creating buttons to pick from album and to capture from the camera.
- Displaying image and video preview.
UIImagePickerController
We will be using iOS’s UIImagePickerController to access the photo library and camera. UIImagePickerController is a UIKit API that manages the system interfaces for taking pictures, recording videos, and retrieving items from the user’s media library. UIImagePickerController also manages user interactions—such as image repositioning, zooming, cropping, and video head and tail trimming.
PhotosPicker
Apple introduces the PhotosPicker API for SwiftUI with iOS 16. While using PhotosPicker to select images from the photo library is rather straitghtforward, loading video with PhotosPicker is a rather involved process. Further, PhotosPicker can only load images and videos from the photo library, not take picture nor record video from the camera. Photos loaded with PhotosPicker still relies on UIKit’s UIImage(data:) to convert the format to one SwiftUI’s Image(uiImage:) can display.
UIImagePickerController, on the other hand, is an older UIKit API. Compared to PhotosPicker, its handling of panoramic images is not as reliable and, without additional library, it cannot access PHLivePhoto objects (video and audio before and after taking LivePhotos). For this tutorial, what UIImagePickerController can do outweighs what it cannot do.
To use UIImagePickerController from SwiftUI, we first wrap it in a UIViewControllerRepresentable bridge that SwiftUI uses to work with UIKit controllers. Create a new Swift file called ImageView.swift and put the following in the file:
import SwiftUI
import UIKit
import AVKit

struct ImagePicker: UIViewControllerRepresentable {
    @Environment(\.dismiss) private var dismiss
    let sourceType: UIImagePickerController.SourceType?
    @Binding var image: UIImage?
    @Binding var videoUrl: URL?

    // UIViewControllerRepresentable required methods

}
The property sourceType tells UIImagePickerController whether we want to pick from the photo
library or use the camera. The resulting photo and/or video URL will be stored in the properties
image and videoUrl respectively for the caller to access. The property dismiss allows us to
grab from the environment the code to dismiss the UIKit ViewController provided by SwiftUI.
Conformance to the UIViewControllerRepresentable protocol requires implementation of two methods:
makeUIControllerViewController() and updateUIViewController(). The makeUIViewController()
method is called by SwiftUI only once to initialize the UIKit ViewController, whereas
updateUIViewController() will be called everytime there’s a state change in the enclosing SwiftUI
view that must be communicated to and reflected by the UIKit ViewController. In our case,
makeUIViewController() creates a UIKit UIImagePickerController(), sets some parameters of the
picker, and returns it. We do not allow users to modify the picker once created, so our
updateUIViewController() is empty. Replace the comment, // UIViewControllerRepresentable
required methods above with the following code:
    func makeUIViewController(context: Context) -> UIImagePickerController {

        let picker = UIImagePickerController()
        picker.sourceType = sourceType ?? .camera
        picker.delegate = context.coordinator
        picker.allowsEditing = true
        picker.mediaTypes = ["public.image","public.movie"]
        picker.videoMaximumDuration = TimeInterval(5) // secs, there's a 10 MB upload limit
        picker.videoQuality = .typeLow //.typeHigh

        return picker
    }

    func updateUIViewController(_ picker: UIImagePickerController, context: Context) { }

    // Coordinator as callback delegate
When using the ImagePicker, user can either pick an image ("public.image") or a video ("public.movie") from the photo album or access the camera to take a photo or record a video.
We set allowsEditing = true so that once a photo or video is selected, user can zoom and
crop images and trim off the head and/or tail of video clips prior to posting.
You can change the videoMaximumDuration and videoQuality to different
values.
However, be mindful that so as not to run up a bill on your cloud-based back-end server, and for a
bearable wait time when uploading, our back-end server limits client upload size to 10 MB. Three
seconds of video captured at 1960x1080 resolution can result in 3 MB of data.
A UIKit UIViewController could deliver events to the app, such as success or cancellation
notifications. The app is required to implement callback functions to handle these events. The
required callback functions are usually documented in a delegation protocol that the app must adopt.
UIImagePickerController defines such a callback delegation protocol called
UIImagePickerControllerDelegate. To use UIImagePickerController in SwiftUI,
UIViewControllerRepresentable requires a Coordinator that conforms to the
UIImagePickerControllerDelegate protocol. We must also define a constructor method,
makeCoordinator() to instantiate the Coordinator. Replace the comment, // Coordinator as
callback delegate with the following code inside your ImagePicker struct:
    func makeCoordinator() -> Coordinator {
        Coordinator(self)
    }

    final class Coordinator: NSObject, UIImagePickerControllerDelegate, UINavigationControllerDelegate {

        let controller: ImagePicker
        init(_ controller: ImagePicker) {
            self.controller = controller
        }

        func imagePickerControllerDidCancel(_ picker: UIImagePickerController) {
            controller.dismiss()
        }

        // didFinishPickingMedia

    }
We provide the makeCoordinator() constructor the object to coordinate, namely the current
instant of ImagePicker. UIKit was built as an Objective-C class, requiring the coordinator
to be declared a class, not a struct, and the class must be part of the Objective-C object
hierarchy, i.e., be a subsclass of the top-level class, NSObject.
The protocol UIImagePickerControllerDelegate stipulates that conforming classes must provide
implementation for two methods, imagePickerController(_:didFinishPickingMediaWithInfor:) and imagePickerControllerDidCancel(_:). In the latter case, we simply call the UIKit
ViewController dismissal method on our controller. Recall that we earlier grabbed
this method from SwiftUI’s environment.
When the user has successfully selected something from the photo library or captured something
with the camera, UIImagePickerController calls the imagePickerController(_:didFinishPickingMediaWithInfor:) callback function. If an image is returned, we put the image in the image variable passed to the controller. Depending on whether the image is edited, the delegate needs to retrieve it either as originalImage or editedImage. If the retrieval is succesful, we resize the image before storing it in the image variable. If video is returned,
we simply store its URL in the videoUrl variable. Replace // didFinishPickingMedia comment
above with:
        func imagePickerController(_ picker: UIImagePickerController, didFinishPickingMediaWithInfo info:[UIImagePickerController.InfoKey : Any]) {
            if let mediaType = info[UIImagePickerController.InfoKey.mediaType] as? String {
                if mediaType  == "public.image" {
                    controller.image = (info[UIImagePickerController.InfoKey.editedImage] as? UIImage ??
                                       info[UIImagePickerController.InfoKey.originalImage] as? UIImage)?
                        .resizeImage(targetSize: CGSize(width: 150, height: 181))!
                } else if mediaType == "public.movie" {
                    controller.videoUrl = info[UIImagePickerController.InfoKey.mediaURL] as? URL
                }
            }
            controller.dismiss()
        }
We now implement the function .resizeImage(targetSize:) as an extension to the UIImage class. Add the following code to your ImageView.swift file outside the ImagePicker class.
extension UIImage {
    func resizeImage(targetSize: CGSize) -> UIImage? {
        // Figure out orientation, and use it to form a rectangle
        let ratio = (targetSize.width > targetSize.height) ?
            targetSize.height / size.height :
            targetSize.width / size.width

        let newSize = CGSize(width: size.width * ratio, height: size.height * ratio)
        let rect = CGRect(x: 0, y: 0, width: newSize.width, height: newSize.height)

        // Do the actual resizing to the calculated rectangle
        UIGraphicsBeginImageContextWithOptions(newSize, false, 1.0)
        draw(in: rect)
        let newImage = UIGraphicsGetImageFromCurrentImageContext()
        UIGraphicsEndImageContext()

        return newImage
    }
}
ChattViewModel
To control showing ImagePicker and to pass data to and from ImagePicker, we add
the following properties to ChattViewModel in the swiftUIChatterApp.swift file:
    @ObservationIgnored var sourceType: UIImagePickerController.SourceType? = nil
    var image: UIImage? = nil
    var videoUrl: URL? = nil
    var showImagePicker = false
The variable sourceType will be passed to ImagePicker to tell it whether user
would like to select from the photo album or use the camera.
ImageButtons()
We want to create a row of buttons for user to work with images. Add an ImageButtons()
View to your ImageView.swift with the following buttons defined as @ViewBuilder functions
inside it. If the user decides not to post their chatt with its attached image(s), if any,
we provide a TrashButton() to clear these from ChattViewModel.
struct ImageButtons: View {
    @Environment(ChattViewModel.self) private var vm

    @ViewBuilder
    func CameraButton() -> some View {
        Button {
            vm.sourceType = .camera
            vm.showImagePicker = true
        } label: {
            Image(systemName: (vm.image == nil && vm.videoUrl == nil) ? "camera" : "camera.fill")
                .foregroundColor(Color((vm.image == nil && vm.videoUrl == nil) ? .systemBlue : .systemRed))
                .frame(width: 24, height: 24)
        }
    }

    @ViewBuilder
    func AlbumButton() -> some View {
        Button {
            vm.sourceType = .photoLibrary
            vm.showImagePicker = true
        } label: {
            Image(systemName: (vm.image == nil && vm.videoUrl == nil) ?  "photo.on.rectangle.angled" : "photo" )
                .foregroundColor(Color((vm.image == nil && vm.videoUrl == nil) ? .systemBlue : .systemRed))
                .frame(width: 24, height: 24)
        }
    }

    @ViewBuilder
    func TrashButton() -> some View {
        Button {
            vm.message = ""
            vm.image = nil
            vm.videoUrl = nil
        } label: {
            Image(systemName: "trash.fill")
                .frame(width: 24, height: 24)
                .foregroundColor(Color(vm.image == nil && vm.videoUrl == nil ? .systemGray : .systemRed))
        }
        .disabled(vm.image == nil && vm.videoUrl == nil)
        .opacity(vm.image == nil && vm.videoUrl == nil ? 0.8 : 1)
    }

    var body: some View {
        HStack {
            TrashButton()
            Spacer(minLength: 160)
            AlbumButton()
            Spacer()
            CameraButton()
        }
    }
}
Previewing image and video
We can use SwiftUI provided Image View to display photos. For video, we define VideoView
for video display with simple playback control. Add the following definition of VideoView
to your ImageView.swift file:
struct VideoViewer: View {
    let videoUrl: URL
    @State private var isPlaying = false

    var body: some View {
        let videoPlayer = AVPlayer(url: videoUrl)

        let playedToEnd = NotificationCenter.default.publisher(
            for: .AVPlayerItemDidPlayToEndTime, object: videoPlayer.currentItem)

        VideoPlayer(player: videoPlayer)
            .onTapGesture {
                isPlaying ? videoPlayer.pause() : videoPlayer.play()
                isPlaying.toggle()
            }
            .onReceive(playedToEnd) { _ in
                videoPlayer.seek(to: .zero)
            }
    }
}
VideoPlayer for SwiftUI is still rather new. Its playback control is rather rudimentary in that
the API allows you to play, pause, and perform seek on a video clip, but to be notified when
playback has ended, you must rely on the NotificationCenter API. Here we use the Combine state
management version of the NotificationCenter. Subscribing to a Combine publisher from a SwiftUI
View is relatively simple: add the onReceive(_:perform:) modifier to the View subscribing to the
publisher, as we did above.
With VideoView defined, we now use it to allow preview of taken picture, recorded video,
or picked picture or video before posting. Define an ImagePreview() that displays the
video and/or picture side-by-side. Add it to your ImageView.swift:
struct ImagePreview: View {
    @Environment(ChattViewModel.self) private var vm

    var body: some View {
        HStack (alignment: .top) {
            if let videoUrl = vm.videoUrl {
                VideoViewer(videoUrl: videoUrl)
                    .scaledToFit()
                    .frame(height: 180) // 180 min height for mute button to show
            }
            Spacer()
            if let image = vm.image {
                Image(uiImage: image)
                    .scaledToFit()
                    .frame(height: 180)
            }
        }
    }
}
Viewing posted image and video
One more View for ImageView.swift before we leave it. ImageView() displays downloaded
video and/or picture associated with each posted chatt side-by-side, aligned to the right
or left depending on whether the current user was the sender of the chatt. We will be
calling this View from ChattView later. It uses VideoView() to play back video
as ImagePreview() does. For display image, however, it uses AsyncImage() instead
of Image(). As the name states, given a URL, AsyncImage() downloads the image
asynchronously instead of blocking the UI. Also we put VideoView() and AsyncImage()
in a LazyHStack() instead of a HStack() here so that only chatts that are visible
on screen will have their images downloaded and shown.
struct ImageView: View {
    let chatt: Chatt
    @Environment(ChattViewModel.self) private var vm

    var body: some View {
        LazyHStack(alignment: .top) {
            if let urlString = chatt.videoUrl, let videoUrl = URL(string: urlString) {
                VideoViewer(videoUrl: videoUrl)
                    .scaledToFit()
                    .frame(height: 150) // 130 min height for play control to show and thus to play
            }
            if let urlString = chatt.imageUrl, let imageUrl = URL(string: urlString) {
                AsyncImage(url: imageUrl){
                    $0.resizable()
                } placeholder: {
                    ProgressView()
                }
                .scaledToFit()
                .frame(height: 150)
            }
        }
    }
}
The networking
Chatt
Add two new stored properties to the Chatt struct to hold the image and video URLs
associated with a chatt:
struct Chatt: Identifiable {
    // ...
    var imageUrl: String?
    var videoUrl: String?

    // ...
}
ChattStore
First add import Alamofire to the top of the file.
Then we update getChatts(errMsg:). Update the apiUrl to point to
the getimages endpoint. Then add decoding the imageUrl and videoUrl
fields to chatts.append():
                    chatts.append(Chatt(
                        name: chattEntry[0],
                        message: chattEntry[1],
                        id: UUID(uuidString: chattEntry[2] ?? ""),
                        timestamp: chattEntry[3],
                        imageUrl: chattEntry[4],
                        videoUrl: chattEntry[5]))
multipart/form-data
Unlike other tutorials in this course, the data we want to post here is not short strings
that we can put in a JSON object. Instead we upload our large data using HTTP
multipart/form-data representation/encoding.
A web page with a form to fill out usually has multiple fields (e.g., name, address, net worth, etc.). Data from these multiple parts of the form is encoded using HTTP’s multipart/form-data representation. One advantage of this encoding is that binary data can be sent as is, not encoded into a string of printable characters, as we must if using JSON. Since we don’t have to encode the binary data into character string, we can stream it directly from file to network without loading it into memory first, allowing us to send much larger files. We use the multipart/form-data encoding with AlamoFire to send images and videos in this tutorial.
To upload multipart/form-data without AlamoFire, for example, using iOS’s URLSession, you will need more detailed knowledge of the HTTP protocol.
Replace your postChatt(_:errMsg:) function in ChattStore.swift with:
    func postChatt(name: String?, message: String?, image: UIImage?, videoUrl: URL?, errMsg: Binding<String>) async {
        guard let apiUrl = URL(string: "\(serverUrl)/postimages") else {
            errMsg.wrappedValue = "postChatt: Bad URL"
            return
        }

        do {
            _ = try await AF.upload(multipartFormData: { mpFD in
                if let name = name?.data(using: .utf8) {
                    mpFD.append(name, withName: "name")
                }
                if let message = message?.data(using: .utf8) {
                    mpFD.append(message, withName: "message")
                }
                if let jpegImage = image?.jpegData(compressionQuality: 1.0) {
                    mpFD.append(jpegImage, withName: "image", fileName: "chattImage", mimeType: "image/jpeg")
                }
                if let videoUrl {
                    mpFD.append(videoUrl, withName: "video", fileName: "chattVideo", mimeType: "video/mp4")
                }
            }, to: apiUrl, method: .post).validate().serializingData().value
        } catch {
            errMsg.wrappedValue = "postChatt: POSTing failed \(error)"
        }
    }
The method constructs the “form” to be uploaded as comprising:
- a part with key “name” whose value contains the username obtained from in-memory data with UTF-8 encoding,
- a part with key “message” constructed similarly, and then
- a part with key “image” whose value is in-memory data that has been JPEG encoded (no compression in this case). The “filename” is simply how the data is tagged, it can be any string, it doesn’t represent any actual “file”. The “mimeType” documents the encoding of the data (though it doesn’t seem to be used for anything), and finally,
- the last part with key “video”, its data is not in memory, but rather must be retrieved from the
videoUrl.
Note that the apiUrl of the request has been set to the postimages API endpoint.
The UI
Now we update the app’s UI.
Posting images
We put ImageButtons() as a row of buttons above the existing input area consisting of
the TextField and SubmitButton in ContentView. Once the user has taken a picture,
record a video, or picked something from the album to post, we present the image(s) in
ImagePreview() row above ImageButtons(). To that end, add the following lines
between the chatt window and your input area of your ContentView (between the
ScrollViewReader{} and HStack {} inside the VStack {} of your ContentView):
            Divider()
            ImagePreview()
                .padding(.horizontal, 30)
            ImageButtons()
                .padding(EdgeInsets(top: 0, leading: 30, bottom: 0, trailing: 80))
To show the ImagePicker when either the CameraButton() or AlbumButton() is tapped,
add the following modifier to your ContentView, e.g., below the navigationBarTitleDisplayMode modifier:
        .fullScreenCover(isPresented: Bindable(vm).showImagePicker) {
            ImagePicker(sourceType: vm.sourceType, image: Bindable(vm).image, videoUrl: Bindable(vm).videoUrl)
        }
Replace the call to postChatt(_:errMsg:) in your SubmitButton with:
await ChattStore.shared.postChatt(name: vm.onTrailingEnd, message: vm.message.isEmpty ? "Image(s) attached" : vm.message, image: vm.image, videoUrl: vm.videoUrl, errMsg: Bindable(vm).errMsg)
Upon returning from the call to getChatts(errMsg:), in addition to clearing vm.message, also set:
            vm.image = nil
            vm.videoUrl = nil
Finally, set the color of the Image() foreground color in SubmitButton’s label by
availability of captured images:
            Image(systemName: "paperplane.fill")
                .foregroundColor(Color(vm.message.isEmpty && vm.image == nil && vm.videoUrl == nil ? .systemGray : .systemYellow))
                .padding(10)
Then set the background color and whether the SubmitButton is disabled to also check
for availability of captured images:
        .disabled(isSending || (vm.message.isEmpty && vm.image == nil && vm.videoUrl == nil))
        .background(Color(isSending || (vm.message.isEmpty && vm.image == nil && vm.videoUrl == nil) ? .secondarySystemBackground : .systemBlue))
Displaying posted image(s)
On the chatt timeline, to display image(s) posted with a chatt, add:
                ImageView(chatt: chatt)
                    .frame(maxWidth: 300, alignment: onTrailingEnd ? .trailing : .leading)
between the last Text() View and Spacer() inside the
if let msg = chatt.message, !msg.isEmpty {}
block of ChattView in the ChattScrollView.swift file.
Congratulations! You’re done with the front end! (Don’t forget to work on the back end!)
Run and test to verify and debug
You should now be able to run your front end against your back end. You will not get full credit if your front end is not set up to work with your back end!
Front-end submission guidelines
We will only grade files committed to the main branch. If you use multiple branches, please merge them all to the main branch for submission.
Push your front-end code to the same GitHub repo you’ve submitted your back-end code:
- Open GitHub Desktop and click on
Current Repositoryon the top left of the interface - Click on the GitHub repo you created at the start of this tutorial
- Add Summary to your changes and click
Commit to mainat the bottom of the left pane - If you have pushed code to your repo, click
Pull Originto synch up the repo on your laptop - Finally click
Push Originto push all changes to GitHub
![]() Go to the GitHub website to confirm that your front-end files have been uploaded to your GitHub repo under the folder
Go to the GitHub website to confirm that your front-end files have been uploaded to your GitHub repo under the folder images. Confirm that your repo has a folder classure outline similar to the following. If your folder classure is not as outlined, our script will not pick up your submission and, further, you may have problems getting started on latter tutorials. There could be other files or folders in your local folder not listed below, don’t delete them. As long as you have installed the course .gitignore as per the inclassions in Preparing GitHub for Reactive Tutorials, only files needed for grading will be pushed to GitHub.
  reactive
    |-- chatter.zip
    |-- chatterd
    |-- chatterd.crt
    |-- images
        |-- swiftUIChatter
            |-- swiftUIChatter.xcodeproj
            |-- swiftUIChatter
    |-- llmprompt.zip
    # and other files or folders
Verify that your Git repo is set up correctly: on your laptop, grab a new clone of your repo and build and run your submission to make sure that it works. You will get ZERO point if your tutorial doesn’t build, run, or open.
IMPORTANT: If you work in a team, put your team mate’s name and uniqname in your repo’s README.md (click the pencil icon at the upper right corner of the README.md box on your git repo) so that we’d know. Otherwise, we could mistakenly think that you were cheating and accidentally report you to the Honor Council, which would be a hassle to undo. You don’t need a README.md if you work by yourself.
Review your information on the Tutorial and Project Links sheet. If you’ve changed your teaming arrangement from previous tutorial’s, please update your entry. If you’re using a different GitHub repo from previous tutorial’s, invite eecsreactive@umich.edu to your new GitHub repo and update your entry.
References
- Apple’s UIImagePickerController
- Resizing Images
- UIImage conversion with Base64
- Crop Box Apple Documentation
- Crop Box Implementation Example
- Determine if the access to photo library is set or not - PHPhotoLibrary
- How to check if the user gave permission to use the camera?
Package Management
- Managing package dependencies with Swift Package Manager in Xcode
- Swift Package Index: Package Collections
Image and video download and play back
- How to load a remote image from a Url
- AsyncImage
- How to play movies with VideoPlayer
- How to detect when AVPlayer video ends playing?
- onReceive(_:perform:)
- Controls with AVPlayer
- VideoPlayer
- AVPlayer
- AVPlayerViewController
- JPEG Formats - Progressive vs. Baseline
- Progressive JPEGs and green Martians
ImagePicker
PhotosPicker
- How to let users select pictures using PhotosPicker
- How to use the SwiftUI PhotosPicker
- How to let users import videos using PhotosPicker
- Bringing Photos picker to your SwiftUI app
- Selecting Photos and Videos in iOS
- PhotosPicker
Multipart/form-data
- Upload Data using Multipart
- Understanding HTML Form Encoding: URL Encoded and Multipart Forms
- RESTful API Tutorial: How to Upload Files to a Server
- RFC7578: Returning Values from Forms: multipart/form-data
- How to Upload Data to a Server: Multipart/Form-Data HTTP Requests in Swift
- Uploading images and forms to a server using URLSession
- Upload image to server using URLSessionUploadTask
- Multipart Request with URLSession and async/await in Swift
Alamofire
- How to parse JSON response from Alamofire API in Swift?
- Send POST parameters with MultipartFormData using Alamofire, in iOS Swift
- Alamofire Multipart with parameters : upload Image from UIImagePickerController Swift
- Alamofire 5 Tutorial for iOS
- Alamofire References
- Alamofire Documentation
- Alamofire MultipartFormData
- Alamofire Uploading MultipartFormData
- Using Alamofire with Swift Concurrency
- Pros and Cons Alamofire Concurrency vs Regular or suggested method
- Evolution of handling API response with Alamofire
| Prepared by Ollie Elmgren, Wendan Jiang, Benjamin Brengman, Tianyi Zhao, Alexander Wu, Nowrin Mohamed, Xin Jie ‘Joyce’ Liu, Chenglin Li, Yibo Pi, and Sugih Jamin | Last updated: February 23rd, 2026 |