Tutorial: Images Back End
Cover Page
Install updates
Remember to install updates available to your Ubuntu back end. If N in the following notice you
see when you ssh to your back-end server is not 0,
N updates can be applied immediately.
run the following:
server$ sudo apt update
server$ sudo apt upgrade
Failure to update your packages could lead to your solution not performing at all, with no warning that it is because you haven’t updated, and also makes you vulnerable to security hacks.
Any time you see *** System restart required *** when you ssh to your server, immediately run:
server$ sync
server$ sudo reboot
Your ssh session will be ended at the server. Wait a few minutes for the system to reboot before you ssh to your server again.
Static files and media directory
Due to the potentially large image and video file sizes and to enable direct download of these files using image/video download libraries on the front end, both image and video data posted alongside chatt is not stored in the PostgreSQL database. Instead the image/video data is stored in static files, filed under a designated media directory. These files are served by a static-file server. We turn the image/video filenames into URLs, which we store in the PostgreSQL database alongside the chatt’s name and message.
So as not to run up a bill on your back-end server, and for a bearable wait time when uploading, we
limit each image or video upload to 10 MB. On both Android and iOS, to find the size of an image
or video file, display it using the platform Photos app and scroll up to reveal the file details.
Create a media directory and set its access permissions:
server$ mkdir ~/reactive/chatterd/media
server$ chmod a+rx ~ ~/reactive ~/reactive/chatterd ~/reactive/chatterd/media
server$ cd ~/reactive/chatterd
Database table
Add two new columns to the chatts table in your chatterdb database to store the URLs
of your image and video static files:
- Log into an interactive PostgreSQL (
psql) session as userpostgres - Connect to the
chatterdbdatabase - Clear your
chattstable of all oldchatts, use the SQL command:TRUNCATE TABLE chatts; - Add two new columns to
chattsto storeimageurlandvideourlboth asTEXT. Type the following:ALTER TABLE chatts ADD COLUMN imageurl TEXT, ADD COLUMN videourl TEXT;Columns of type
TEXTallow the user to store strings of undetermined length. - To verify that you’ve added the new column to the
chattstable, enter:SELECT * FROM chatts;Make sure you get back the following result (though perhaps more stretched out and may include other column(s), such as
appIDif you have completed other tutorial(s)):name | message | id | time | imageurl | videourl | ------+----------+----+------+----------+----------+ (0 rows)If so congratulations! You have successfully added the new columns!
- Exit PostgreSQL
Web server
We next prepare the Chatter back end to handle image and video data. Please click the relevant
link for the web framework of your choice:
Go | Python | Rust | TypeScript
and return here to resume the server setup once you have your web framework set up.
Testing image and video upload
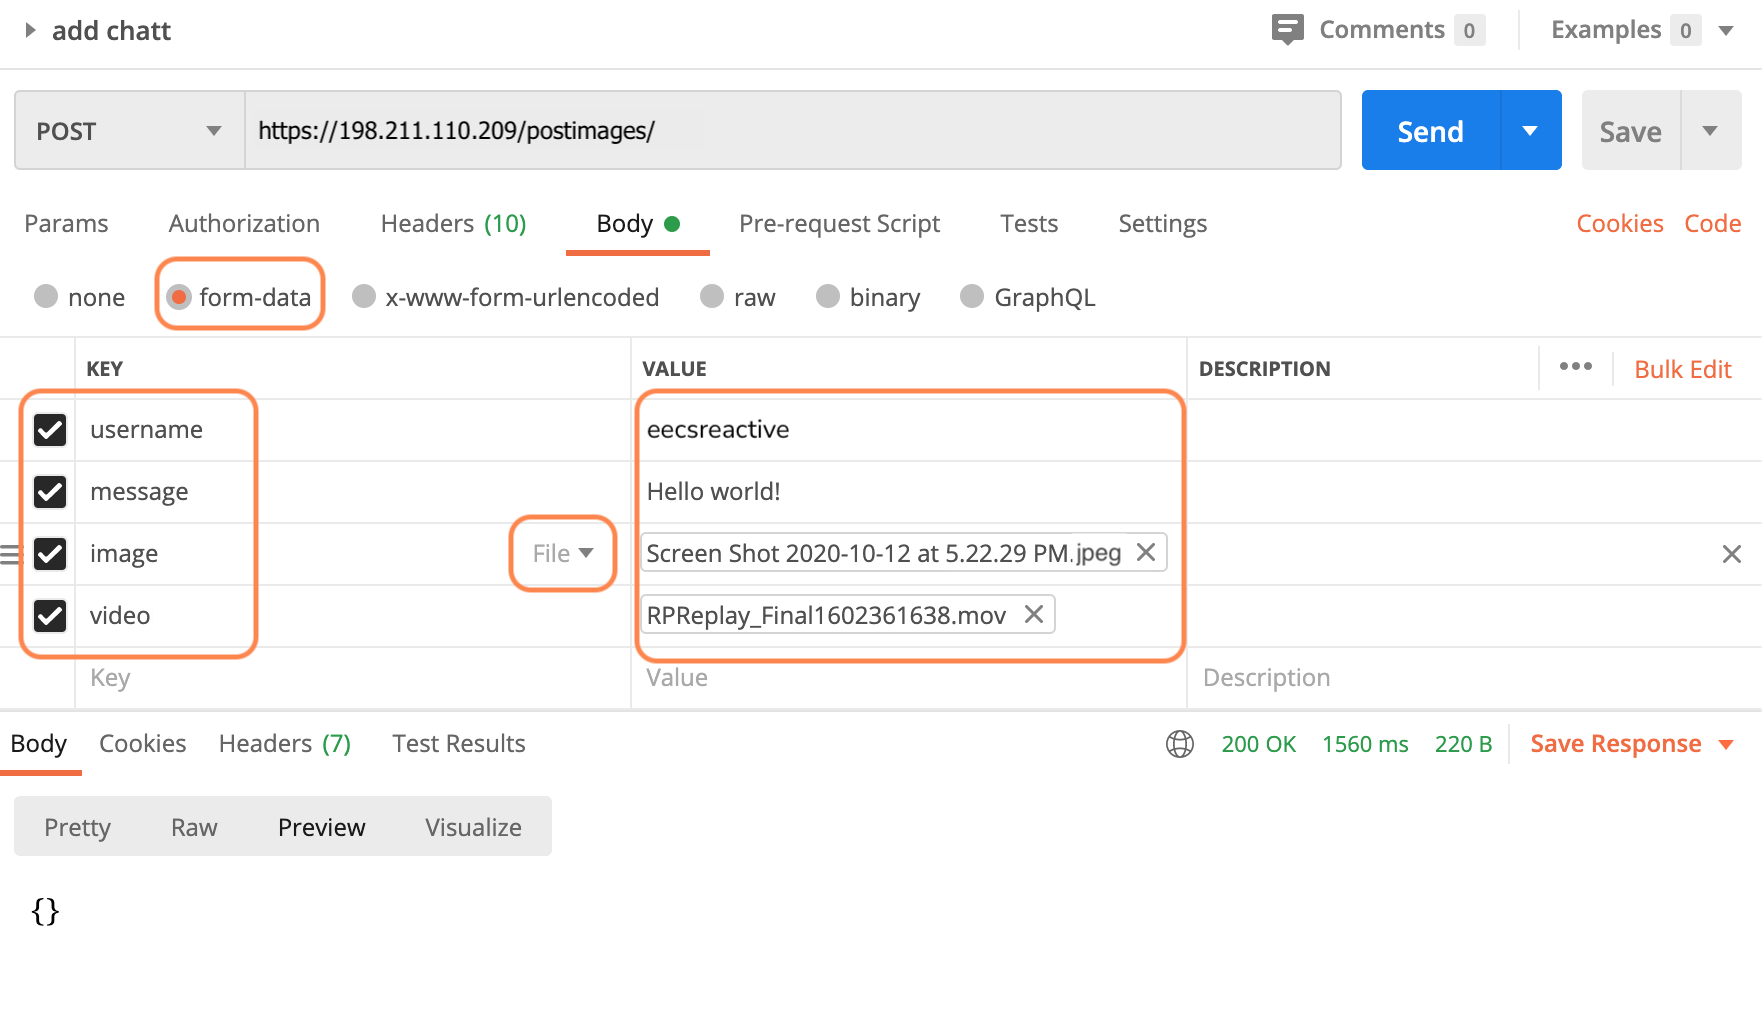
To test your back end with Postman, configure the header and body of your POST request like the following:
-
Create
POSTrequest in Postman. <div class="primer-spec-callout danger" markdown="1"> Be sure to include the trailing/inpostimages/. Some web framework, such as Django, cannot carry POSTed data when redirecting frompostimagestopostimages/. </div> -
Under
Bodyselectform-datainstead ofraw. Enter"username"as the firstKeyand enter your uniqname as itsValue. Similarly add a"message"field. Then add"image"as theKeyfor the third field. Then click the arrow to the right of theKeyand chooseFile. When you click on the correspondingValuefield, a drop-down menu should appear. Click+ New file from local machineand upload your.jpegfiles (screenshot).If you want to send a
chattwith no image and/or video, you can simply not add any"image"and/or"video"field. Or you may add these keys but set their values to either the empty string ("") ornull. In Postman, to set the value to the empty string, set the field type toTextin the drop-down arrow, to the right of theKeyfield, but leave theValuefield empty. To set it tonull, set the field type toFilebut don’t select any file. -
Click
Send. -
Next do a
getimages/request within Postman as you did in theChattertutorial. You should see the image and video URLs associated with yourchattabove in the returned JSON.Stream error in HTTP/2 framing layer
Both the
getchatts/andgetimages/Chatter API specify an empty payload. If you send yourGETrequest in Postman with a non-emptyMultipartbody, some server framework will report,Error: Stream error in the HTTP/2 framing layer.To correct this error, set the
GETrequest body to none in Postman.
</details>
- You can copy the URLs returned and do another
GETrequest on these URLs, allowing you to see the image/video in Postman.
![]() WARNING: You will not get full credit if your front end is not set up to work with your back end!
WARNING: You will not get full credit if your front end is not set up to work with your back end!
Everytime you rebuild your Go or Rust server or make changes to either of your JavaScript or Python files, you need to restart chatterd:
server$ sudo systemctl restart chatterd
![]() Leave your
Leave your chatterd running until you have received your tutorial grade.
![]() TIP:
TIP:
server$ sudo systemctl status chatterd
is your BEST FRIEND in debugging your server. If you get an HTTP error code 500 Internal Server Error or if you just don’t know whether your HTTP request has made it to the server, first thing you do is run sudo systemctl status chatterd on your server and study its output, including any error messages and debug printouts from your server.
And you’re done with the back end! Before you return to work on your front end, wrap up your work here by submitting your files to GitHub.
Submitting your back end
We will only grade files committed to the main branch. If you use multiple branches, please
merge them all to the main branch for submission.
Navigate to your reactive folder:
server$ cd ~/reactive/
Commit changes to the local repo:
server$ git commit -am "images back end"
and push your chatterd folder to the remote GitHub repo:
server$ git push
If git push failed due to changes made to the remote repo by your tutorial partner, you must run
git pull first. Then you may have to resolve any conflicts before you can git push again.
![]() Go to the GitHub website to confirm that your back-end files have been uploaded to your
GitHub repo.
Go to the GitHub website to confirm that your back-end files have been uploaded to your
GitHub repo.
Congratulations! You’ve completed the back end modifications necessary to support images!
| Prepared by Wendan Jiang, Ollie Elmgren, Benjamin Brengman, Mark Wassink, Alexander Wu, Yibo Pi, and Sugih Jamin | Last updated February 21st, 2026 |