Preparing GitHub for Tutorials and Projects
There are several ways to interact with GitHub. In this course, we will use GitHub Desktop, which provides a visual interface to interact with GitHub and is independent of any IDEs. If you are proficient with git command-line interface, you don’t have to use GitHub Desktop.
- If you do not have a GitHub Student account, please get the GitHub Student Developer Pack so that you have access to GitHub Wiki, which you will need for your course project.
GitHub requires a personal access token to use HTTPS git. Please follow GitHub’s instructions to create a classic personal access token. Create a classic personal access token instead of a fine-grained one as students have had problems with the fine-grained access tokens. Save your personal access token securely.
- Download and install GitHub Desktop
- Link to your GitHub account: on GitHub Desktop navigate to
Settings > Accounts > Sign In. A window will pop up and you can choose between signing in using your browser and signing in using your GitHub username and password.
If you prefer to use CLI, you can store your personal access token conveniently but insecurely by storing it in
~/.git-credentials, using the format:https://<YOUR_GITHUB_USERNAME>:<YOUR_PERSONAL_ACCESS_TOKEN>
Create your agentic GitHub repo
On your browser, create a new, PRIVATE agentic repo with your GitHub account:
-
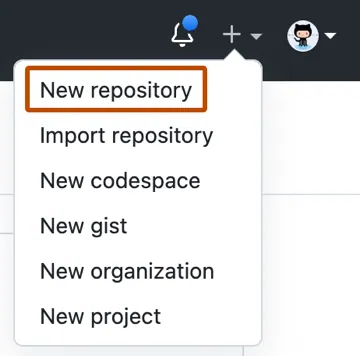
In the upper-right corner of your GitHub page, use the drop-down menu labeled
+, and selectNew repository(screenshot). -
Name the new repo
agenticand set its visibility toPrivate. -
Check
Add .gitignore, choose any (you will be overwriting the.gitignorelater, this is just the simplest way to create a non-empty repo.) -
Click the big green
Create repository.
Note: for this and subsequent tutorials and projects, we will assume your folders/directories are named according to the “canonical” names used in the spec. You can choose a different name other than
agentic, but be aware that you’d have to map the names used in the specs to your naming scheme in all tutorials and projects, for both front and back end.
Please invite eecsreactive@umich.edu as collaborator to your repo:
- On your GitHub site on your browser, click on
Settings, the right most menu item (you may have to click on the...to reveal it). - Click on
Manage accesson the left menu, and click on the big greenInvite a collaboratorbutton - Enter
eecsreactive@umich.eduand click the matching name that shows up - Click the big green button,
Add eecsreactive@umich.edu to this repository.
If you’re working on the tutorial as a team, please keep your tutorial’s solution in ONE member’s agentic git repo ONLY. Invite your team mate to your repo by navigating to Settings > Manage access > Invite a collaborator as per above and enter your team mate’s GitHub account or UM email address.
Clone your agentic GitHub repo to your laptop
In the following, replace /YOUR:TUTORIALS with the name of your tutorials folder.
- Navigate to your newly created
agenticGitHub repo on your browser - Click on the green
Codebutton and selectOpen with GitHub Desktop - Tell your browser to allow GitHub Desktop to launch
-
In the
Clone a Repositorydialog box that GitHub Desktop pops up, edit theLocal Pathtext field to where you want to put youragenticrepo on your local host and clickClone. For example, if you have a folder namecourseson your home folder, you can enter/Users/yourusername/courses/or, on Windows,C:\Users\yourusername\courses\.This will create a new folder under
Local Path, which we will refer to as/YOUR:TUTORIALS. If yourLocal Pathwere/Users/yourusername/courses/as per the above example,/YOUR:TUTORIALSwill be/Users/yourusername/courses/agentic/.
To prepare your git repo:
- Download a copy of the course gitignore and save it in
/YOUR:TUTORIALSas.gitignore(note the leading dot before the filename). If your laptop OS prevents you from saving a file with a leading dot in its name, download the file to your/YOUR:TUTORIALS/asgitignorewithout the leading dot and then run in Terminal or PowerShell:laptop$ cd /YOUR:TUTORIALS laptop$ mv gitignore .gitignoreThis overwrites the
.gitignoreGitHub added earlier when creating your repo. - From GitHub Desktop commit your newly created
.gitignoreand push them to youragenticrepo on GitHub.
GitHub Branching for Dual Backend/Frontend Repo
Abstract Evolution Tree
In the figure below each Version (T) serves as a baseline, and each Project (P) branches from those baselines.
Note: T4 is an alternative to T3, you will do only one or the other.
graph TD
    %% Define Node Styles for clarity
    classDef coreCode fill:#2b6cb0,stroke:#1a365d,stroke-width:2px,color:#fff;
    classDef projectCode fill:#2f855a,stroke:#22543d,stroke-width:2px,color:#fff;

    %% Evolution Paths
    T1[Version T1] --> P1[Project 1: P1]
    T1 --> T2[Version T2]
    T1 --> T3[Version T3]

    T2 --> P2[Project 2: P2]
    T2 --> T4[Version T4]

    T3 --> P3[Project 3: P3]

    T4 --> P4[Project 4: P4]

    %% Apply Styles
    class T1,T2,T3,T4 coreCode;
    class P1,P2,P3,P4 projectCode;
Tutorial to Version Mapping
In this course, each Version comprises two tutorials, as shown in the expanded figure below.
graph TD
    %% Colors and Styling
    classDef branchT fill:#2b6cb0,stroke:#1a365d,stroke-width:2px,color:#fff;
    classDef branchP fill:#2f855a,stroke:#22543d,stroke-width:2px,color:#fff;

    %% Base Branch Line (T1 - T2)
    subgraph T1 ["Version T1 Base"]
        direction LR
        llmPrompt[1. llmPrompt] --> llmChat[2. llmChat]
    end

    %% P1 Branch off T1
    llmChat -->|Branch| P1[Project P1: llmPlay]

    %% T2 Branch off T1
    llmChat -->|Branch| llmTools[3. llmTools]
    subgraph T2 ["Version T2 Base"]
        direction LR
        llmTools --> llmHITL[4. llmHITL]
    end

    %% P2 Branch off T2
    llmHITL -->|Branch| P2[Project P2: llmAction]

    %% T3 Branch off T1
    llmChat -->|Branch| llmVec[5. llmVec]
    subgraph T3 ["Version T3 Base"]
        direction LR
        llmVec --> llmRAG[6. llmRAG]
    end

    %% P3 Branch off T3
    llmRAG -->|Branch| P3[Project P3: llmSearch]

    %% T4 Branch off T2 (Alternative Track)
    llmHITL -->|Branch| llmVecBis[5. llmVec-bis]
    subgraph T4 ["Version T4 Base"]
        direction LR
        llmVecBis --> llmRAGBis[6. llmRAG-bis]
    end

    %% P4 Branch off T4
    llmRAGBis -->|Branch| P4[Project P4: llmSearch-bis]

    %% Apply Classes
    class llmPrompt,llmChat,llmTools,llmHITL,llmVec,llmRAG,llmVecBis,llmRAGBis branchT;
    class P1,P2,P3,P4 branchP;
To handle the course’s evolutionary tracks on a single Git repository, we need to coordinate how to manage the codebase across our dual-platform development environment: back-end harnessd development on
Ubuntu server and front-end Agent development on macOS/WSL laptop, to ensure that the independent feature sets (a “tutorial” is a feature set, a “project” is also a feature set) don’t bleed into one another.
The three basic requirements are:
- after you’re done working on a feature set, commit and push all your back-end and front-end code of the feature set,
- set a git tag for this feature set; for example, after you’re done with tutorial 2, set git
tag
llmChat; after you’re done with tutorial 3, you set git tagllmtHITL, etc. - before you start work on the next feature set, you MUST create a branch from the git tag of
the feature set you want to start from; for example, to build project 1 from tutorial 2, you
create a branch from git tag
llmChat.
After you’re done with project 1, you commit and push both its front-end and back-end code and then create a new git tag, llmPlay. To start work on tutorial 3, you (go back in time and) create a new branch from the git tag of tutorial 2, llmChat, etc.
🏷️ How to Create and Push a Git Tag
Once you have verified that all your back-end and front-end code are committed and pushed, use one of the options below to lock in your mandatory baseline milestone tag.
⚠️ CRITICAL RULE: The milestone tag should only be created after both the backend and frontend code are fully merged. Exactly ONE machine is allowed to create and push a given milestone tag. Once one machine pushes the tag, the other machine MUST fetch/pull to synchronize.
🛠️ Option A: Creating the Tag via Terminal CLI
# 1. Create an annotated tag on your current commit. e.g., `llmChat` for <MILESTONE_TAG_NAME>`
$ git tag -a <MILESTONE_TAG_NAME> -m "Milestone: Completed <ASSIGNMENT_NAME>"

# 2. Push the new tag up to GitHub
$ git push --tags
🖥️ Option B: Creating the Tag via GitHub Desktop
- Open GitHub Desktop and click Fetch origin at the top to ensure your local history is completely up to date.
- In the left-hand panel, click the History tab.
- Locate and right-click the top (most recent) commit in the commit list.
- Click Create Tag… from the context menu.
- Enter your
<MILESTONE_TAG_NAME>(e.g.,llmChat) into the Tag field and click Create Tag. - Click the blue Push origin banner (or click Fetch origin / Push tags) at the top to upload your new tag to GitHub.
Two Alternate Workflows Walkthrough
Some tutorials, e.g., llmTools have you complete its back-end portion first. Others, e.g., llmPrompt, have you complete its front-end portion first. Below are step-by-step walkthrough of each workflow. Whether you’re following the backend-first or front-end first workflow, remember the:
⚠️ CRITICAL RULE: The milestone tag should only be created after both the backend and frontend code are fully merged. Exactly ONE machine is allowed to create and push a given milestone tag. Once one machine pushes the tag, the other machine MUST fetch/pull to synchronize.
📌 Track 1: Backend-First Workflow
Part 1: Start on the Ubuntu Server (Backend)
- Navigate to your project folder:
server$ cd ~/agentic - Warp back to the required baseline tag and spawn your new isolated assignment branch:
server$ git checkout <BASELINE_TAG> # e.g., llmChat server$ git checkout -b <NEW_ASSIGNMENT_BRANCH> # e.g., llmPlay - Execute your backend work inside
~/agentic/harnessd. - Once completed, save your work and broadcast the branch to GitHub:
server$ git add .
server$ git commit -m "Finish <ASSIGNMENT_NAME> Backend" # e.g., llPLay
server$ git push --all
Part 2: Complete on the macOS/WSL Laptop (Frontend)
Choose either Option A (CLI) or Option B (GitHub Desktop) to sync and finish the frontend work. Do not mix methods.
🛠️ Option A: Using the Terminal CLI
- Navigate to your project folder and download the new branch structure created by the server:
laptop$ cd /YOUR:TUTORIALS # ~/agentic laptop$ git fetch --all - Checkout and track the new assignment branch:
laptop$ git checkout <NEW_ASSIGNMENT_BRANCH> # e.g., llmPlay - Execute your frontend work inside
~/agentic/Agent. - Stage and commit your frontend additions:
laptop$ git add . laptop$ git commit -m "Finish <ASSIGNMENT_NAME> Frontend" # e.g., llmPlay - Pull the backend updates from GitHub (this automatically merges them with your frontend work), create the tag, and push the completed milestone to the cloud:
laptop$ git pull
laptop$ git tag -a <ASSIGNMENT_TAG> -m "Completed <ASSIGNMENT_NAME>" # e.g., llmPlay
laptop$ git push --all && git push --tags
🖥️ Option B: Using GitHub Desktop
- Open GitHub Desktop and click Fetch origin at the top.
- Click the Current Branch dropdown, select the Remote tab, and click your
<NEW_ASSIGNMENT_BRANCH>to initialize it locally. - Execute your frontend work inside
/YOUR:TUTORIALS/Agent. - In the Summary box in the bottom-left panel, type
"Finish <ASSIGNMENT_NAME> Frontend"and click Commit. - Click Pull origin to pull down and merge the server’s backend changes safely.
- Click the History tab in the left sidebar, right-click the latest commit, and select Create Tag….
- Name it
<ASSIGNMENT_TAG>and click Create Tag. - Click Push origin to upload your completed project and tag.
Part 3: Final Server Catch-up Sync
Once the laptop has finalized the track and created the tag, you must sync your server one last time.
server$ cd ~/agentic
server$ git pull
server$ git fetch --tags
📌 Track 2: Frontend-First Workflow
Part 1: Start on the macOS/WSL Laptop (Frontend)
Choose either Option A (CLI) or Option B (GitHub Desktop) to initialize the track and execute the frontend work.
🛠️ Option A: Using the Terminal CLI
- Navigate to your project folder and download the latest tags from GitHub:
laptop$ cd /YOUR:TUTORIALS # ~/agentic laptop$ git fetch --all - Warp back to the required baseline tag and spawn your new isolated assignment branch:
laptop$ git checkout <BASELINE_TAG> # e.g., llmChat laptop$ git checkout -b <NEW_ASSIGNMENT_BRANCH> # e.g., llmPlay - Execute your frontend work inside
~/agentic/Agent. - Stage and commit your frontend work:
laptop$ git add . laptop$ git commit -m "Finish <ASSIGNMENT_NAME> Frontend" # e.g., llmPlay - Publish the new branch up to GitHub so the server can track it:
laptop$ git push --set-upstream origin <NEW_ASSIGNMENT_BRANCH> # e.g., llmPlay
🖥️ Option B: Using GitHub Desktop
(Note: GitHub Desktop does not allow you to directly create a branch from a Git tag. You must branch from the specific historical commit.)
- Open GitHub Desktop and click Fetch origin at the top.
- Go to the left sidebar and click the History tab.
- Scroll or search to locate the commit associated with your target
<BASELINE_TAG>. - Right-click that exact commit, select Create Branch from Commit, and name it
<NEW_ASSIGNMENT_BRANCH>. - Click Publish branch at the top right to broadcast this new isolated branch to GitHub.
- Execute your frontend work inside
/YOUR:TUTORIALS/Agent. - In the Summary box in the bottom-left panel, type
"Finish <ASSIGNMENT_NAME> Frontend"and click Commit. - Click Push origin to upload your frontend changes.
Part 2: Complete on the Ubuntu Server (Backend)
- Navigate to your project folder and download the laptop’s new branch:
server$ cd ~/agentic server$ git fetch --all - Checkout and track the branch published by the laptop:
server$ git checkout <NEW_ASSIGNMENT_BRANCH> # e.g., llmPlay - Execute your backend work inside
~/agentic/harnessd. - Once completed, save your work, merge the frontend updates, and lock in the final milestone tag:
server$ git add . server$ git commit -m "Finish <ASSIGNMENT_NAME> Backend" # e.g., llmPlay server$ git pull server$ git tag -a <ASSIGNMENT_TAG> -m "Completed <ASSIGNMENT_NAME>" # e.g., llmPlay - Push the combined code and the new tag to GitHub:
server$ git push --all && git push --tags
Part 3: Final Laptop Catch-up Sync
Once the server has finalized the track, you must sync your laptop one last time to pull down the server’s changes and the milestone tag.
🛠️ Using the Terminal CLI
laptop$ cd /YOUR:TUTORIALS
laptop$ git pull
laptop$ git fetch --tags
🖥️ Using GitHub Desktop
Click Fetch origin at the top, then click Pull origin.
🔍 How to Check Your History
At any time, you can verify your branches match the expected track architecture layout.
- On CLI (Server/Laptop): Run
git log --oneline --graph --allto view an ASCII tree map. - On GitHub Desktop: Go to your repository page on github.com, click the Insights tab at the top, and select Network from the left-side menu to view a color-coded branching graph.
🛑 Appendix: Troubleshooting
"Detached HEAD" state
This happens if you accidentally check out a Tag directly (e.g., git checkout llmChat) instead of checking out or creating a Branch. In this state, any new commits you make are temporarily floating and will be lost if you switch away.
🛠️ Fix via Terminal CLI:
If you haven’t made any commits yet, simply switch back to a safe branch:
laptop$ git checkout <ANY_BRANCH_NAME>
If you did write code and make commits while detached, save them instantly by turning your current position into a new branch:
laptop$ git checkout -b <NEW_BRANCH_NAME>
🖥️ Fix via GitHub Desktop:
GitHub Desktop will detect this and show a prominent warning banner at the top of your screen.
- Click the Current Branch dropdown.
- Choose an existing branch or click New Branch to safely port your work into a proper tracking branch.
Error: local changes would be overwritten by checkout
This happens when you try to switch branches or tracks, but you have unsaved, uncommitted changes in your current workspace that conflict with the branch you are trying to jump to.
🛠️ Fix via Terminal CLI:
- Option A (Save them): If you want to keep your changes, commit them first before switching:
laptop$ git add . laptop$ git commit -m "Saving temporary progress" - Option B (Nuke them): If you made a mistake and want to completely discard your local changes to get a clean slate:
laptop$ git reset --hard HEAD - Option C (Stash them): If you want to put your current changes in a temporary drawer, switch branches, and bring them back later:
laptop$ git stash
laptop$ git checkout <DESIRED_BRANCH>
# Later, to bring them back: git stash pop
🖥️ Fix via GitHub Desktop:
When you try to switch branches with uncommitted files, GitHub Desktop will pop up a smart prompt asking you what to do:
- Select “Leave my changes on [current branch]” to automatically stash them away safely while you look at the other branch.
- Select “Bring my changes to [new branch]” if you want to carry your current frontend edits over into your new track.
- If you just want to throw your changes away entirely, right-click the files in the left-hand sidebar changes list and select Discard all changes.
Merge Conflict
A merge conflict happens when your laptop frontend and your server backend accidentally modify the exact same line of the exact same file. Git gets confused and asks you to pick a winner.
Understanding Local vs. Remote Branches (main vs origin/main)
When using Git, you will see pairs of branches with similar names. You must understand the difference to prevent merging the wrong way:
- Plain Name (e.g.,
main,llmPlay): This is your Local branch. It only exists on the machine you are currently working on. - Prefix Name (e.g.,
origin/main,origin/llmPlay): This is the Remote branch. It represents the state of the code saved up in the cloud on GitHub.
💡 Rule of Thumb: When updating your machine, you always want to merge the remote branch into your local branch (e.g., Merge origin/main into main).
🖥️ How to resolve it in GitHub Desktop:
- If a conflict occurs during a pull, GitHub Desktop will block you and show a list of “Conflicted Files”.
- Click the dropdown next to a conflicted file. The app will give you three distinct choices:
- “Use Modify/Theirs” (Remote): Overwrite your local changes with what was pushed to GitHub.
- “Use Mine” (Local): Keep your local edits and discard what was on GitHub.
- “Open in [Your Editor]”: Open the file to manually combine both pieces of code.
- If you open your editor, look for the conflict markers:
<<<<<<< HEAD (Your local frontend code) ======= (The server's backend code from GitHub) >>>>>>> origin/branch-name - Delete the markers (
<<<<<<<,=======,>>>>>>>) and edit the code so it looks exactly how you want it to look. Save the file. - Go back to GitHub Desktop, click Commit Merge, and then click Push origin.
Failed to push some refs
Messed Up Concurrent Branching Setup
This error occurs when you violate the workflow rules and accidentally create a branch (e.g., llmPlay) locally on your laptop after that exact branch was already created and pushed by the server (or vice-versa). Because both machines built independent histories, GitHub will block your push to protect the repository.
🛠️ Fix via Terminal CLI:
If you are working on the command line, you need to pull the remote branch, force Git to reconcile the unrelated histories, and merge them:
# 1. Ensure you are on the blocked branch
laptop$ git checkout <BRANCH_NAME>

# 2. Fetch the server's branch structure from GitHub
laptop$ git fetch --all

# 3. Pull and force Git to merge the independent timelines
laptop$ git pull origin <BRANCH_NAME> --allow-unrelated-histories

# 4. If any file conflicts appear, open your editor and resolve them manually.
# 5. Finalize the merge by pushing the unified line to GitHub:
laptop$ git push
🖥️ Fix via GitHub Desktop:
- Click the Fetch Origin button at the top of GitHub Desktop.
- The interface will detect the mismatch, and your “Push” button will transform into a Pull Origin button accompanied by a warning badge.
- Click Pull Origin.
- A prompt will appear asking how to handle the diverging timelines. Select “Merge the remote branch into my local branch”.
- If file conflicts occur, use the application’s built-in dropdown menu to choose your resolution preference (“Use Mine” or “Use Theirs”), or select “Open in Your Editor” to fix the code manually.
- Once the conflicts are cleared, click Commit Merge and then click Push Origin to safely sync both environments.
Resources
Following some useful resources to familiarize you with GitHub Desktop.
- Activity: Use the GitHub Desktop client
- Git basics
- Connecting your git repository with a remote server
- GitHub Docs
- How to revert a commit
- Understanding and resolving merge conflicts
- Stashing and rebasing
| Prepared by Mark Wassink, Rithika Ganesh, Ryan Chen, and Sugih Jamin | Last updated: September 19th, 2026 |
Acknowledgments: Gemini 3.5+ and 3.1 Pro were used to prepare the Git repo branching section of this guide. All structural concepts, technical details, and final editorial decisions remain entirely my responsibility.