Getting Started with Android Development
You can complete all the Android-version of the tutorials in this course on the Android emulator, you don’t need a physical device. The tutorials and programming assignments are targeted to Android 16 (API Level 36), though they all build to minimum SDK of API Level 34 (Androd 14). If your phone cannot run Android 14 or later, you can build the tutorials on the emulator; in which case, double check that your development host has enough resources (compute power, memory capacity, disk space) to run the emulator.
Minimum requirements?
Unfortunately I don’t have a minimum required host spec. The emulator ran fine on the following spec for the student reporting it:
- AMD Ryzen 5 3600 6-core 3.6 GHz
- 16 GB RAM
- 1 TB HD
- Windows 10 Education
whereas students with the following spec had trouble running the emulator:
- Intel Core i5 8th-gen
- 16 GB RAM
- 512 GB HD
- Windows 11 Home
COMPATIBILITY ISSUE:
Some vendors build more closely to Android hardware spec than others. Some phones are better provisioned than others. Some vendors add their own OS mods on top of Android, layering a new wrapper or changing the expected behavior of Android APIs. Given our limited resources, we have tested the tutorials only on plain Android APIs, as documented in the Android Developers web site. The last time anybody counted (2015), there were 24,000 different Android devices from 1,300 brands. Even Google doesn’t have the resources to evaluate compatibility on all of them. We know that the tutorials run on Google’s Pixel 4a or later phones. If you have phones from a different vendor, we cannot guarantee that your phone would be adequately provisioned, or built sufficiently to Google’s spec, to be able to run all of the tutorials. We can help you debug, but in the end the phone may simply be not up to spec. We simply don’t have the means (funds and time) to try out all available Android devices in the market to check for compatibility. Recall that all Android-version of the tutorials do run on the Android emulator, so you don’t need a physical device to complete the tutorials.
Languages
We will develop in Kotlin only, not Java. Google has switched to “Kotlin first” since Google I/O 2019 and Jetpack Compose requires Kotlin. For 3rd-party libraries and SDKs, Kotlin can co-exist seamlessly with Java. Android Studio automatically converts Java code pasted into a Kotlin file. You can also invoke Java to Kotlin conversion from Android Studio’s menu: Code > Convert Java File to Kotlin File.
The course does not support any cross-platform frameworks, including React Native and Flutter. All course projects must be built natively. If you are contemplating cross-platform mobile development, please consult our collection of articles on industry experiences with cross-platform solutions.
Developing Android app
We assume:
- you have a device or emulator running Android 16 (API level 36).
check version
To check your Android version, on your phone navigate to
Settings > (scroll all the way down) About phone > Android version. - you will develop only in Kotlin, not Java.
- you are using latest version of Android Studio
- your entire team should be on the same version of Android Studio and Android API level.
alternative IDEs
You can use a different IDE (such as VSCode or IntelliJ), though we’ll “support” only Android Studio.
Setting up Android Studio
Installation:
- Download Android Studio. Install and launch.
- On the
Welcomescreen, clickNext. - On the
Install Typescreen, chooseStandard, clickNext. - On the
Select UI Themescreen, select your theme and clickNext. - On the
Verify Settingsscreen, clickNext. - On the
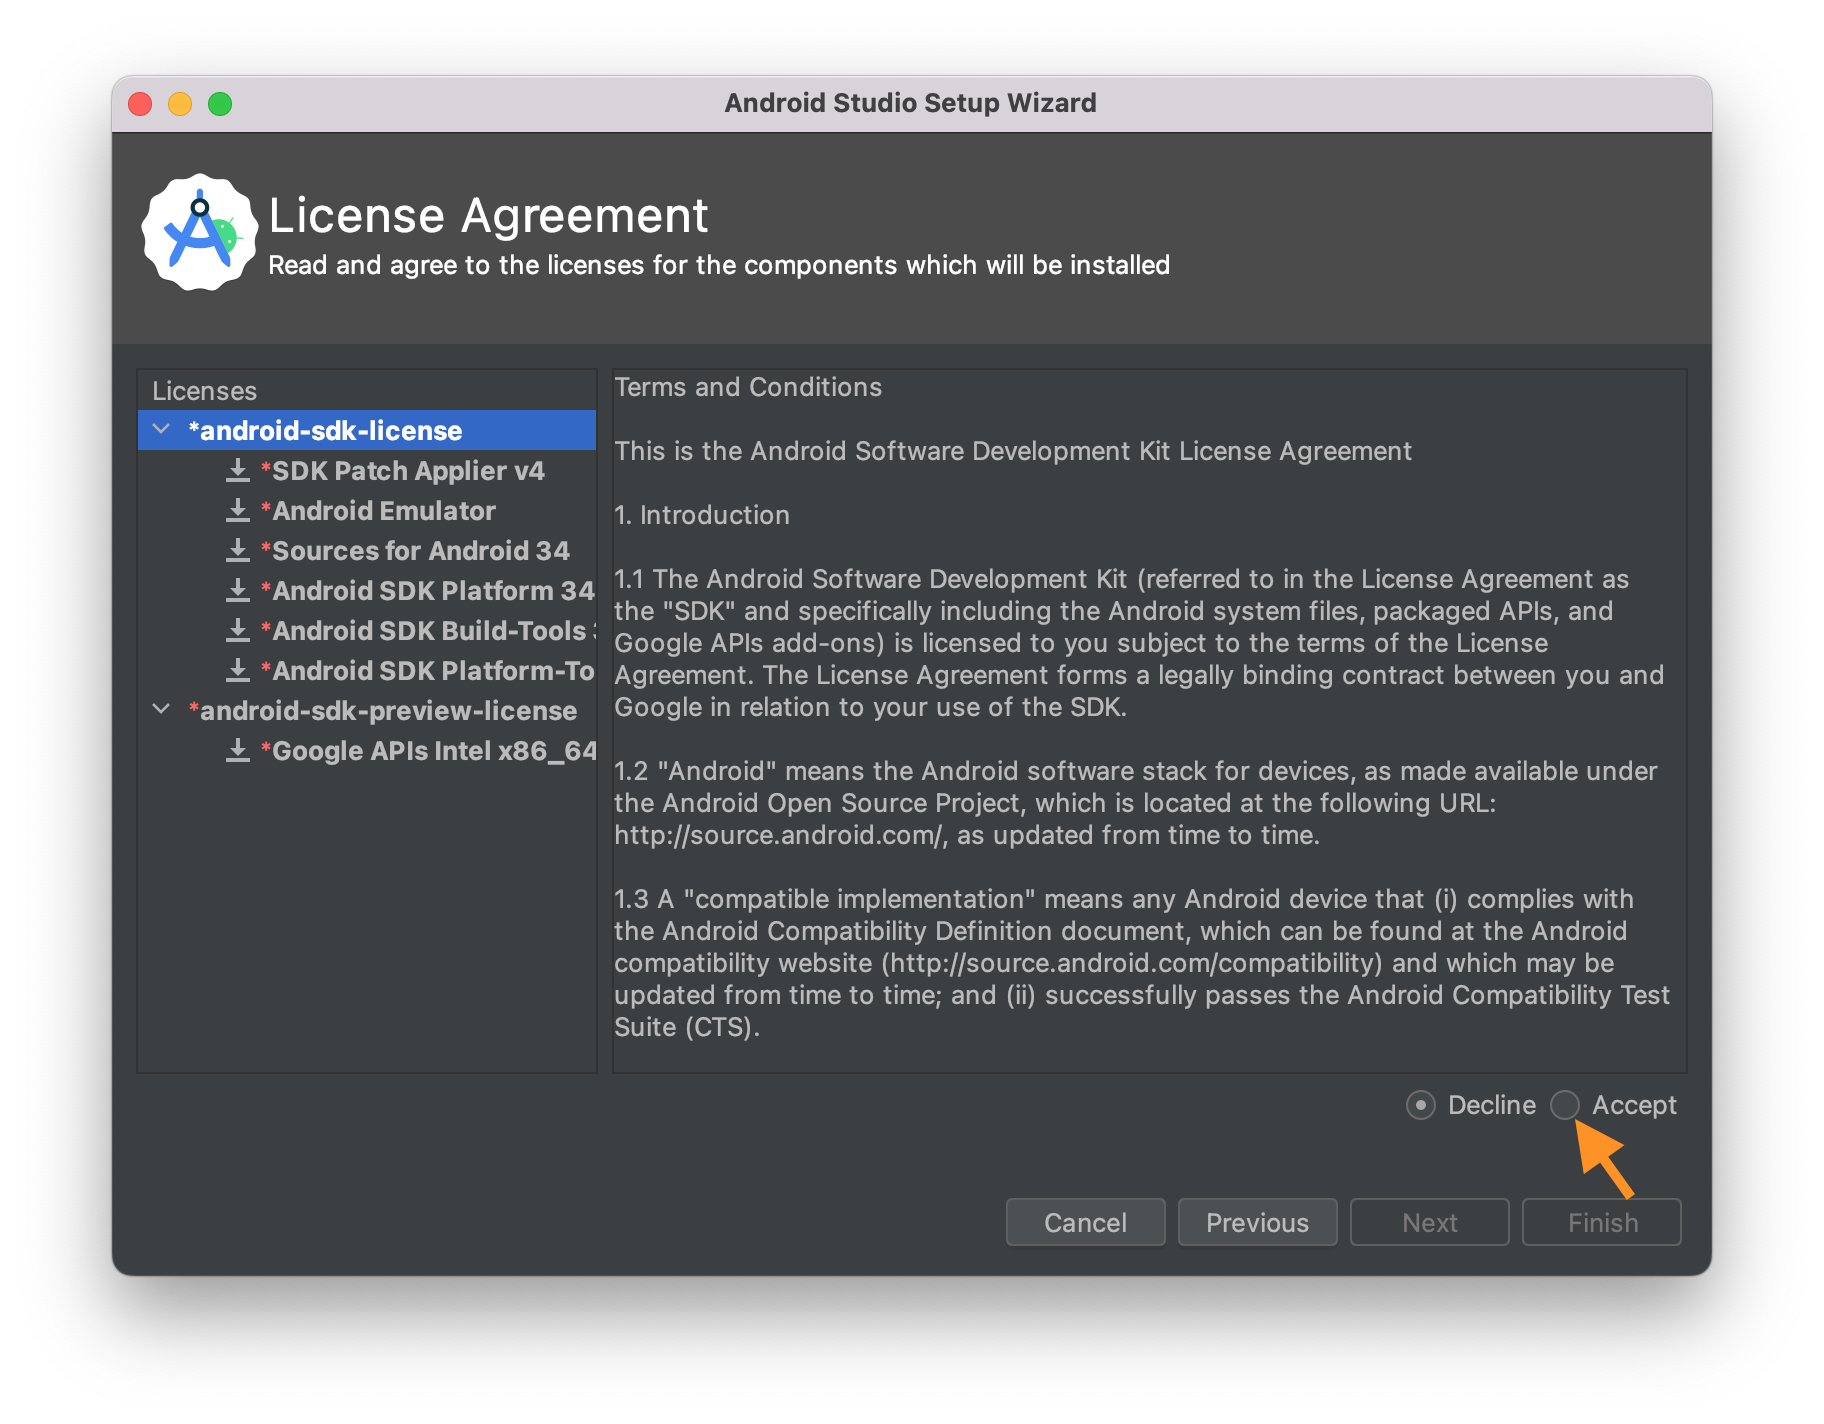
License Agreementscreen, select the first group (android-sdk-licensein the screenshot, may be different on your screen), clickAccept(screenshot). It is ok to download materials for Platform 34. - Still on the
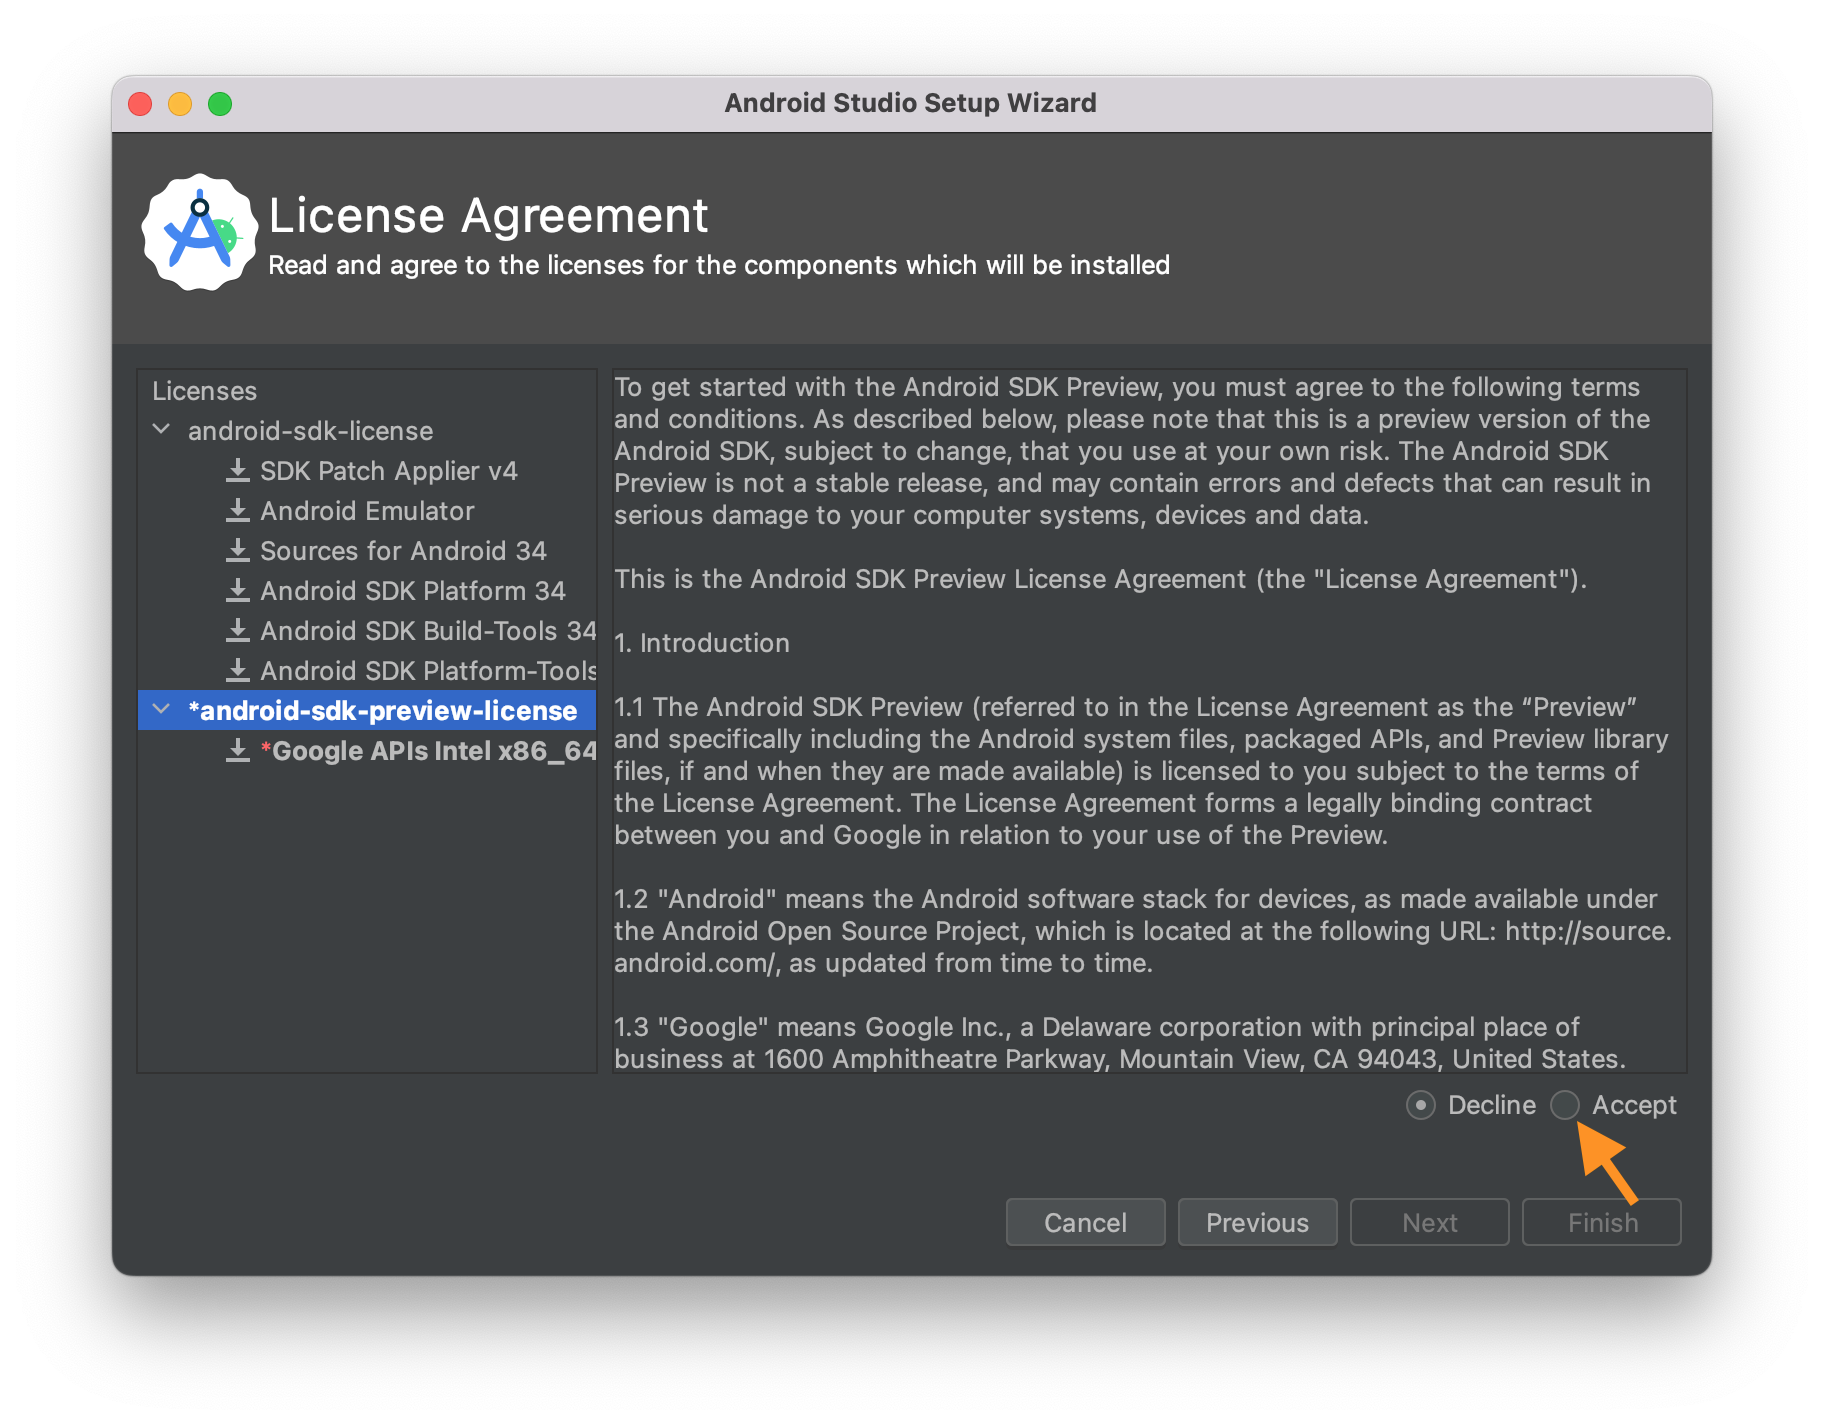
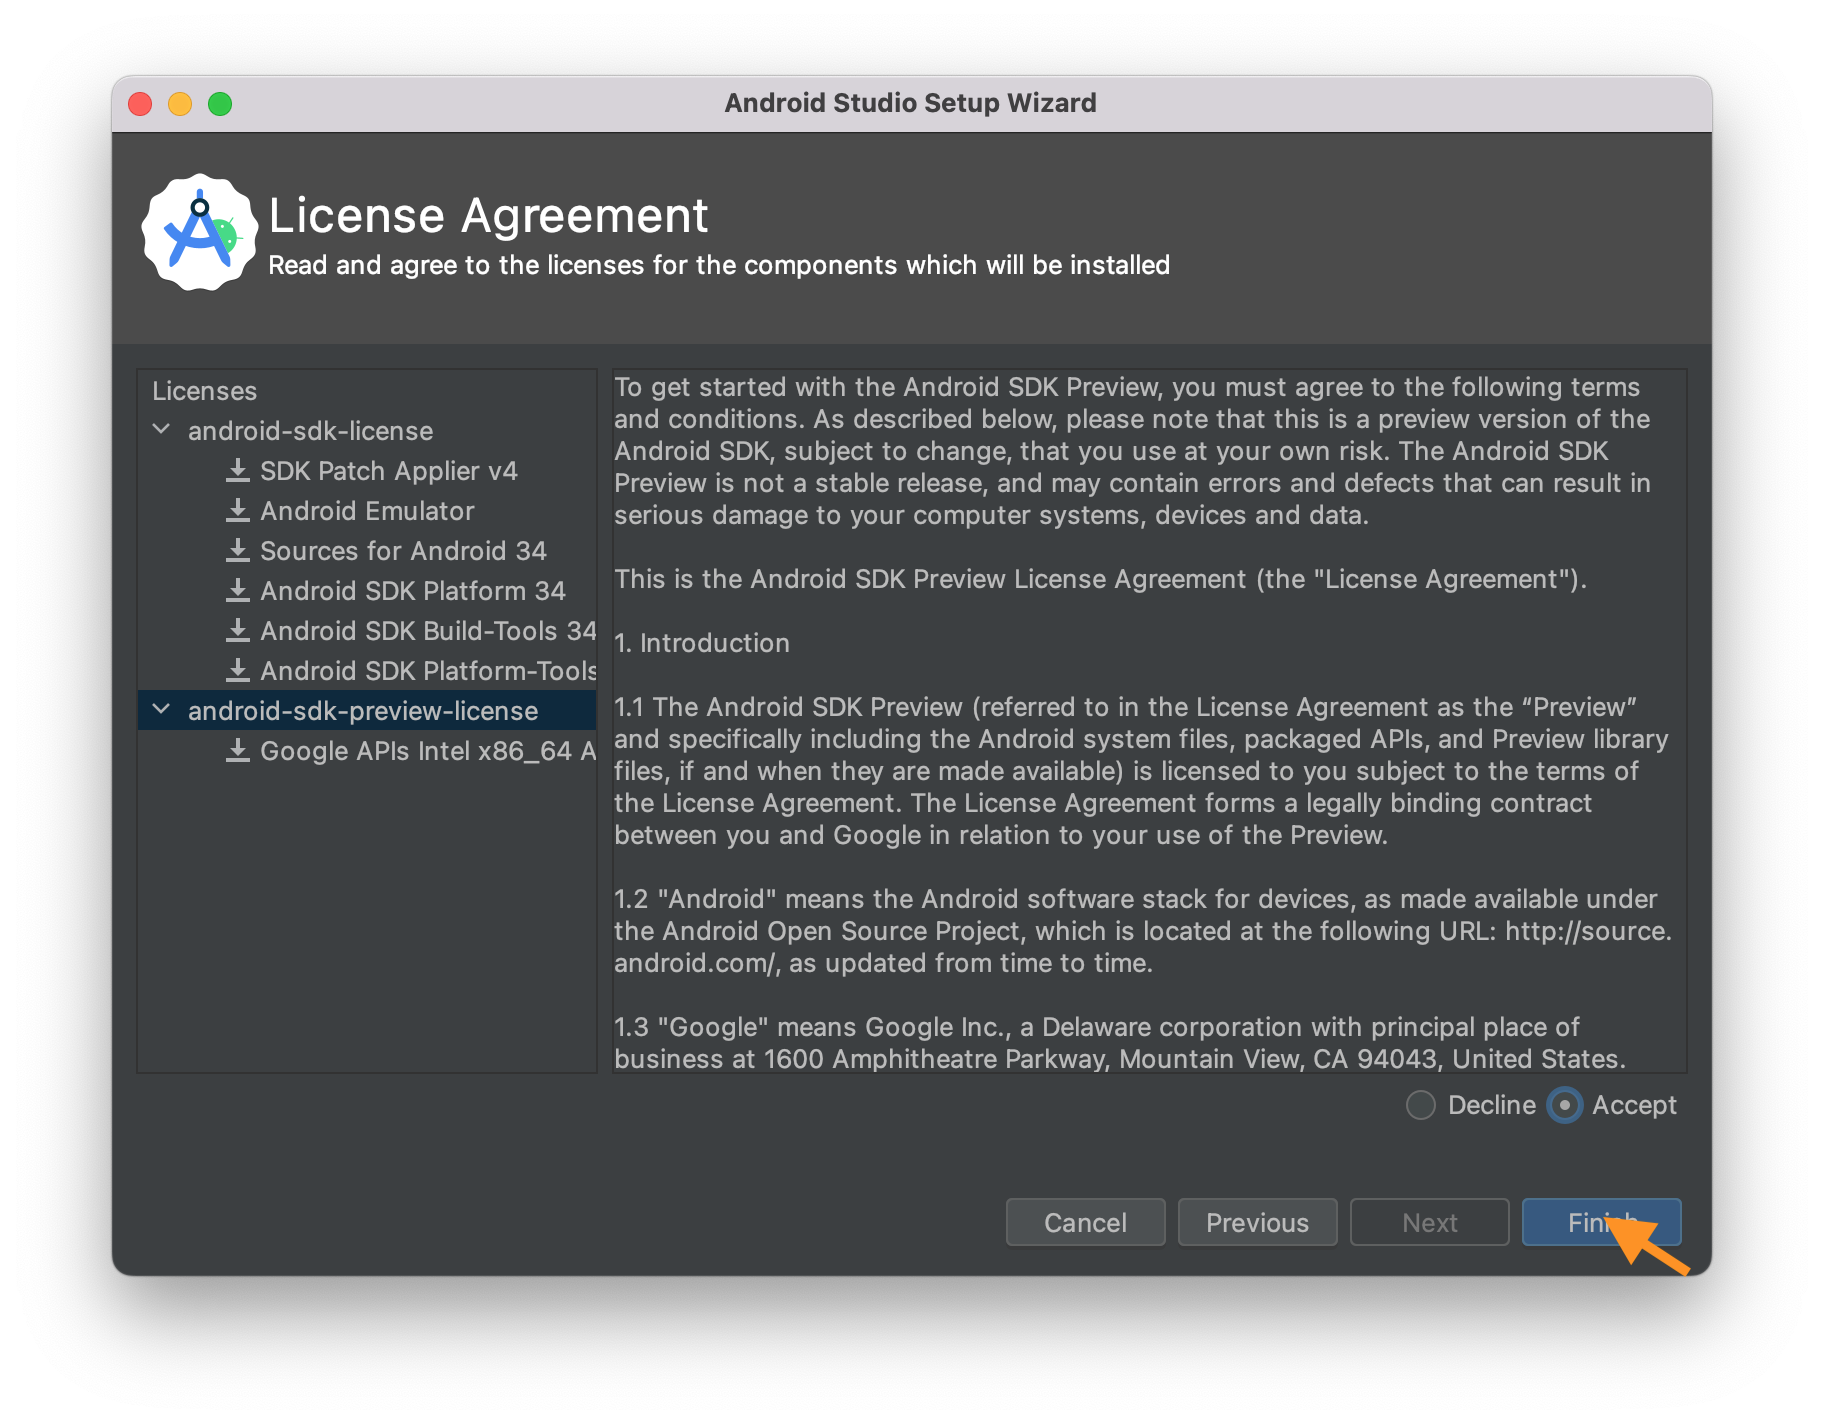
License Agreementscreen, select the second group (e.g.,android-preview-license), clickAccept(screenshot), if yourLicense Agreementscreen has a third and further groups, continue to select each and clickAcceptuntil theFinishbutton ungreys, clickFinish(screenshot). - On the
Downloading Componentsscreen, wait until downloading is completed, theFinishbutton ungreys, then clickFinish. - On the
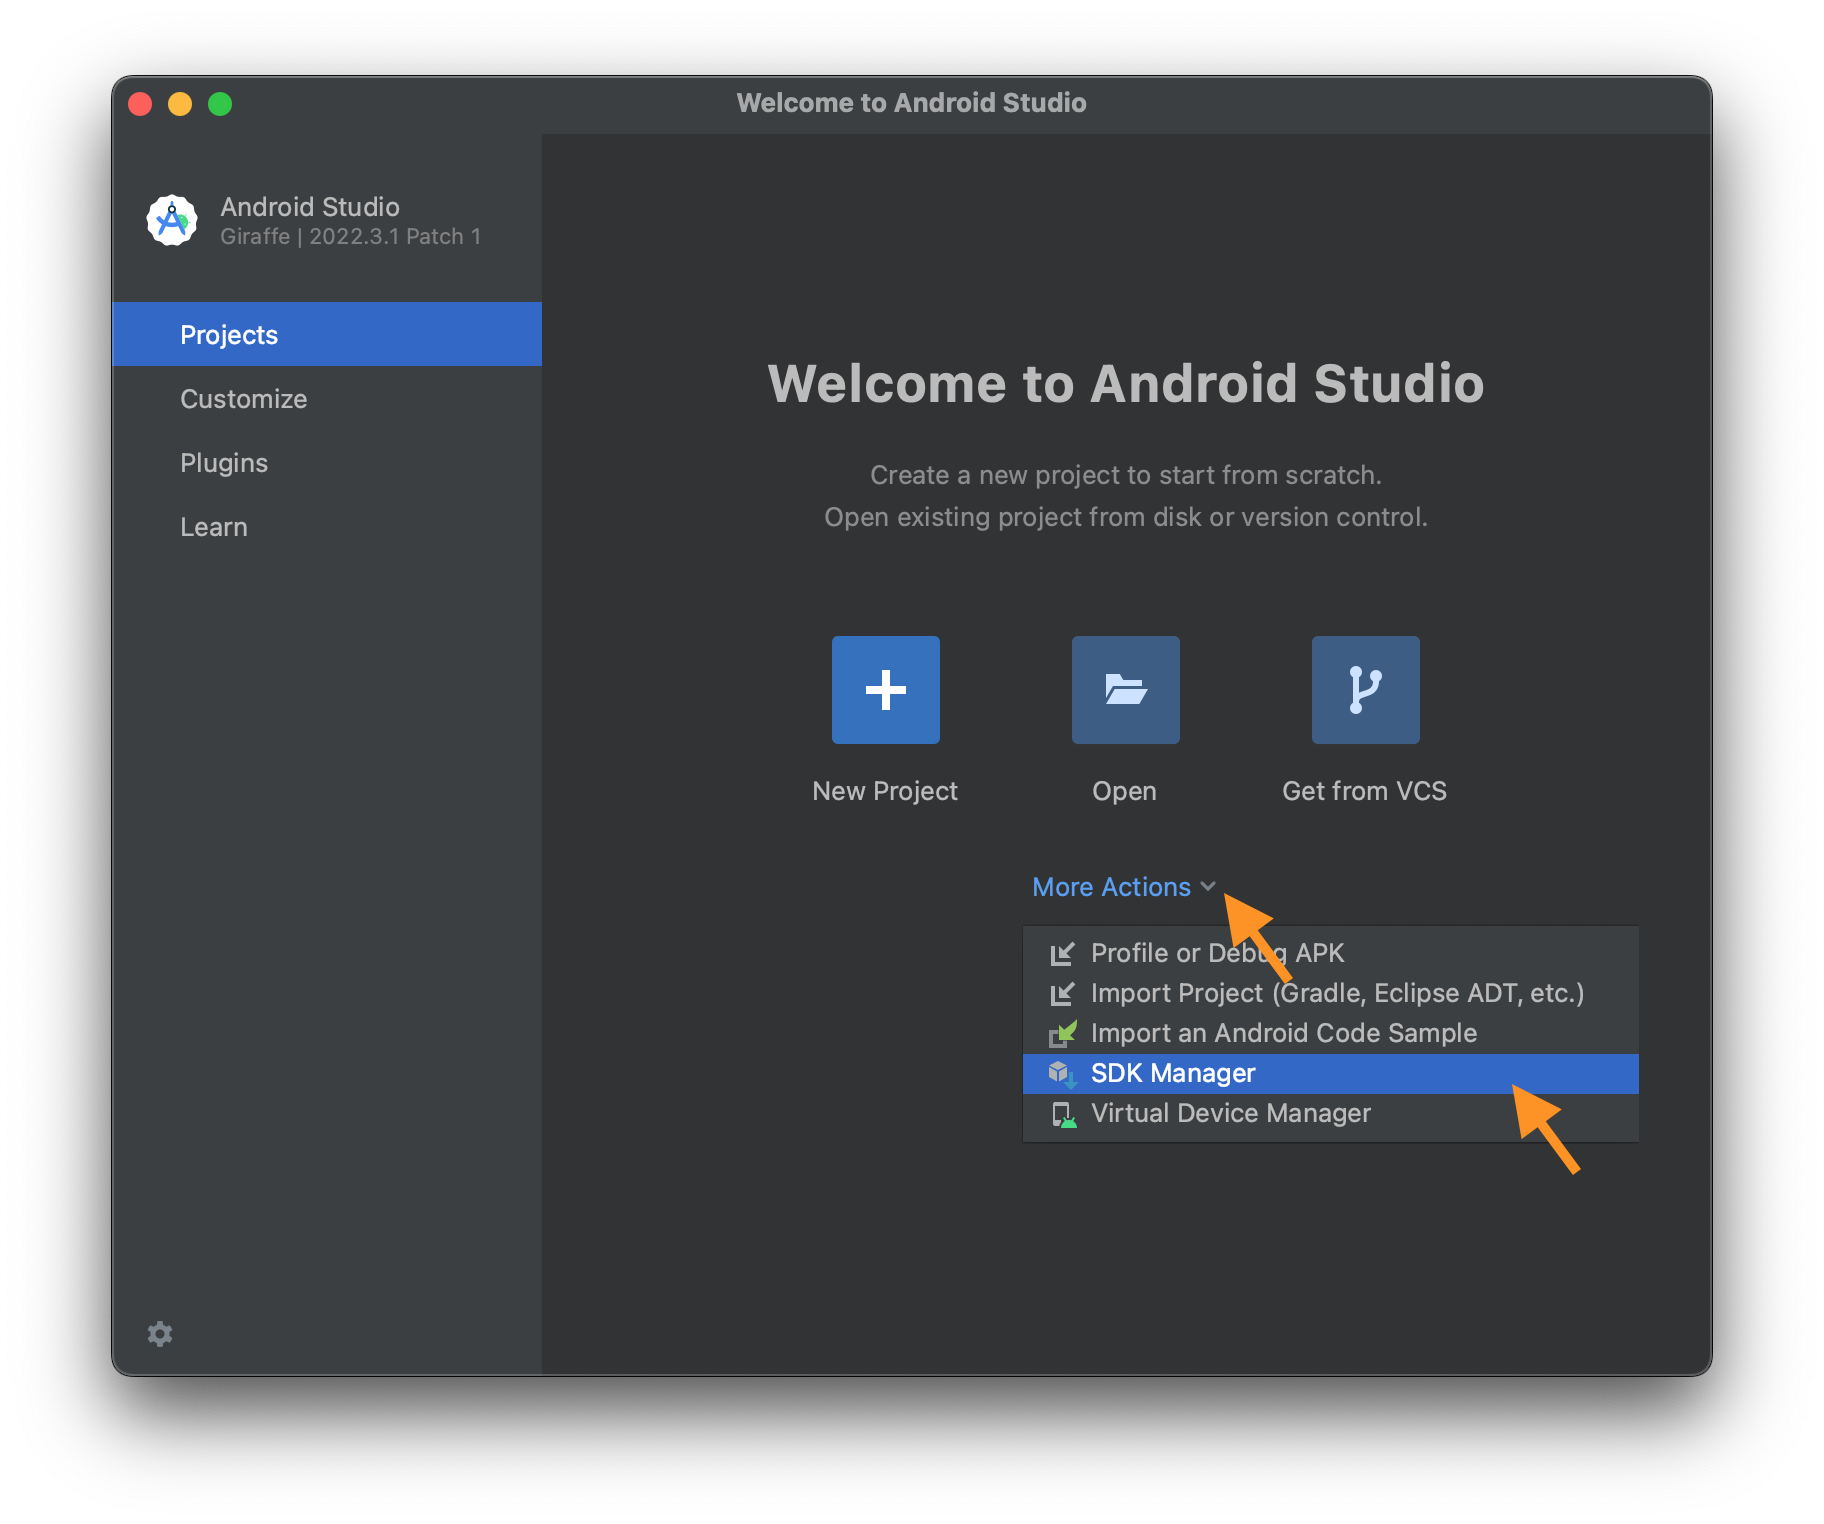
Welcome to Android Studioscreen, chooseMore Actio... > SDK Manager(screenshot).Alternatively, choose
Tools > SDK Manageronce passed the Welcome screen. - On the
Languages & Frameworks > Android SDKscreen, checkAndroid 16.0. Do not clickApplynorOKyet. - Staying in the
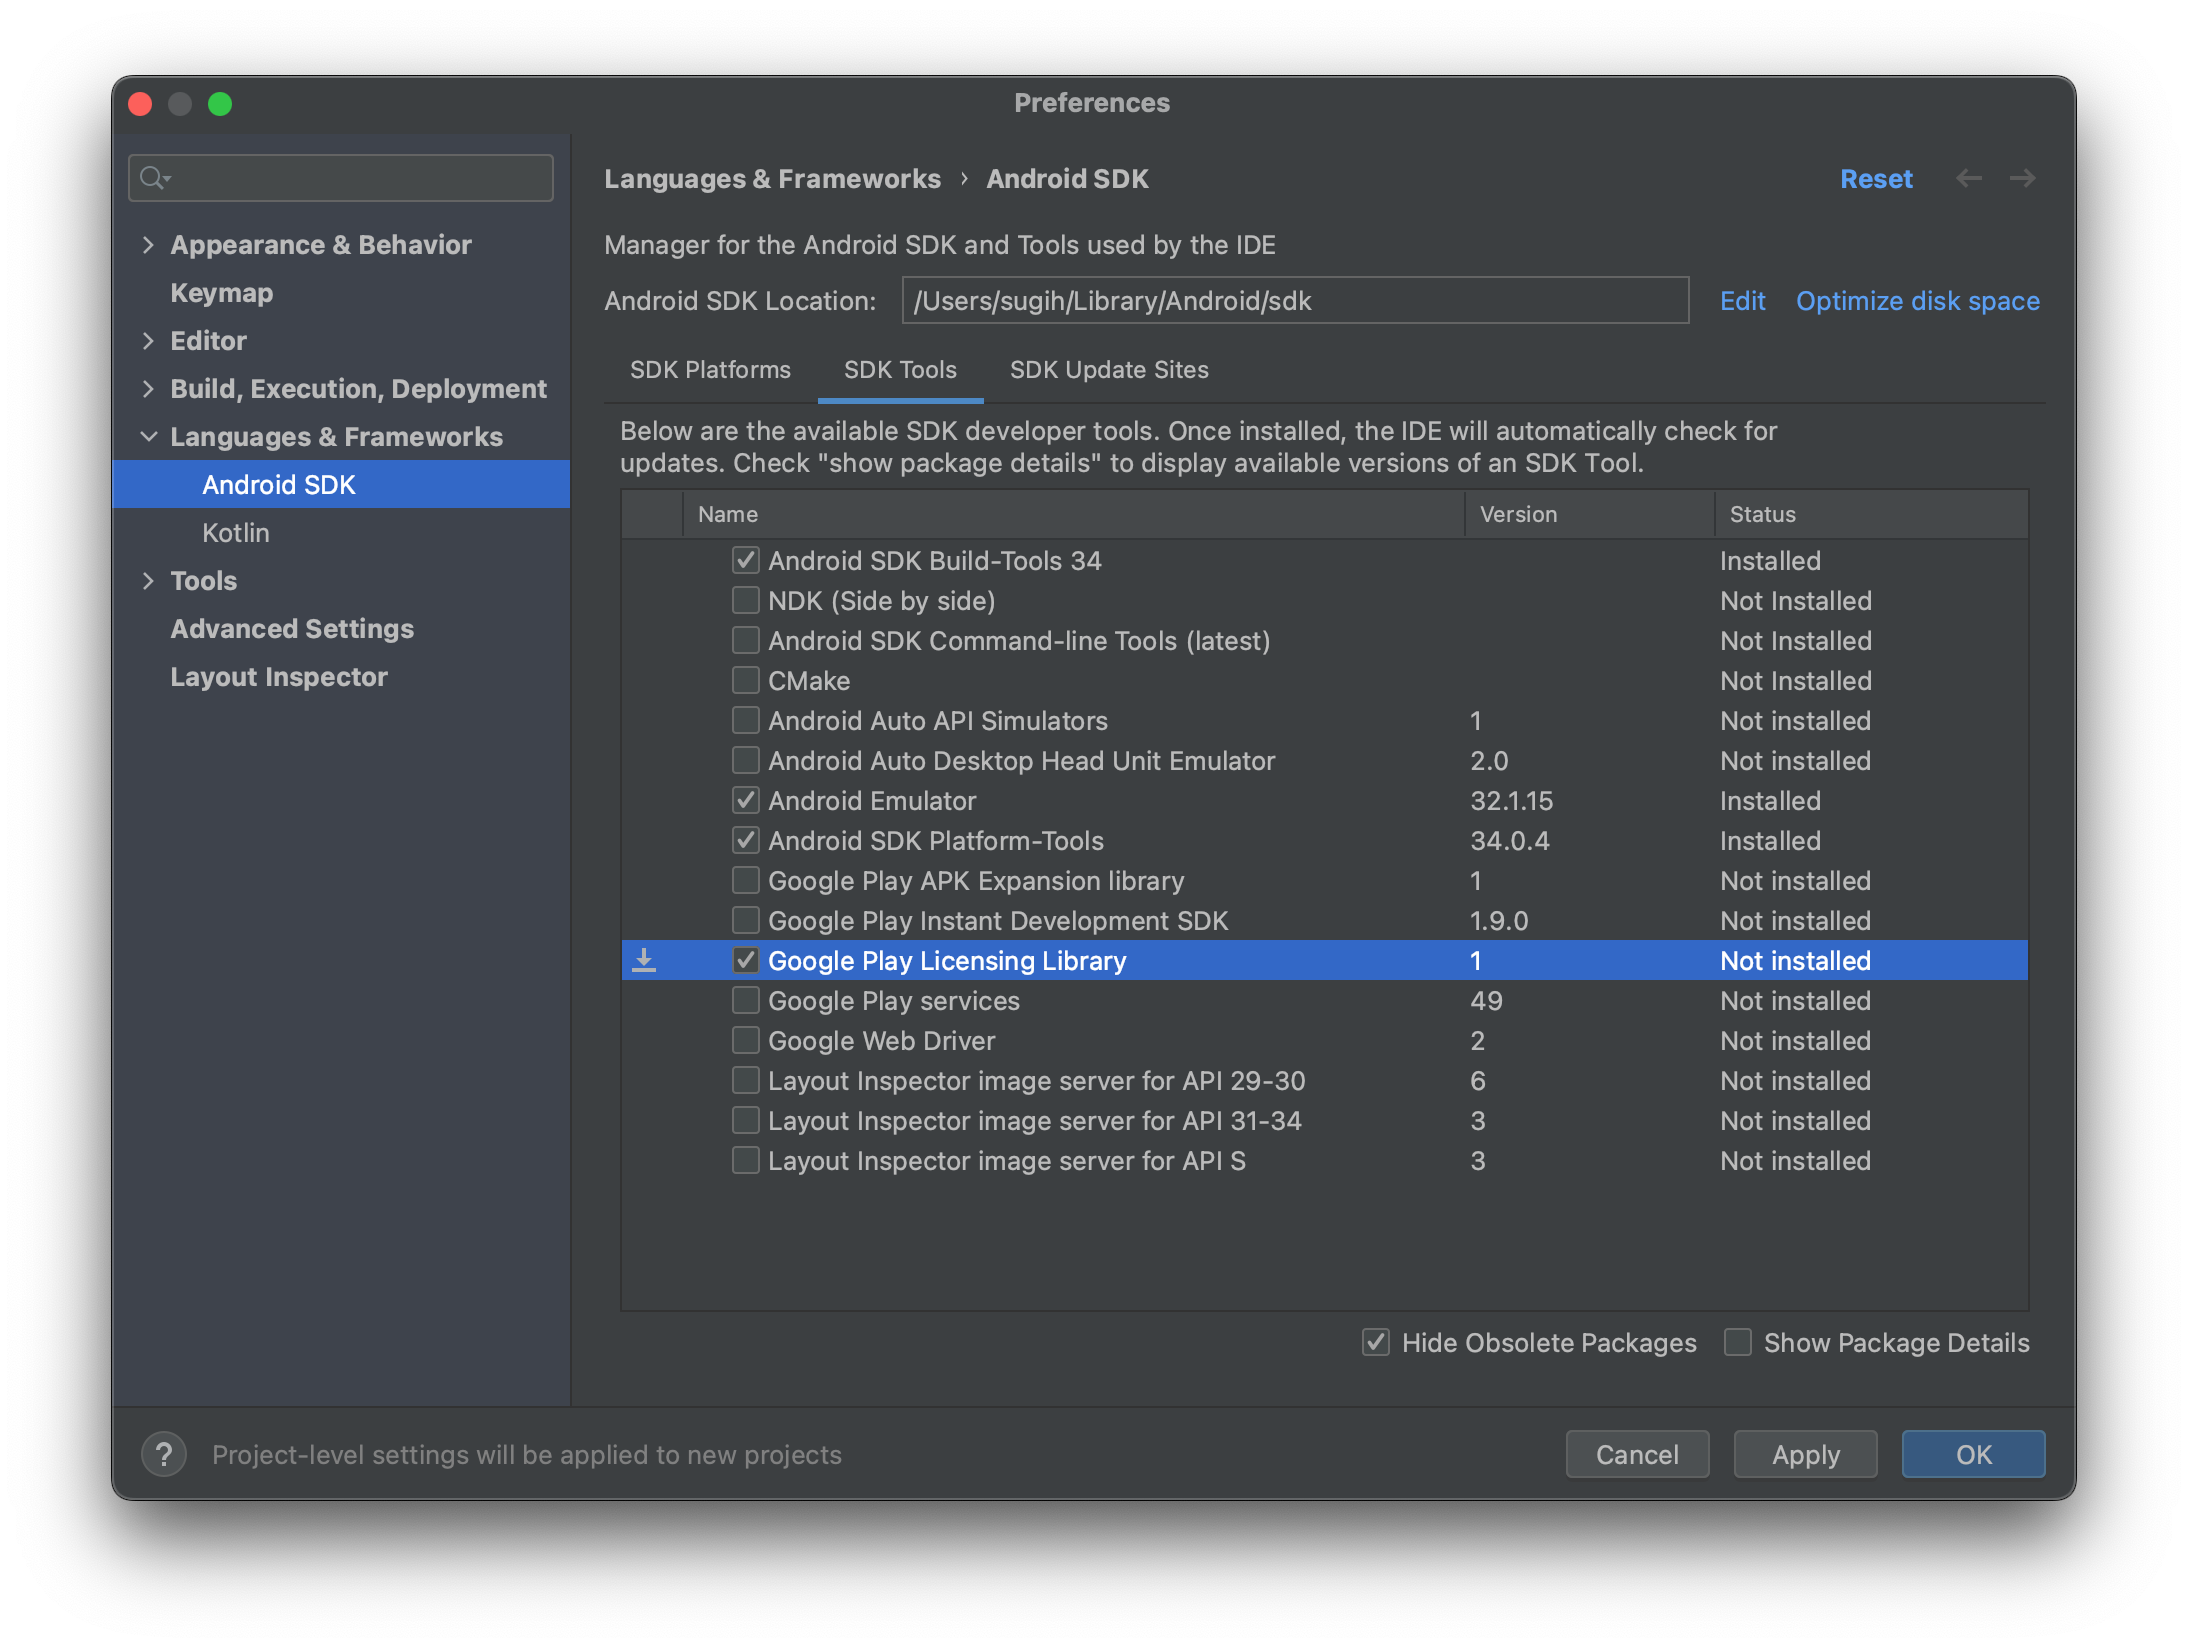
Languages & Frameworks > Android SDKscreen, click on theSDK Toolstab and checkGoogle Play Licensing Library(screenshot). Now clickApply. - On the
Confirm Changescreen, clickOK. - On the
SDK Component Installerscreen, once installation is completed and theFinishbutton ungreys, clickFinish. - On
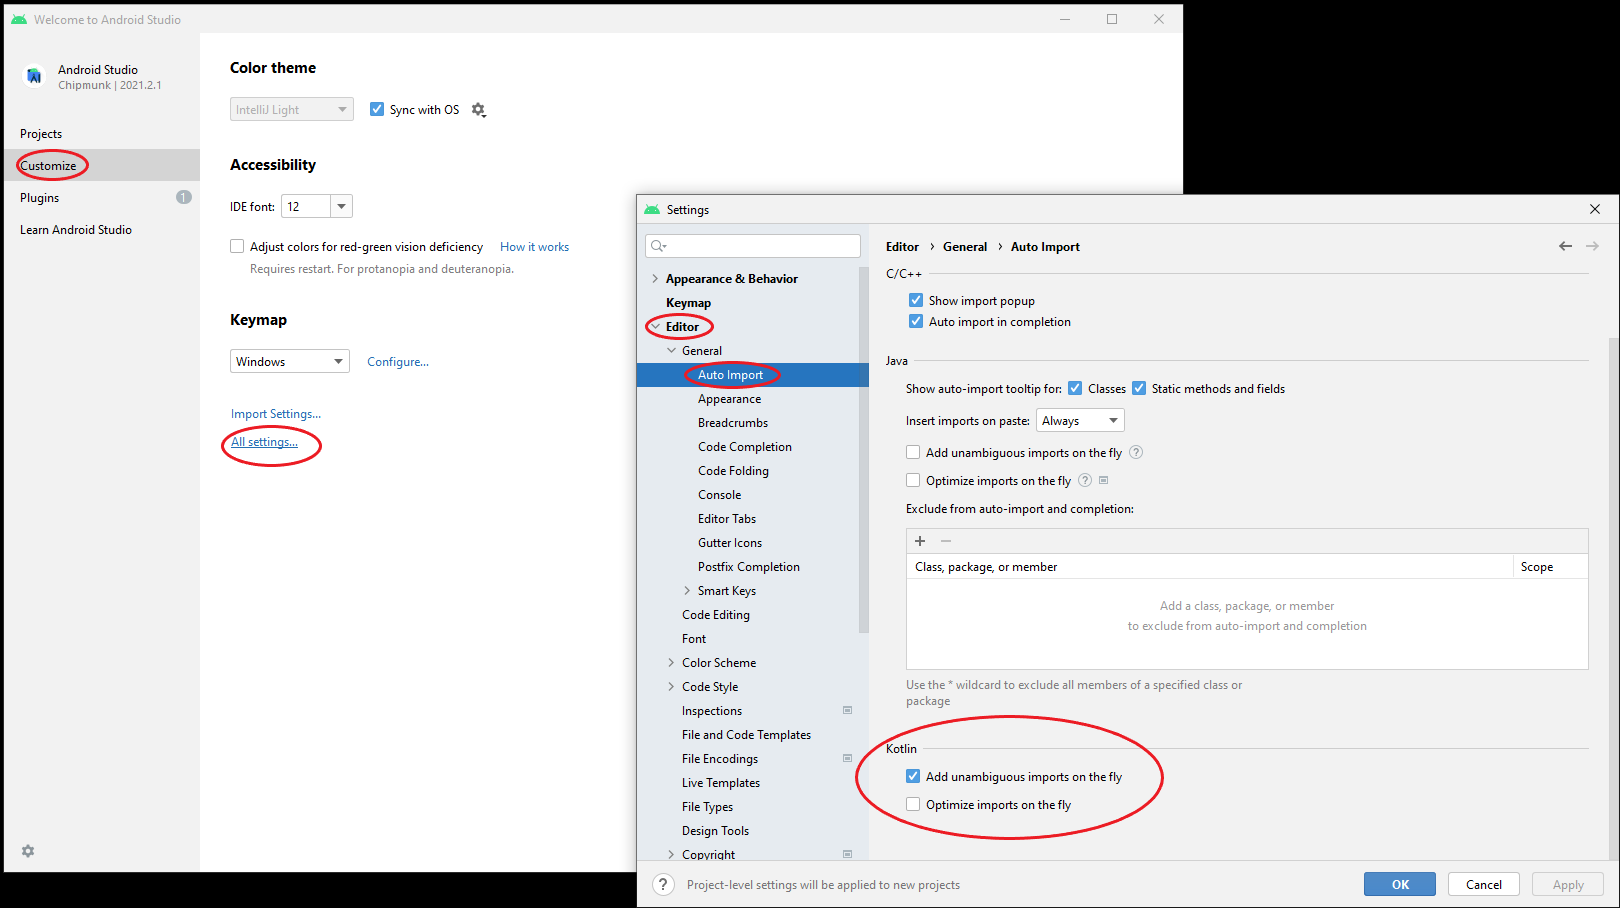
Android Studio [or File] > Preferences [or Settings]:On Windows, from Android Studio’s Welcome screen, navigate to
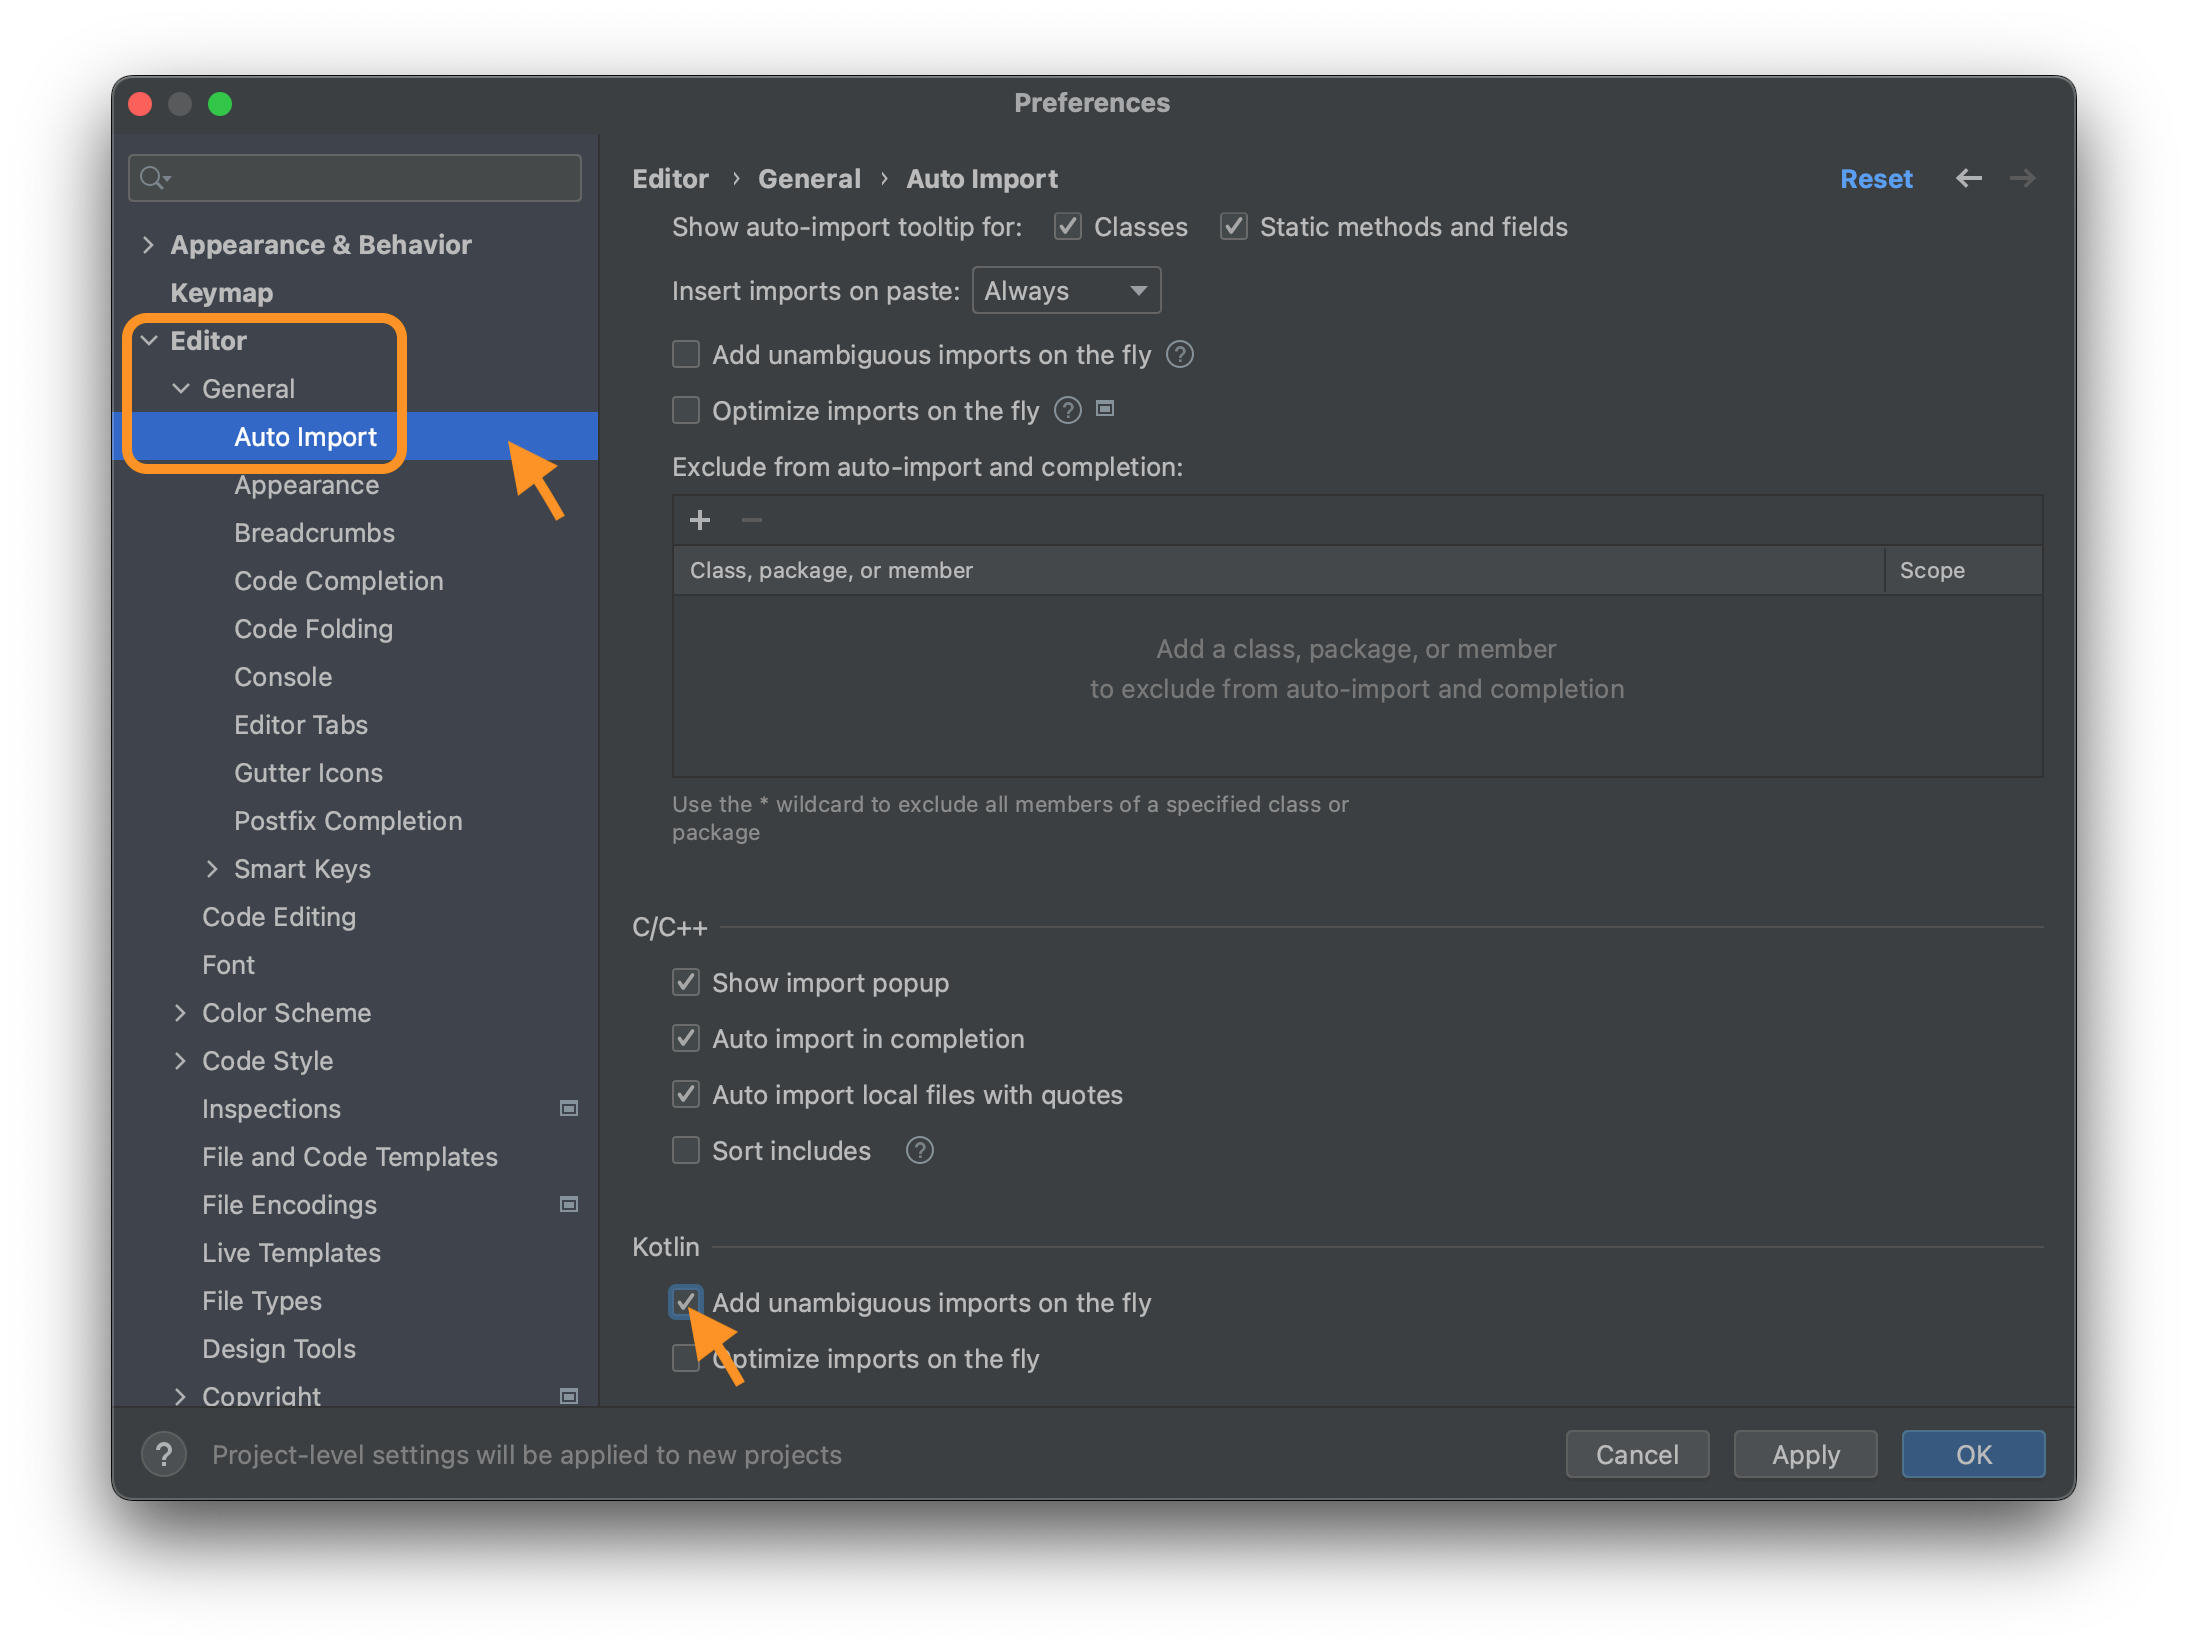
Customize > All settings...(screenshot) or from the main menuFile > Settingsif past the Welcome screen.Navigate to
Editor > General [drop down] > Auto Import, then in theKotlinsection near the bottom of the pane checkAdd unambiguous imports on the fly(screenshot). Do not checkOptimize imports on the fly.With auto import enabled, as you enter code, Android Studio will automatically detect and determine which library you need to import. It will then prompt you to hit the Alt-Enter or Opt-Enter key combination to automatically import said library. Go ahead and import the suggested libraries.
Sometimes, there are multiple library choices and Android Studio would have you choose. Most of the times the choice will be rather obvious (don’t choose the Audio library if you’re not implementing Audio, or do pick the one with the word
composeif you’re using Jetpack Compose, for example). We will provide a full list of imports as an Appendix to each tutorial spec, so you can double check when in doubt. Or you could cut and paste all of the imports into your source files before any code. If you choose to cut-and-paste, be sure that you do NOT checkOptimize imports on the fly, otherwise Android Studio will automatically remove them all for being unused and therefore unnecessary.Navigate to
Editor > UI Tools > Editor View Mode: > Kotlin:on theDesignbutton, click the drop-down menu and selectCode.
Missing essential plugins error
On Windows, if Android Studio would not launch and complains of Corrupted Installation and Missing essential plugins, delete the file C:\Users\%USERNAME%\AppData\Roaming\AndroidStudio*\disabled_plugins.txt [thanks C. Goh F22].
To run your app on your physical device, see the Running and debugging on device section below. To use the Android emulator, see the Running and debugging on an emulator section below.
About Android Studio
- Depending on the available resources of your development host, Android Studio can be slow doing the following:
- Gradle syncing and project indexing
- Gradle build can be especially SLOW (What is Gradle?)
- Code may sometimes be underlined while correct as it takes time to index
Source: reddit - When references are unresolved for no good reason, try, in succession:
Build > Clean Project Build > Rebuild Project File > Sync Project with Gradle Files File > Invalidate Caches/Restart... - If Android Studio does unexpected things, e.g.,
Log.d()doesn’t print any debug messages, restart and see if malbehavior persists.
For Android Studio to run a little faster:
- Disable all non-essential plugins. We have only the following (in order of appearance) enabled:
- Smali Support
- Gradle
- Groovy
- Kotlin
- Properties
- Toml
- JUnit
- Anroid SDK Upgrade Assistant
- IntelliLang
- Jetpack Compose
- WebP Support
- Give it as much memory as you can afford:
Android Studio [or File] > Settings [or Preferences] > Appearance & Behavior > System Settings > Memory Settingsmax out IDE and Daemon heap sizesDon’t forget to hit
Applybefore hittingOKfor your changes to take.
Android Studio panes
- Left: Project directory, structure
- Right: text and layout/design editors
- Bottom: build result, debugging output
TIPS:
- A run down of various Android Studio’s
View > Tool Windows, which also lists their keyboard shortcuts:- Project: the project navigation pane: the left pane.
- Run: if you use
println()in your code, it prints out on theRunpanel. - Debug:
println()also outputs here, along with a lot of other messages from Android’s subsystems. If your app crashes, you can view the stack trace here along with the offending lines in your source code. - Problems: compile-time errors
- Logcat: output of
println(),Log.d(), andLog.e(). You can specify filter to show only certain messages. - Build: build error, library linking error.
- Some useful keyboard shortcuts.
- For less clutter, especally on a small screen, you may want to disable everything in
View > AppearanceexceptNavigation Bar. - On the left pane, under the “more” (three dots) icon, confirm that
Appearance > Hide Empty Middle Packagesis selected. - Then, under the same “more” icon, select
Behavior > Open Files with Single ClickandBehavior > Always Select Opened Fileto make Android Studio feels a bit more responsive. - Mouse over an API will pop up the API’s documentation
- The filenames on the navigation pane change colors according to whether it has been modified, committed, etc.
different screenshots
Depending on your version of Android Studio, the screenshots in our documentations may not look exactly the same as what you see on screen. If you are completely lost and cannot make sense of the screenshots, please consult the teaching staff.
See also 7 Android Studio Usage Tips for more productive use of Android Studio and Google’s Meet Android Studio for a thorough reference.
Running and debugging
On device
To enable USB debugging, on your Android phone tap on Settings > About Phone [> Software Info(rmation)] > Build Number seven times (and click your heels three times?) to enable the Developer options. Turn Developer options on and then turn on Settings > System > Developer Options. Turn on both Use developer options and USB debugging (and optionally Wireless debugging).
Android Studio supports WiFi pairing for debugging, which you activate using a QR code or pairing code. If Android Studio cannot detect your device, you can add it manually on the command line. If you don’t want to use a QR code, you can connect your device to Android Studio over WiFi using the plug-in ADB Wi-Fi which requires your phone to be connected by USB cable to be paired initially. For me, the only thing that works is manual pairing.
If you prefer to debug over a USB cable without WiFi, connect your device to your laptop. Android Studio should automatically recognize your device and use it to run your app. Click play to build and run.
See the Android Developers site for explanation of the remaining Developer options, though you can safely skip it at this point, except to turn on Stay awake.
Simulate Location
To simulate location on device, there are multiple apps in the Google Playstore that allow you to set fake GPS location at the same time you have your app running. For example, “Fake GPS” developed by “ByteRev” has no ads (last I checked). Once you’ve installed the app, go to Settings > System > Developer options > Select mock location app and select the app. In the app, search for the desired simulated location and tap the play button. When your app reads device location, it should see the simulated location. You can go back to the fake GPS app to select a different simulated location and it should automatically be reflected in your app without restarting. Tap the pause or stop button in the fake GPS app to stop simulating location.
On an emulator
- Start the
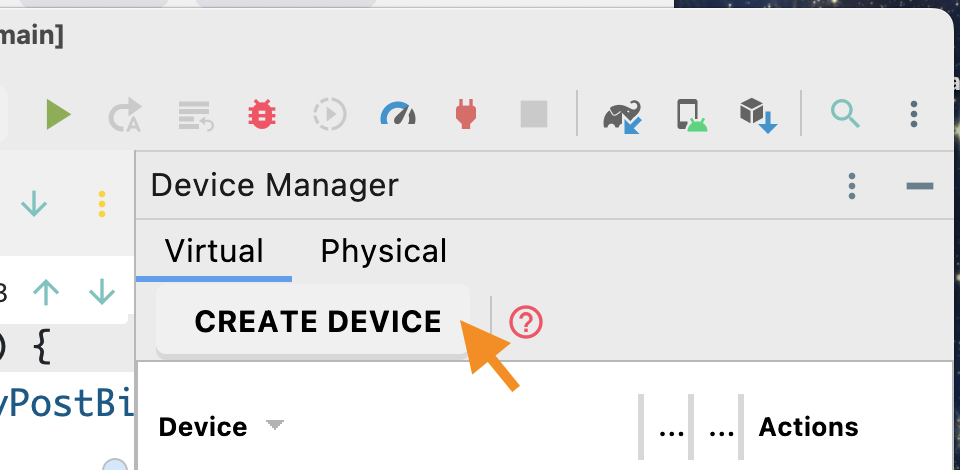
Device ManagerfromTools > Device Manageron Android Studio’s main menu bar. - The left pane should open up on Android Studio. On the left pane, click
Device Manager > Virtual > CREATE DEVICE“button” (screenshot). - Pick a
Phonedevice listed with “Play Store” enabled and clickNEXT(screenshot).Be sure to pick a device listed with “Play Store” enabled, otherwise your emulator will not work for all tutorials.
by modifying config.ini
You can also enable
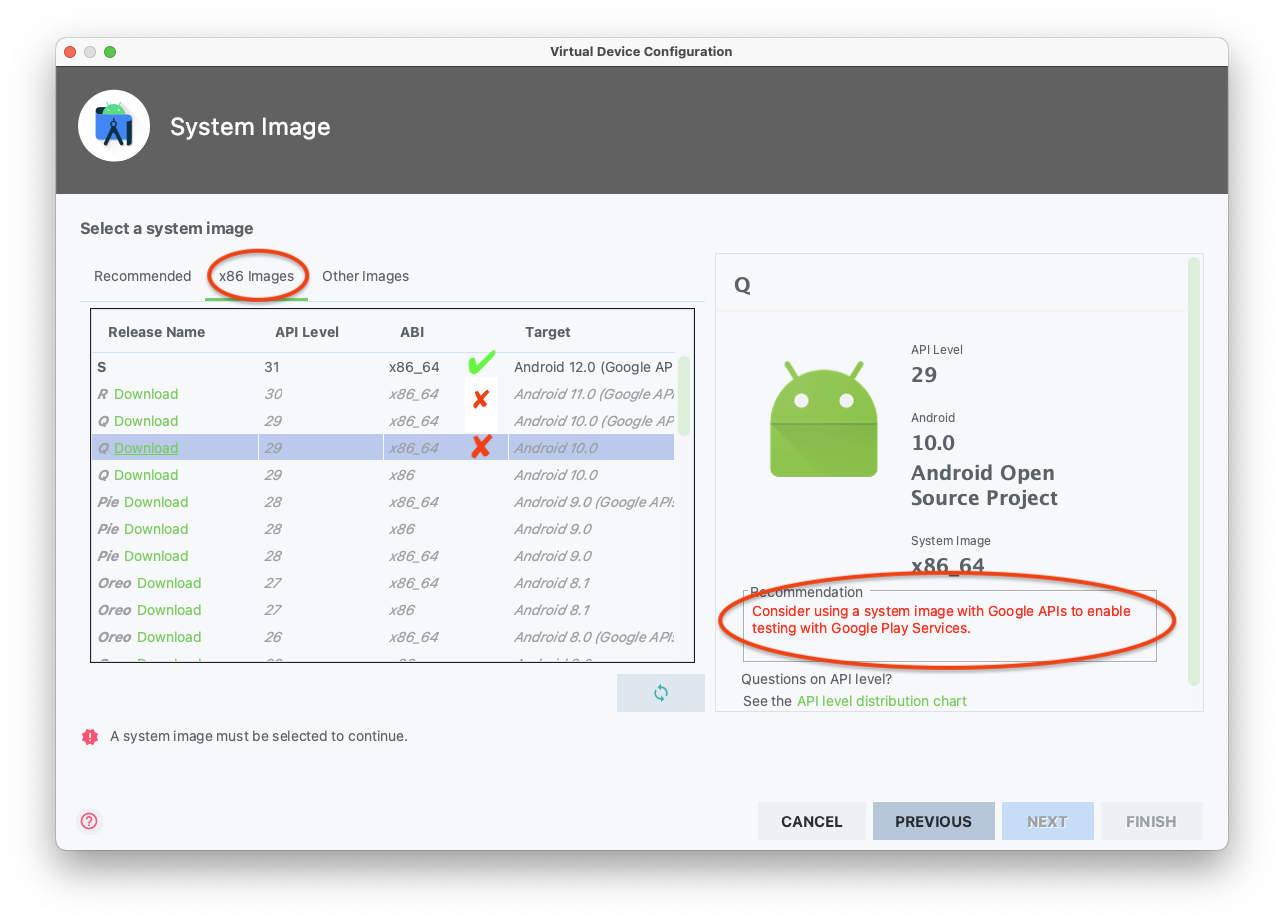
Play Storemanually for your device of choice by following the instructions in this stackoverflow article. - Choose a system image. Choose EXACTLY API Level 36. Choose a system image listed with “(Google APIs)”. Click on the word
Downloadand then clickFINISHandNEXTwhen done (screenshot). - Close the
AVD Managerscreen
Developer option on emulator
There shouldn’t be a need to turn on the Developer option on the emulator for any of the tutorials in this course, but in case you do need to turn it on, tap on Settings > About Phone > Build Number seven times and set Settings > System > Developer options > Use developer options on [thanks R. Ma F22].
If your Android emulator terminated unexpectedly and you have non-ASCII characters in your username, follow this stackoverflow answer to store your emulator on a path with only ASCII characters [thanks Zhou T., W22].
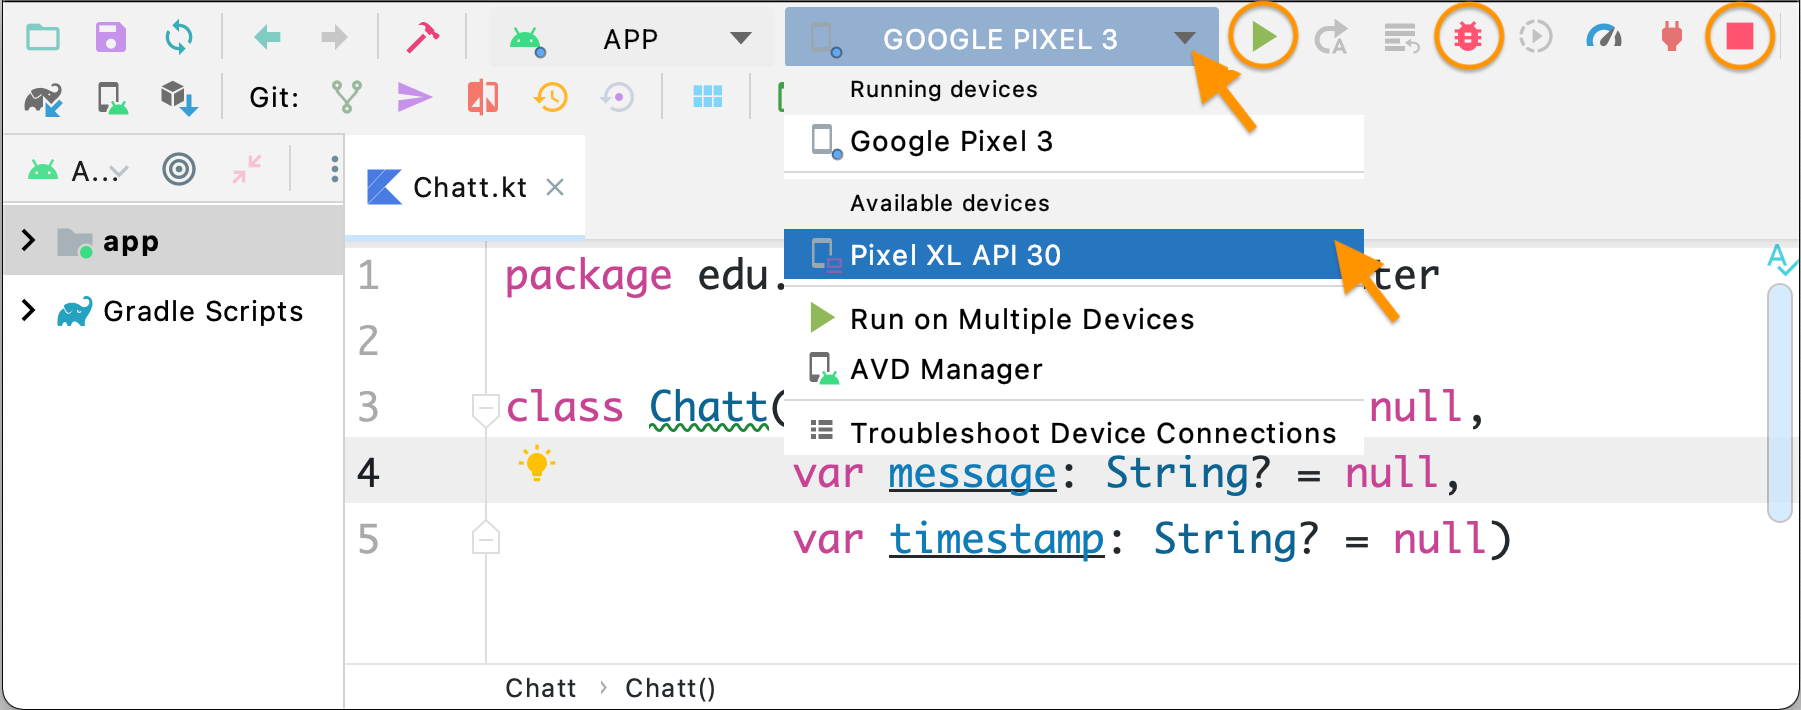
Back in Android Studio, make sure your virtual device is selected in the box next to the green play button (screenshot).
To run your app
- Hit the green play button
- Play button changes icon to reload icon
- To see the log, choose from the main menu
View > Tools Window > Logcat - Click the stop button (seven positions to the right of the play button) on Android Studio to close the app (not the emulator)
To debug:
- Instead of the play button, hit the bug button
- To view the debug output, choose from the main menu
View > Tools Window > Debug(this menu item shows up only when you’re debugging a process)
Running the tutorials on the Android emulator
If you have problem running the emulator, check out Troubleshooting and known issues for Android Emulator and system images.
Chatter and Images
There is no special set up necessary to run the basic Chatter and Images tutorials. The virtual camera on the emulator captures a stock scene for both photos and videos.
Looks like videos captured on the emulator can only be played back on Android. In particular, we cannot play them back on iOS devices nor on QuickTime Player (incompatibility with the narrowband H.264 codec used?).
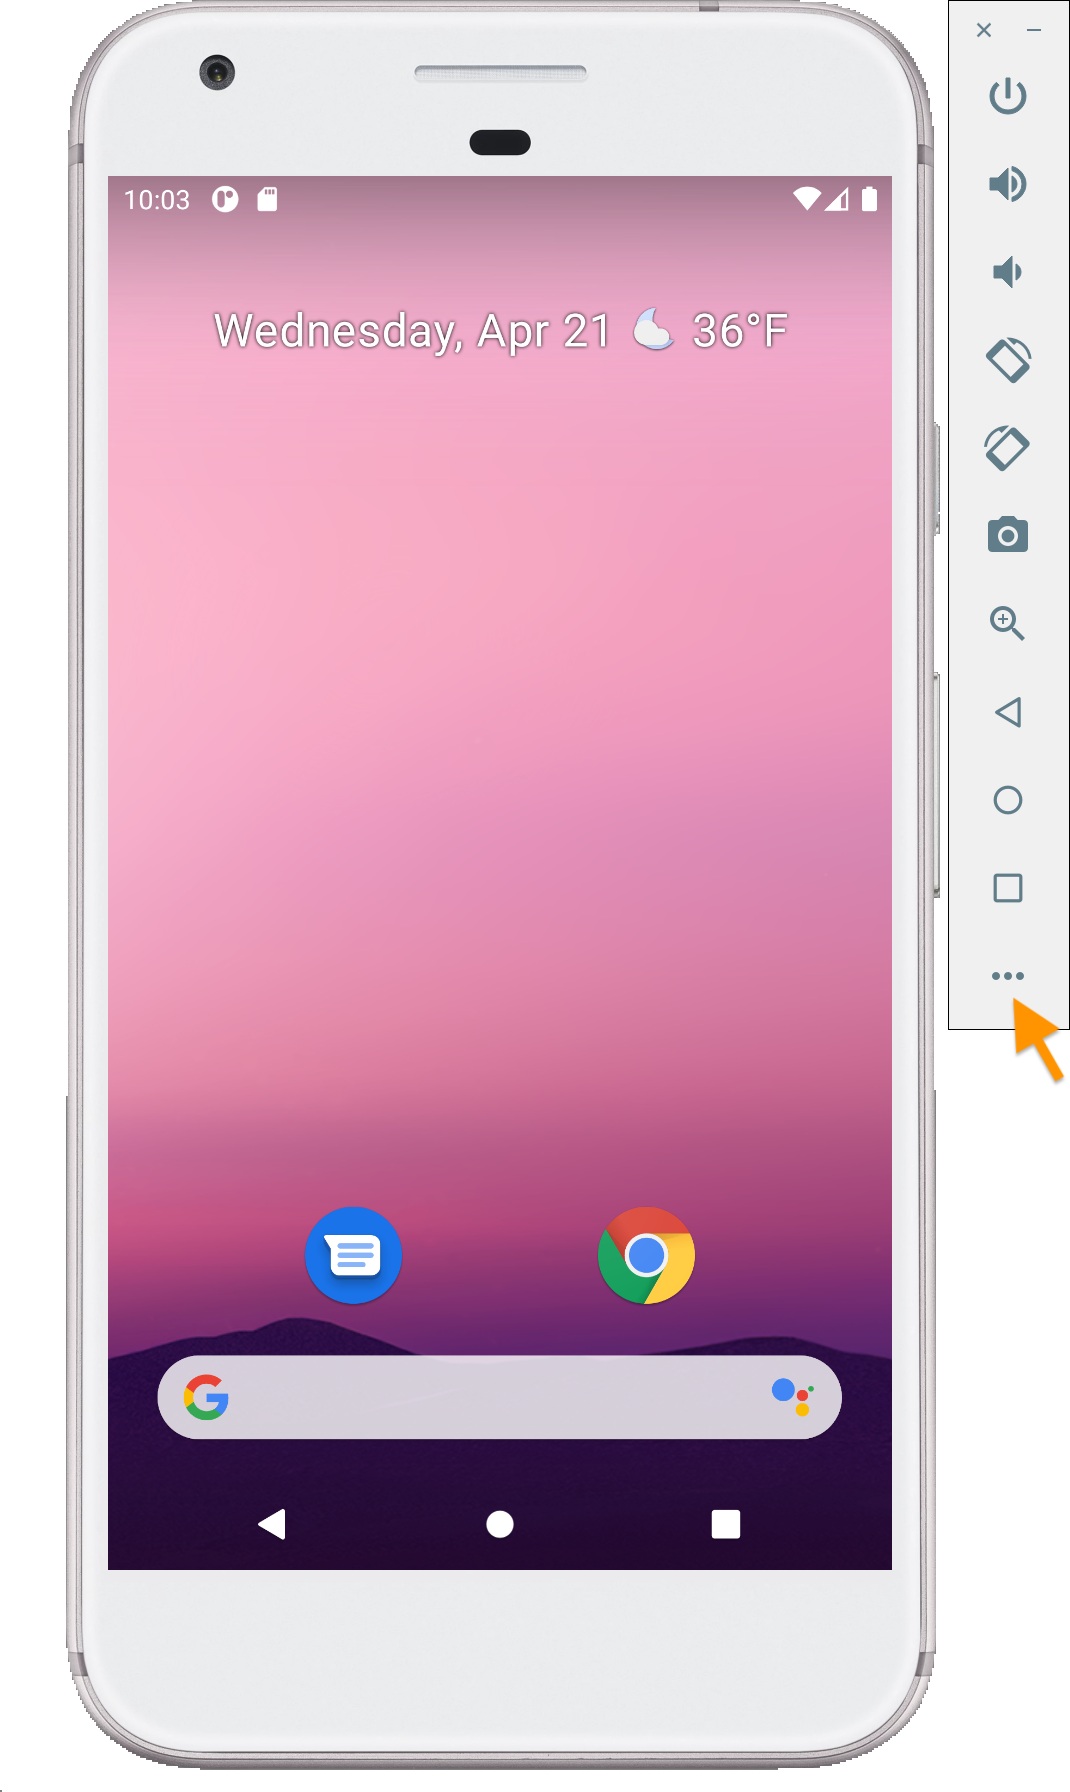
To use the emulator with the other tutorials, you need to access its Extended controls: click on the ... at the bottom of the right menu bar (screenshot).
Maps
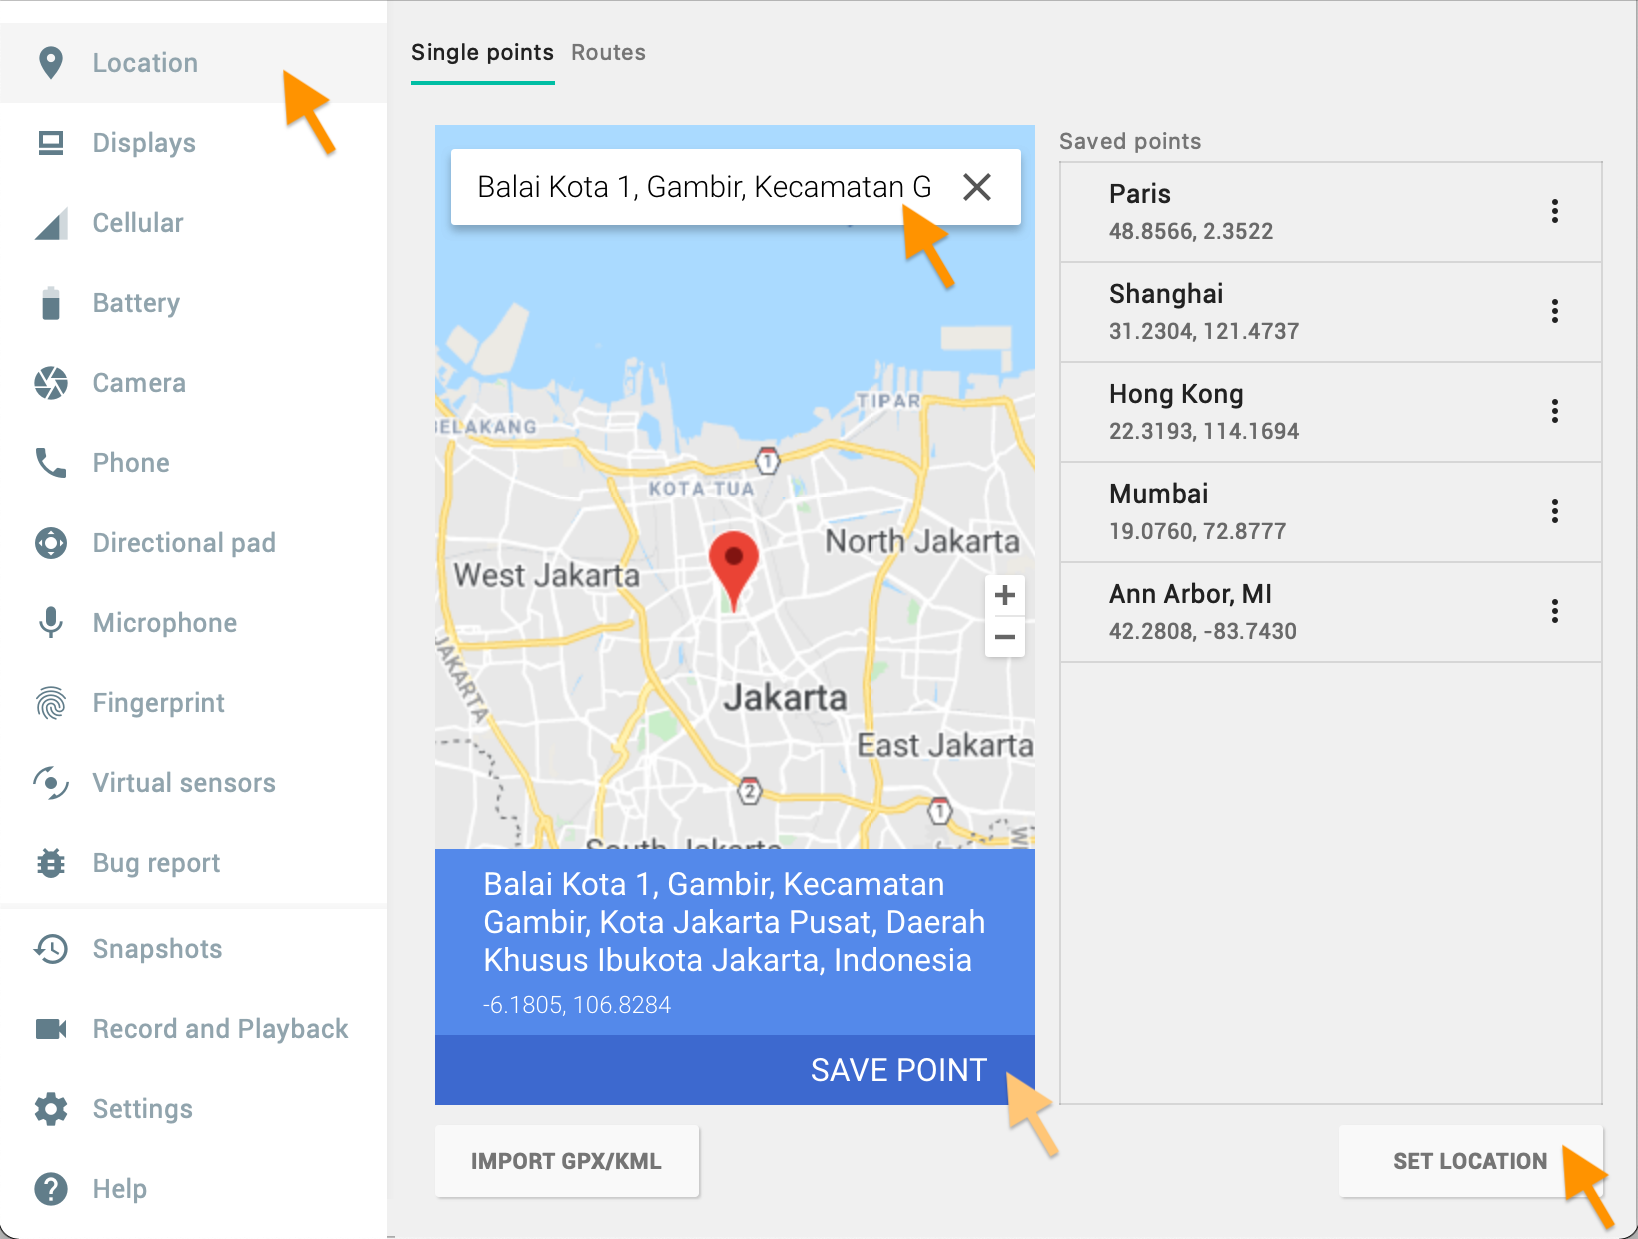
To use the emulator with the Maps tutorial, you need to set two of the extended controls (click on the ... at the bottom of the right menu bar (screenshot)):
Location: to set the virtual location where you want your emulated device to be located:- click on the Location menu item,
- search for your intended location,
- for ease of future re-location, you can click on
SAVE POINT, give the location an easy to remember name, and clickOK, - click on
SET LOCATION(screenshot with 5 saved points).
Repeat the above process to switch to a different location (which should be picked up by the Maps tutorial).
Virtual sensors: to change the virtual facing of the emulated device, change its x-, y-, and z-rotations. The compass direction would likely not be accurate, but it does change as you rotate the emulated device around and this should be picked up by the Maps tutorial.
Audio
To record audio on the Android emulator, click the Microphone item on the extended controls menu and enable Virtual microphone uses host audio input (screenshot).
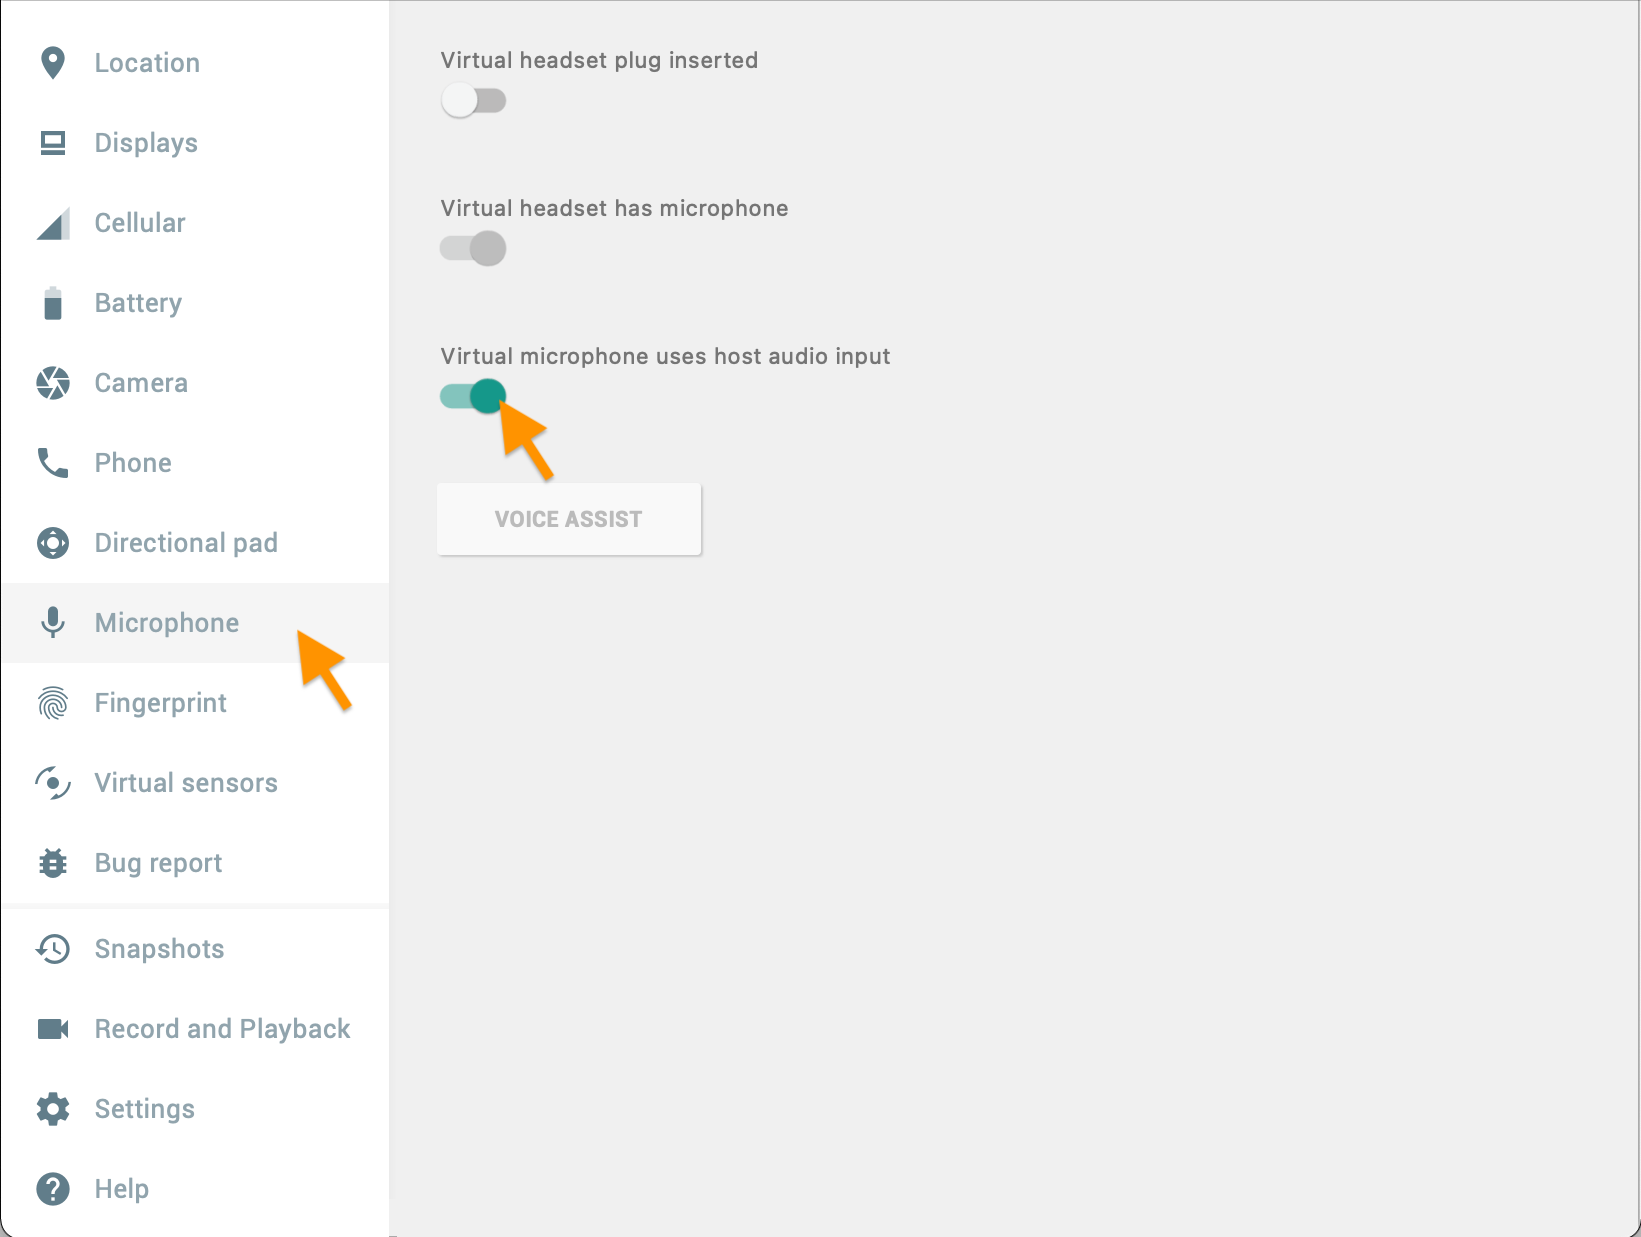
Due to privacy concern, this option must be set every time you restart the emulator.
On macOS, both recording and playing back audio on the Android emulator work fine. If you’re having problem, rebooting the emulator (hold down on the power button on the emulator) may fix it.
On other OS/platforms, the quality of the recorded audio will depend on the quality of your computer’s mic. Playing back audio also would depend on the quality of your audio and speaker systems. Your mileage may vary.
Also double check that the virtual microphone is turned on and volume on the emulator is cranked up.
Signin
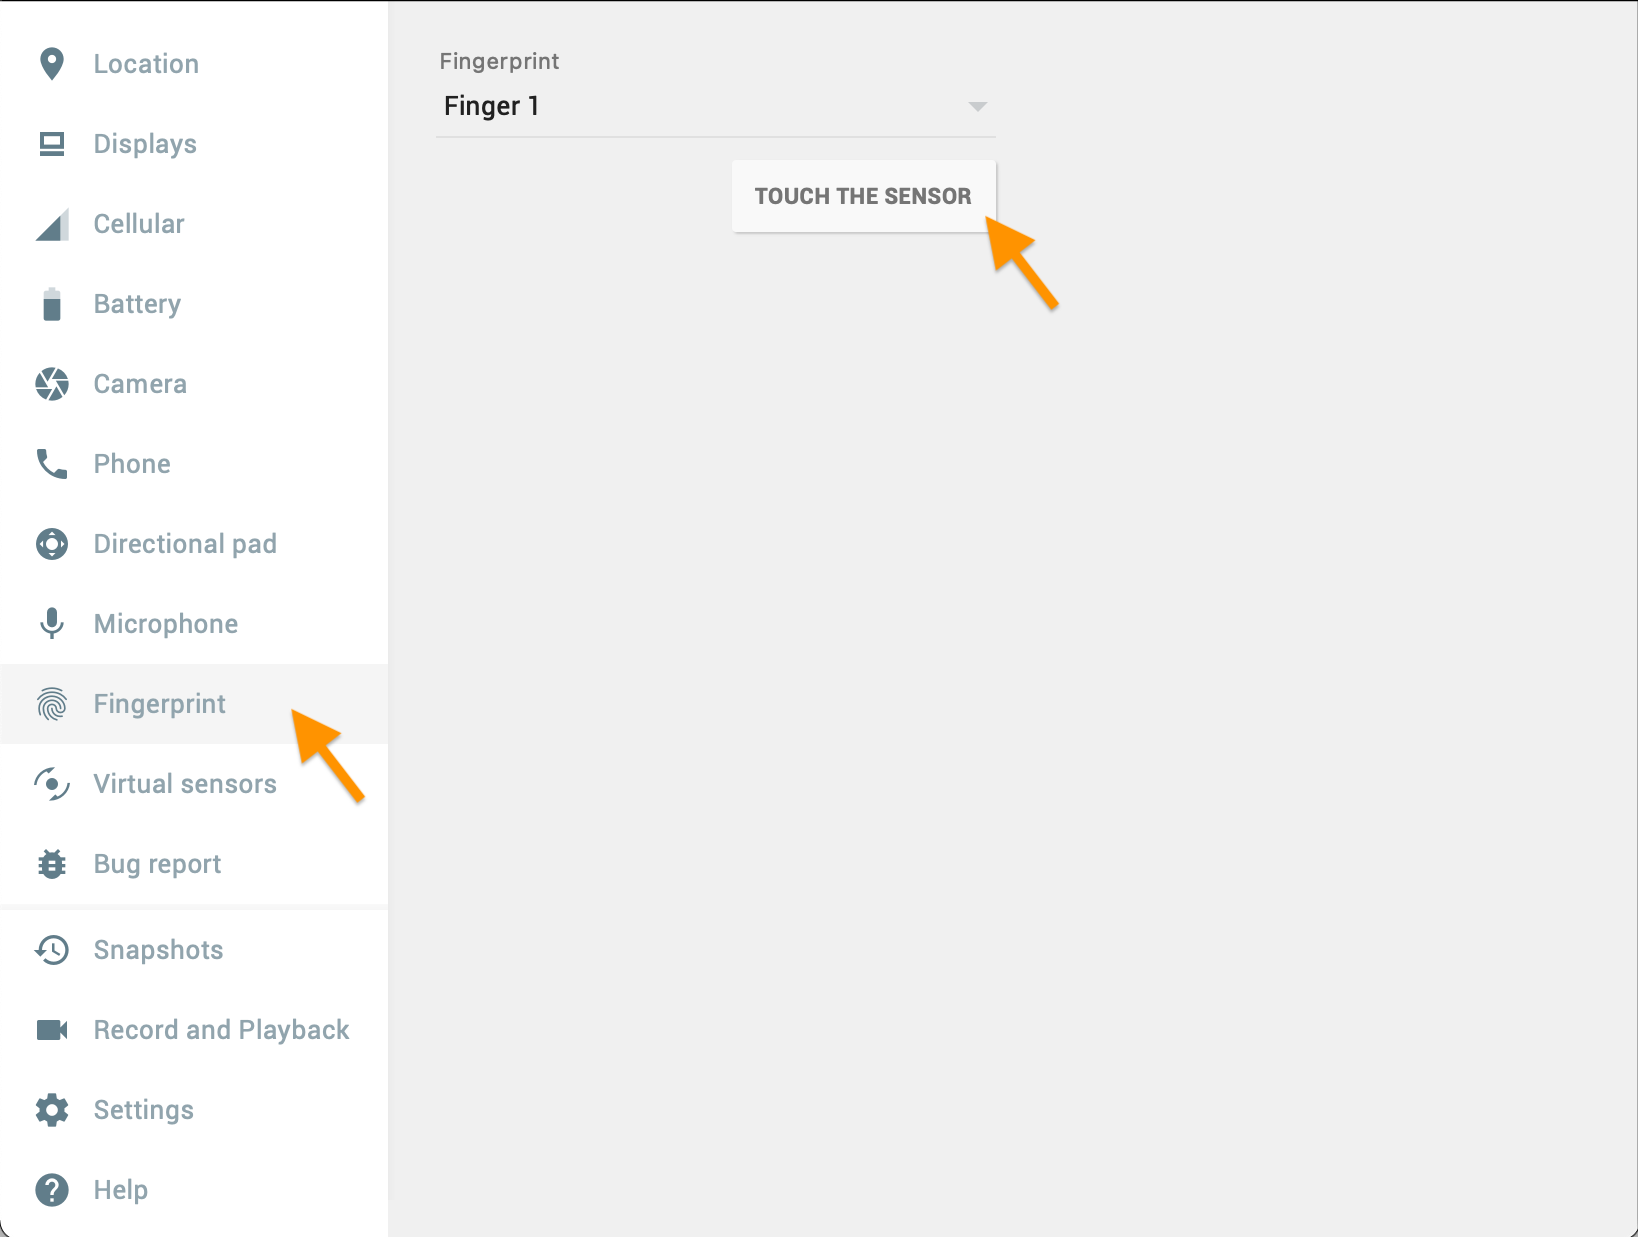
To use the emulator with the Signin/Biometric tutorial, click the Fingerprint item on the extended controls menu.
- You first need to register your virtual fingerprint with the emulated device as you would your real fingerprint on a physical device
- With the
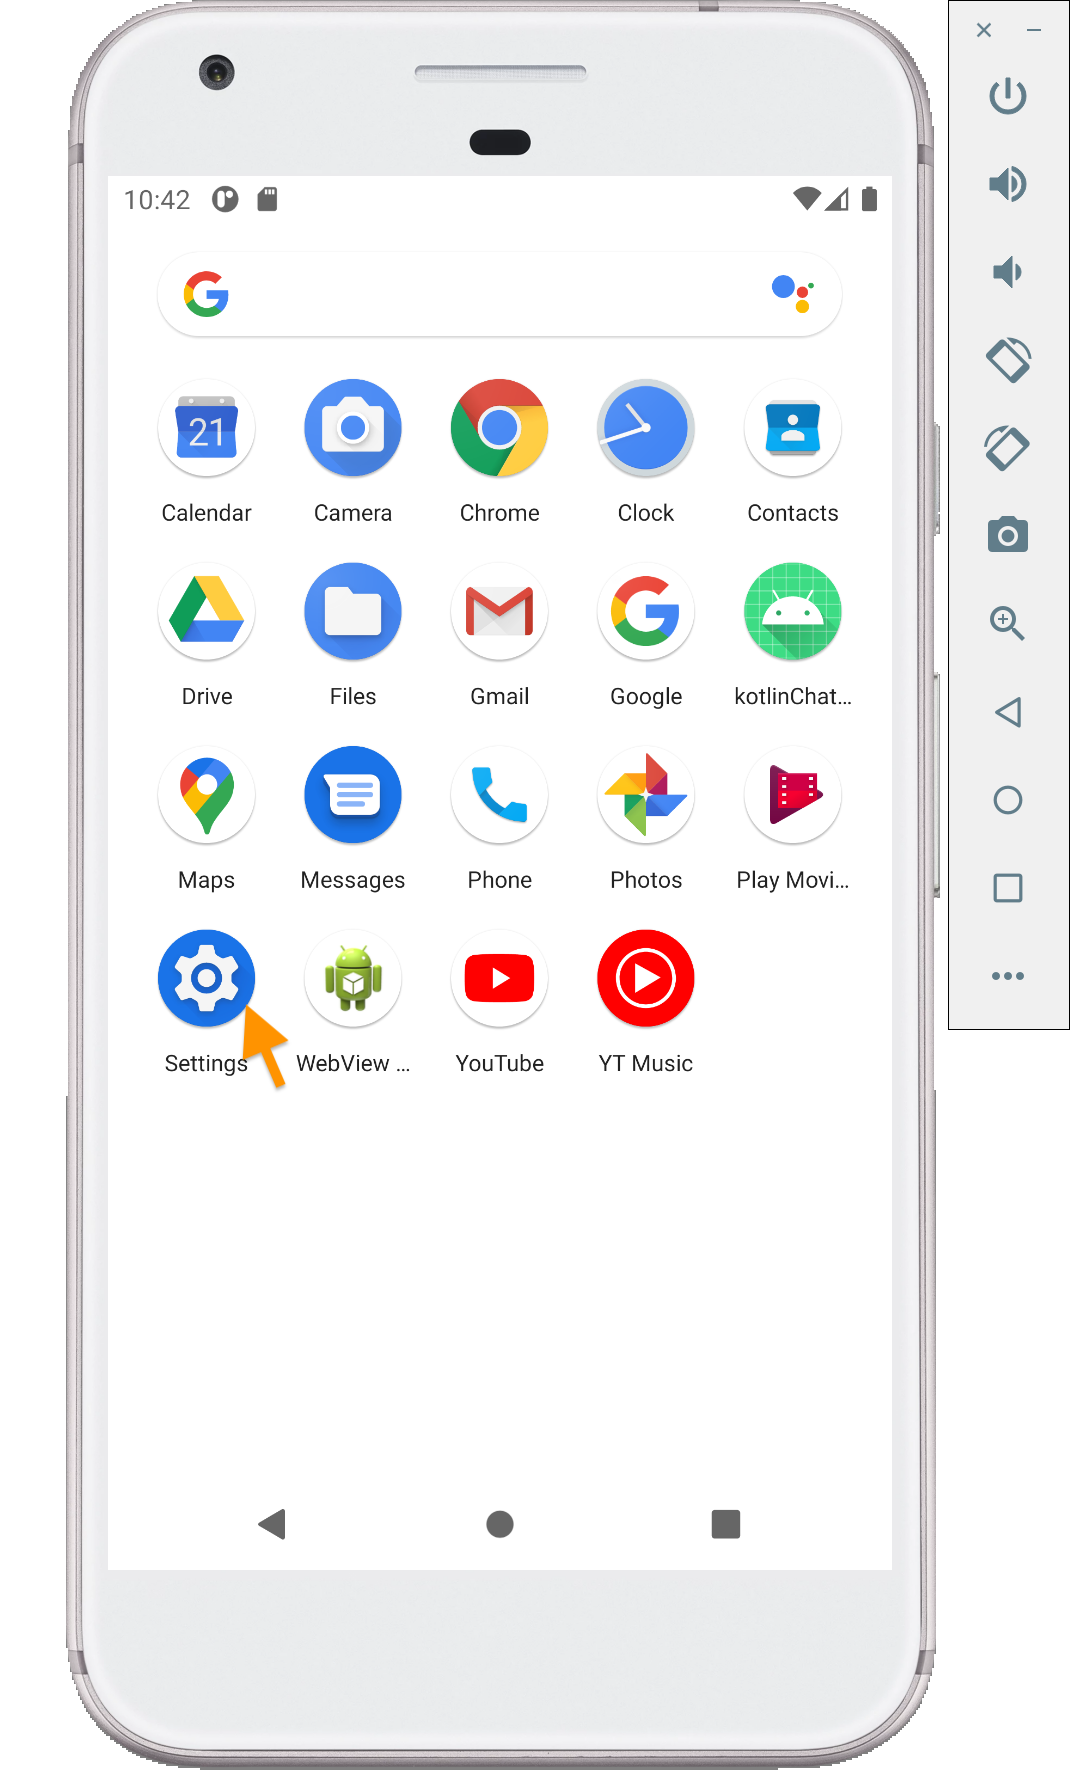
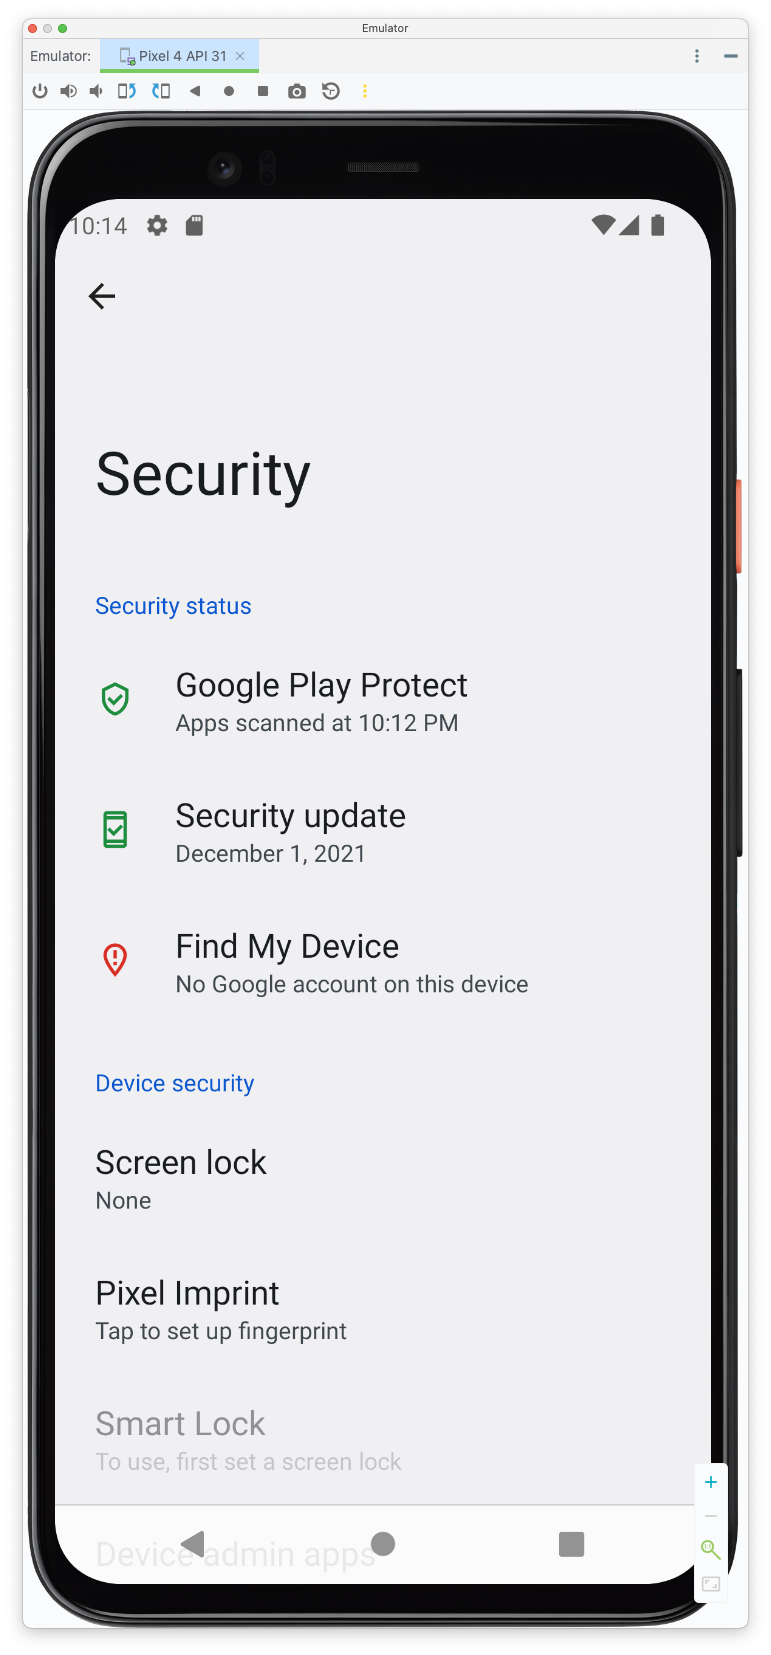
Fingerprintextended control window open, on the emulator’s Home Screen, scroll up to reveal theLauncherdrawer and open theSettingsapp (screenshot). - Search for
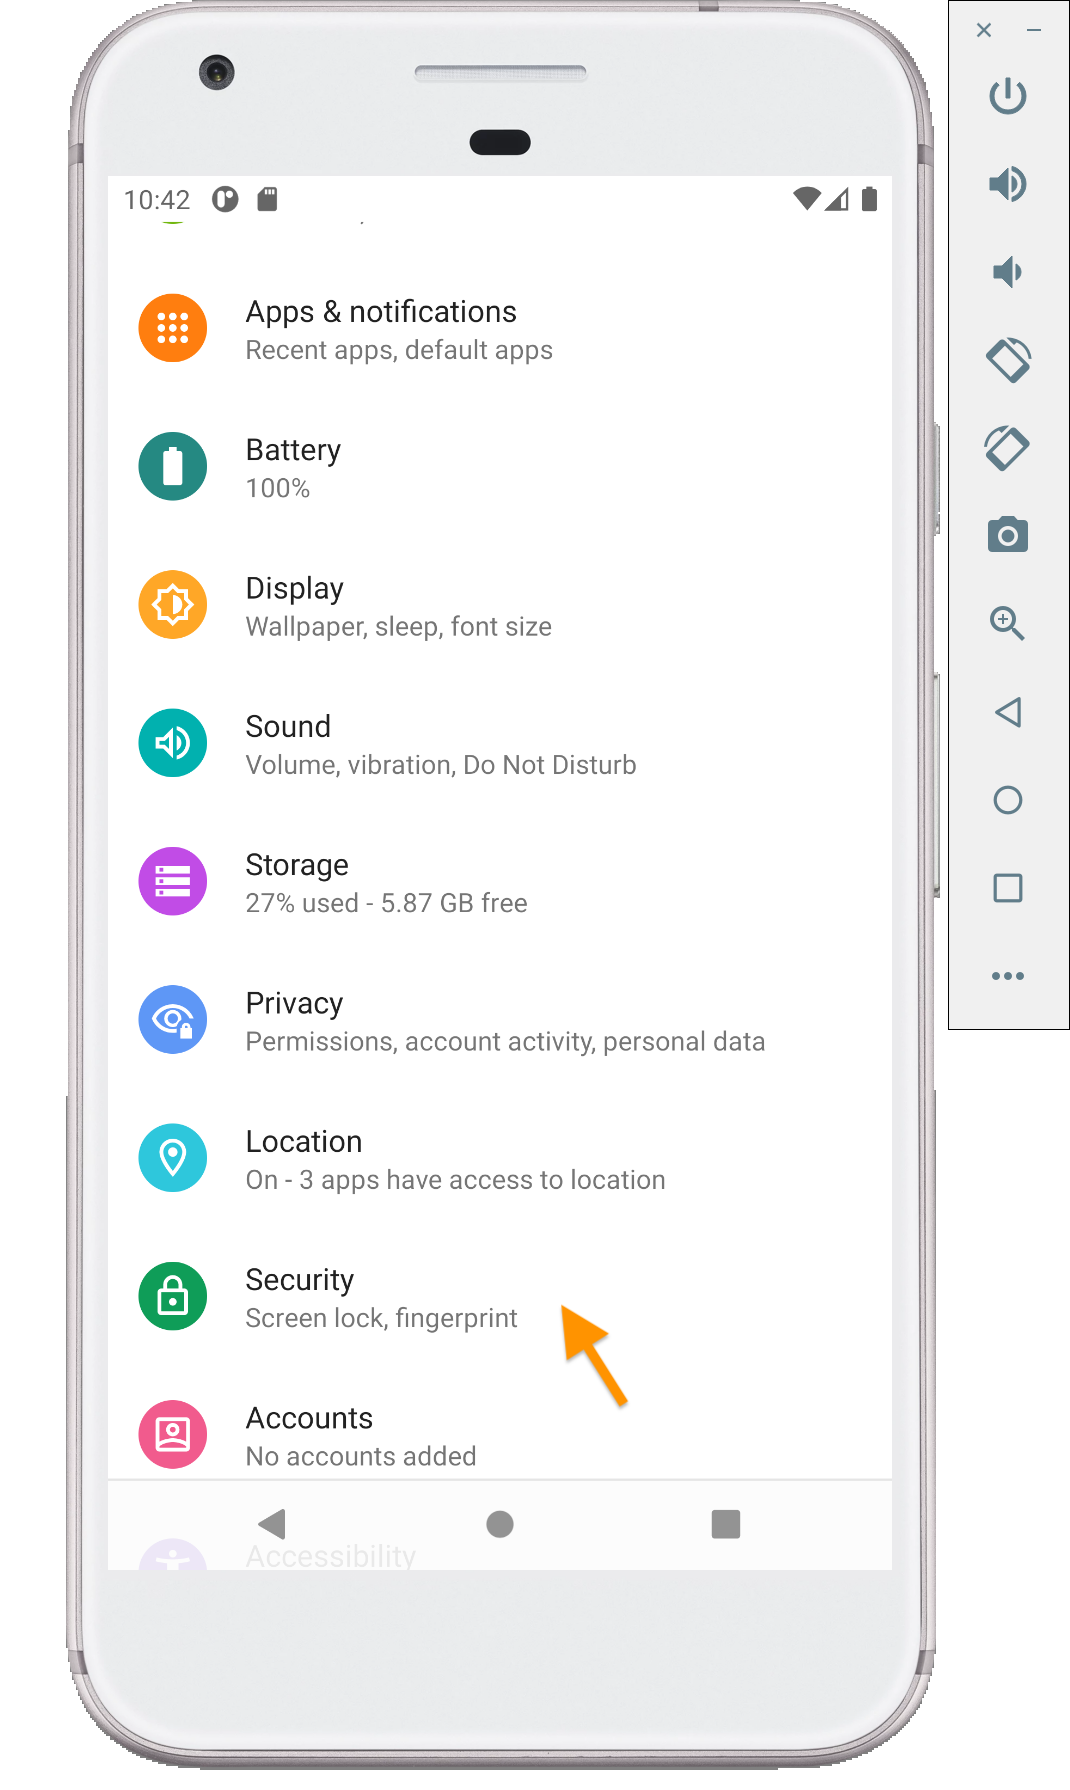
Securityand open it (screenshot). - Then click on
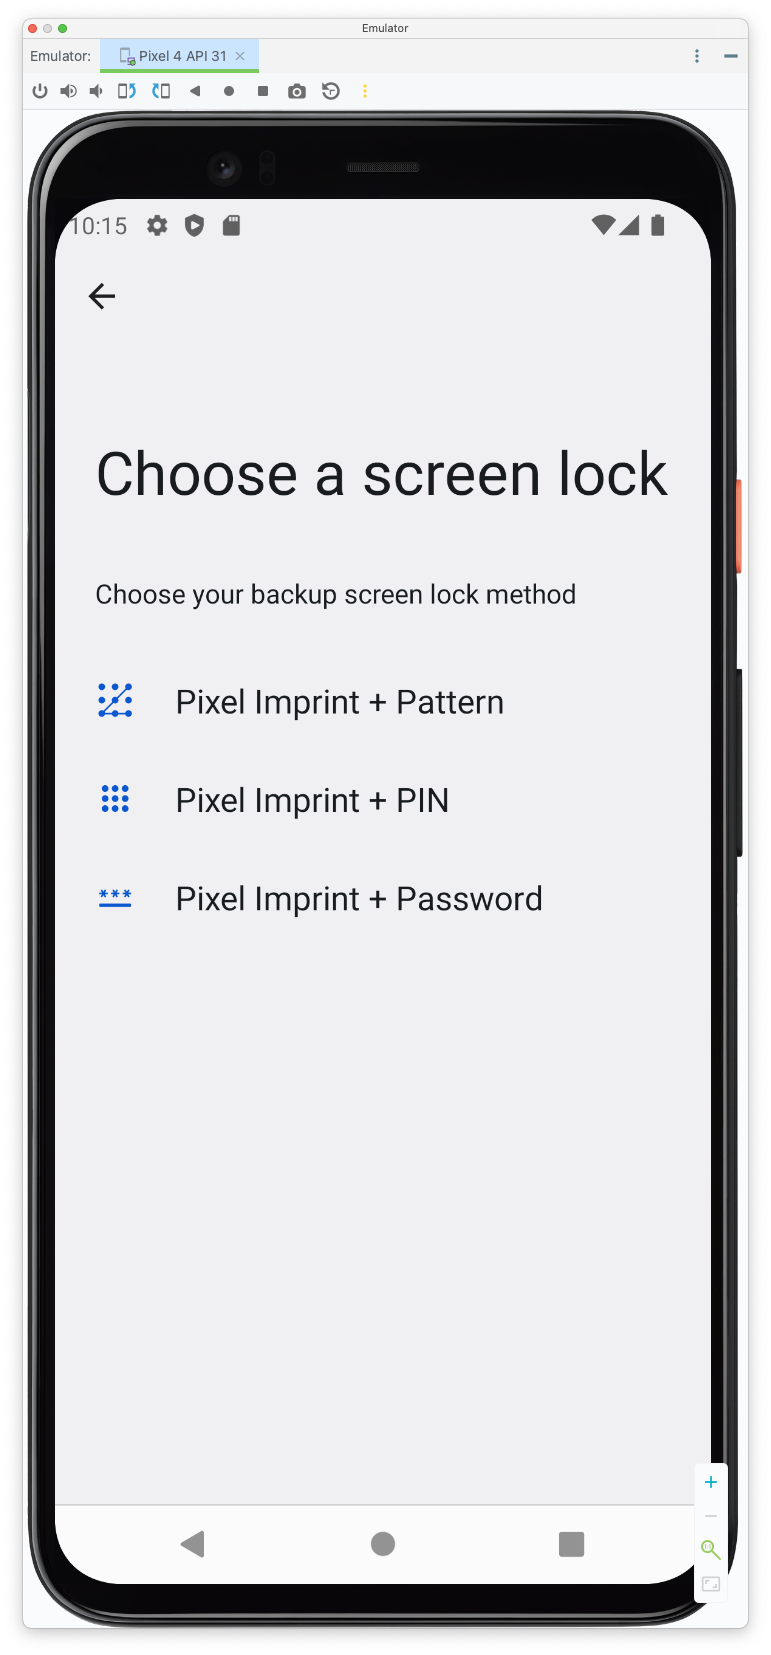
Pixel Imprintwhich should be in the second,DEVICE SECURITYsection of theSecuritypage (screenshot). - On the next screen, choose to set up
Pixel Imprint + PIN(screenshot). - You will be asked to choose and enter a PIN, twice, and then to decide whether to have any notification shown on locked screen.
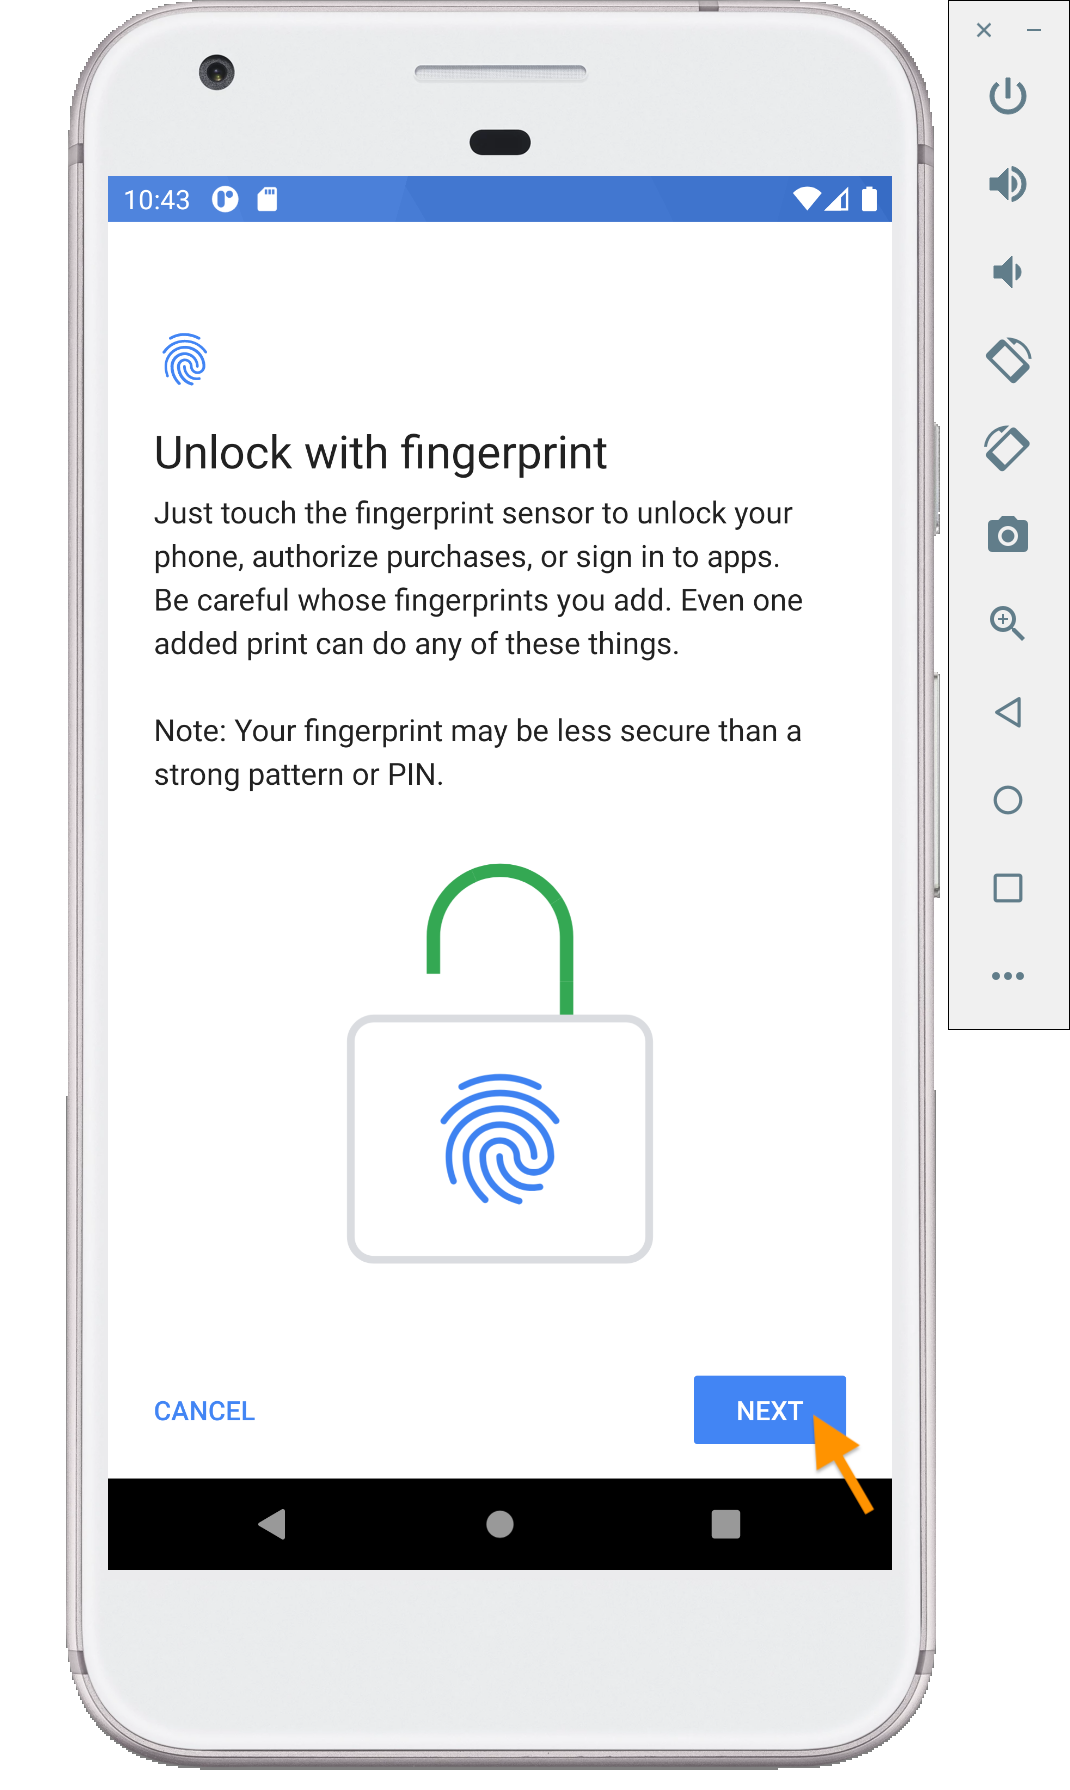
- After all that, you can finally register your virtual fingerprint, click
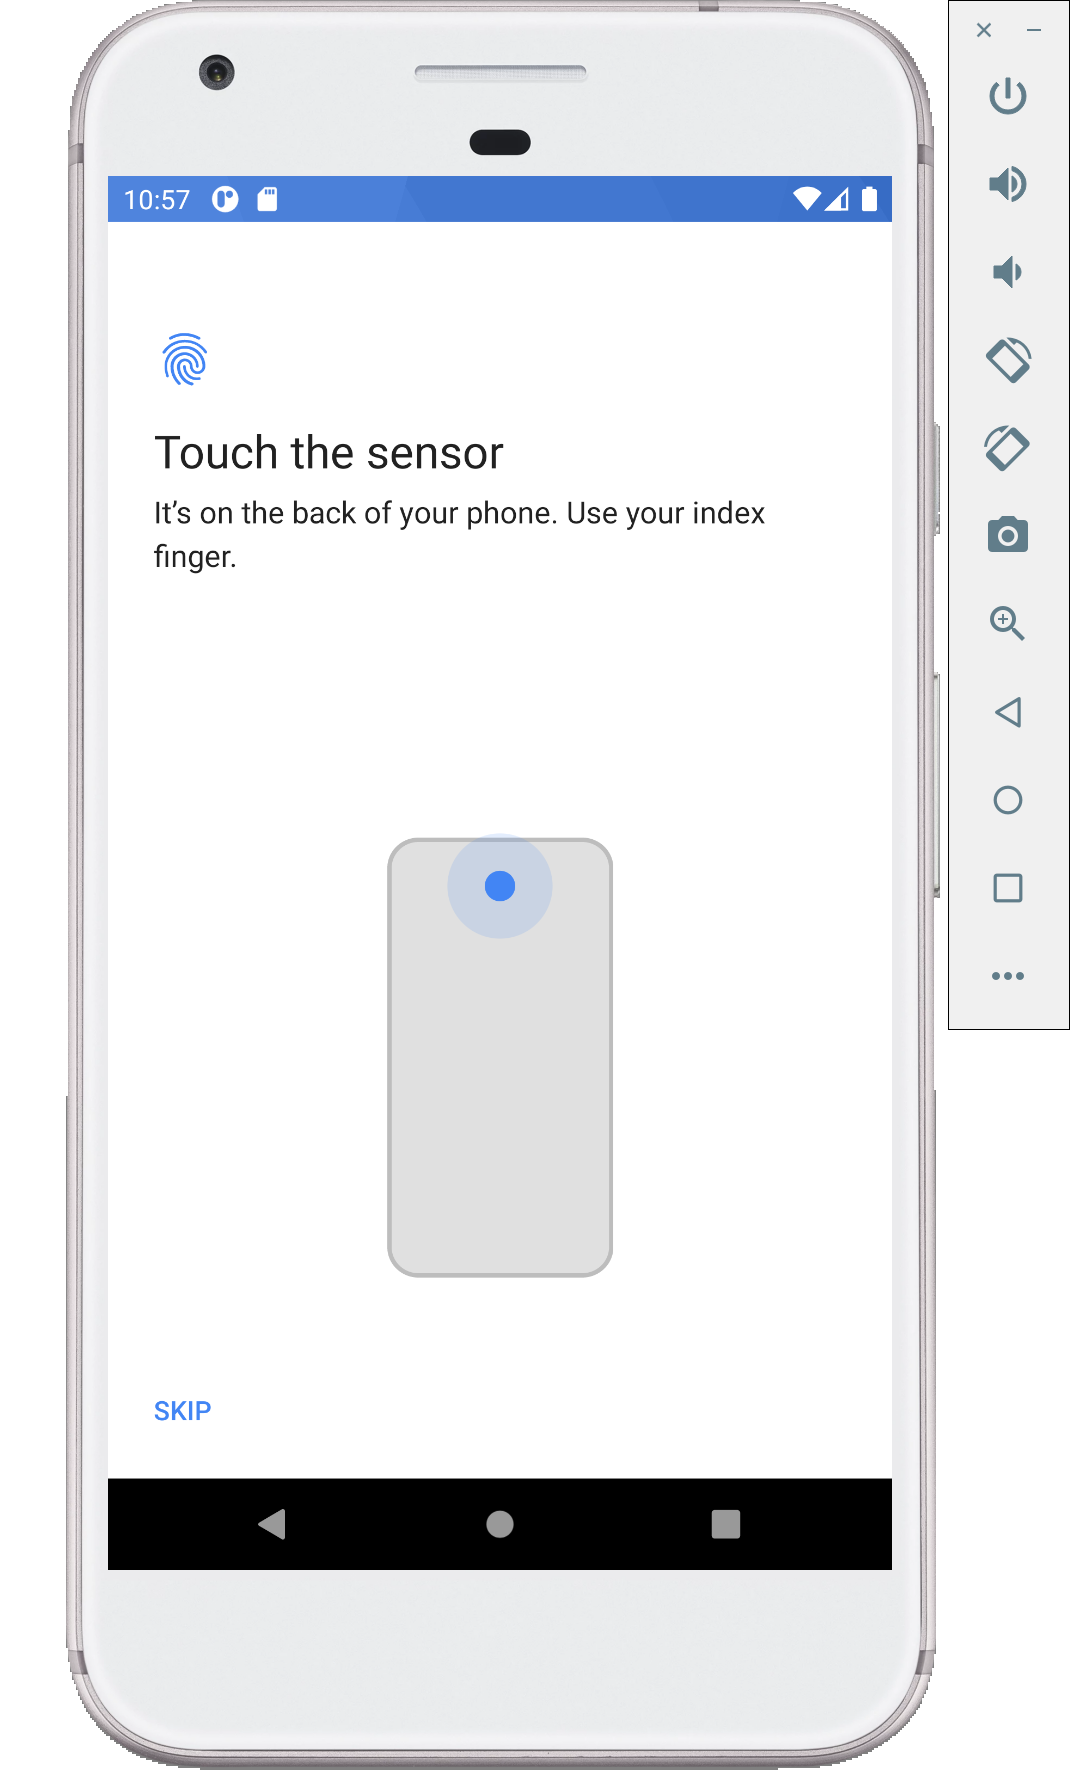
NEXT(screenshot). - When prompted to “Touch the Sensor” on the back of your phone (screenshot),
go to the
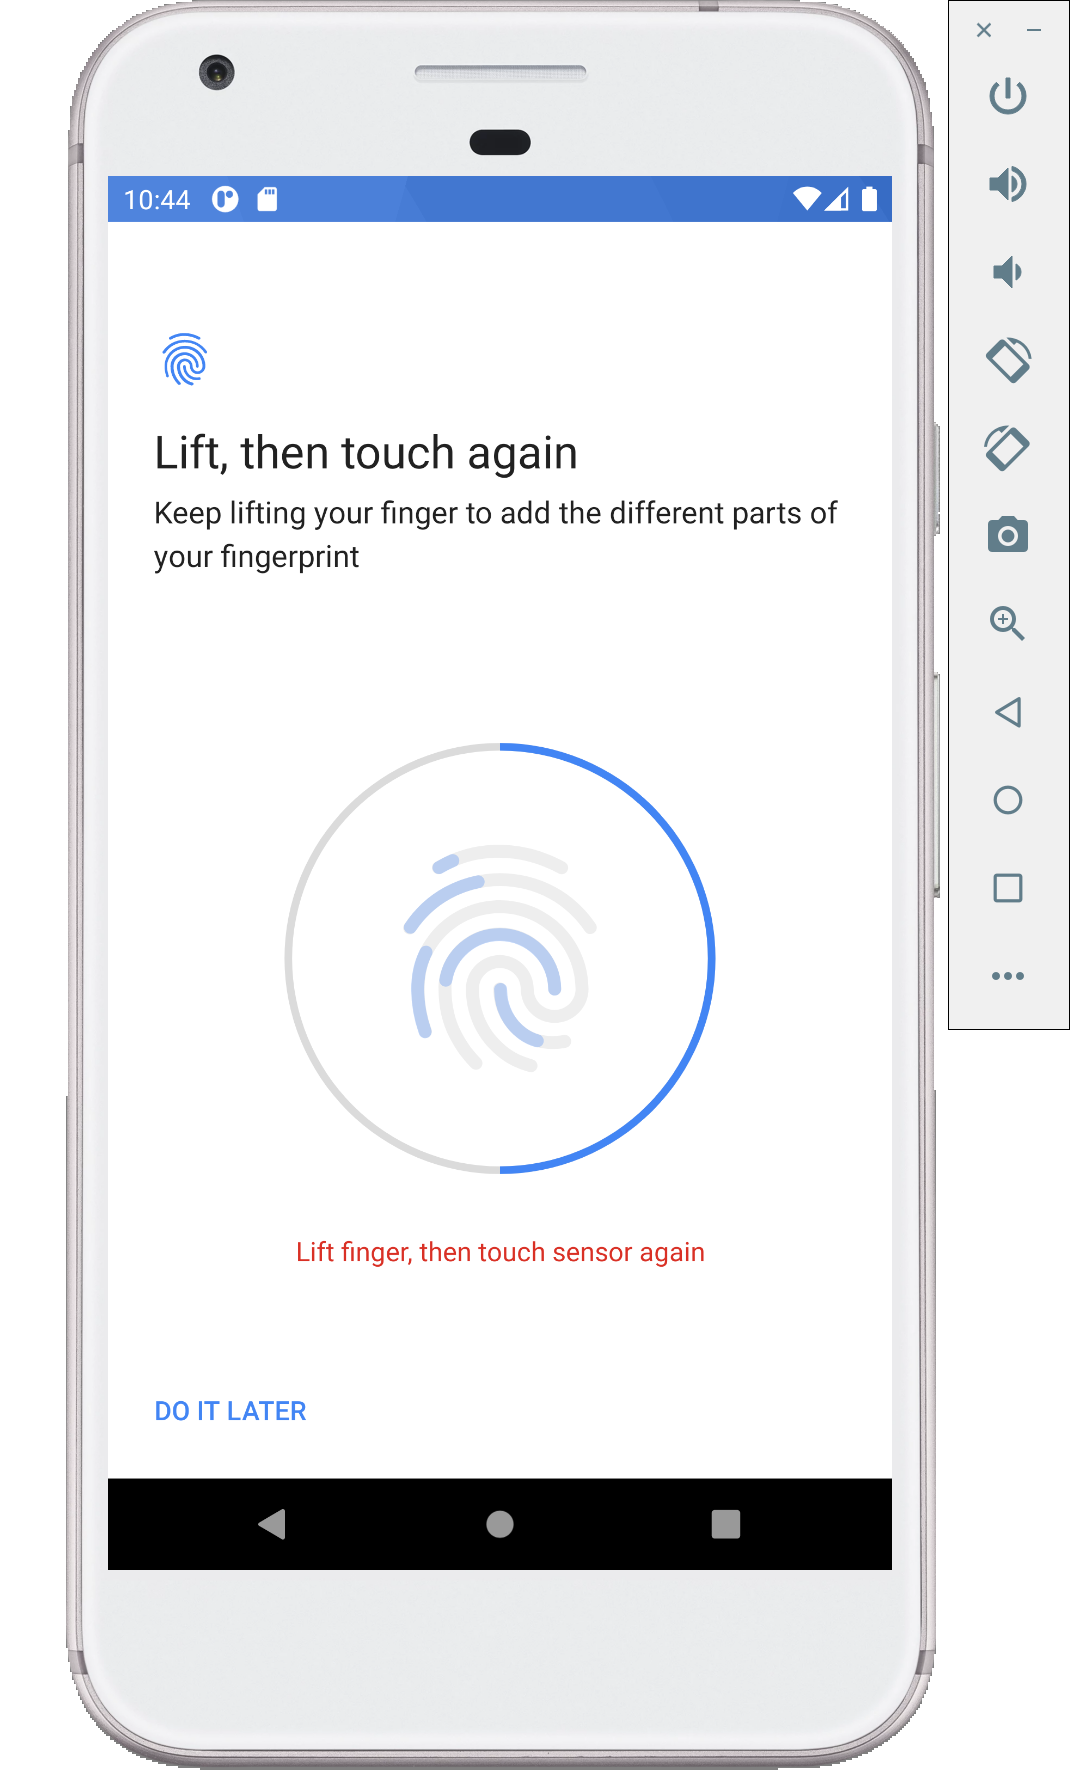
Extended controlswindow of the Android emulator (that you opened at the start of this process) and click on theTOUCH THE SENSORbutton (screenshot). - Keep on clicking on the
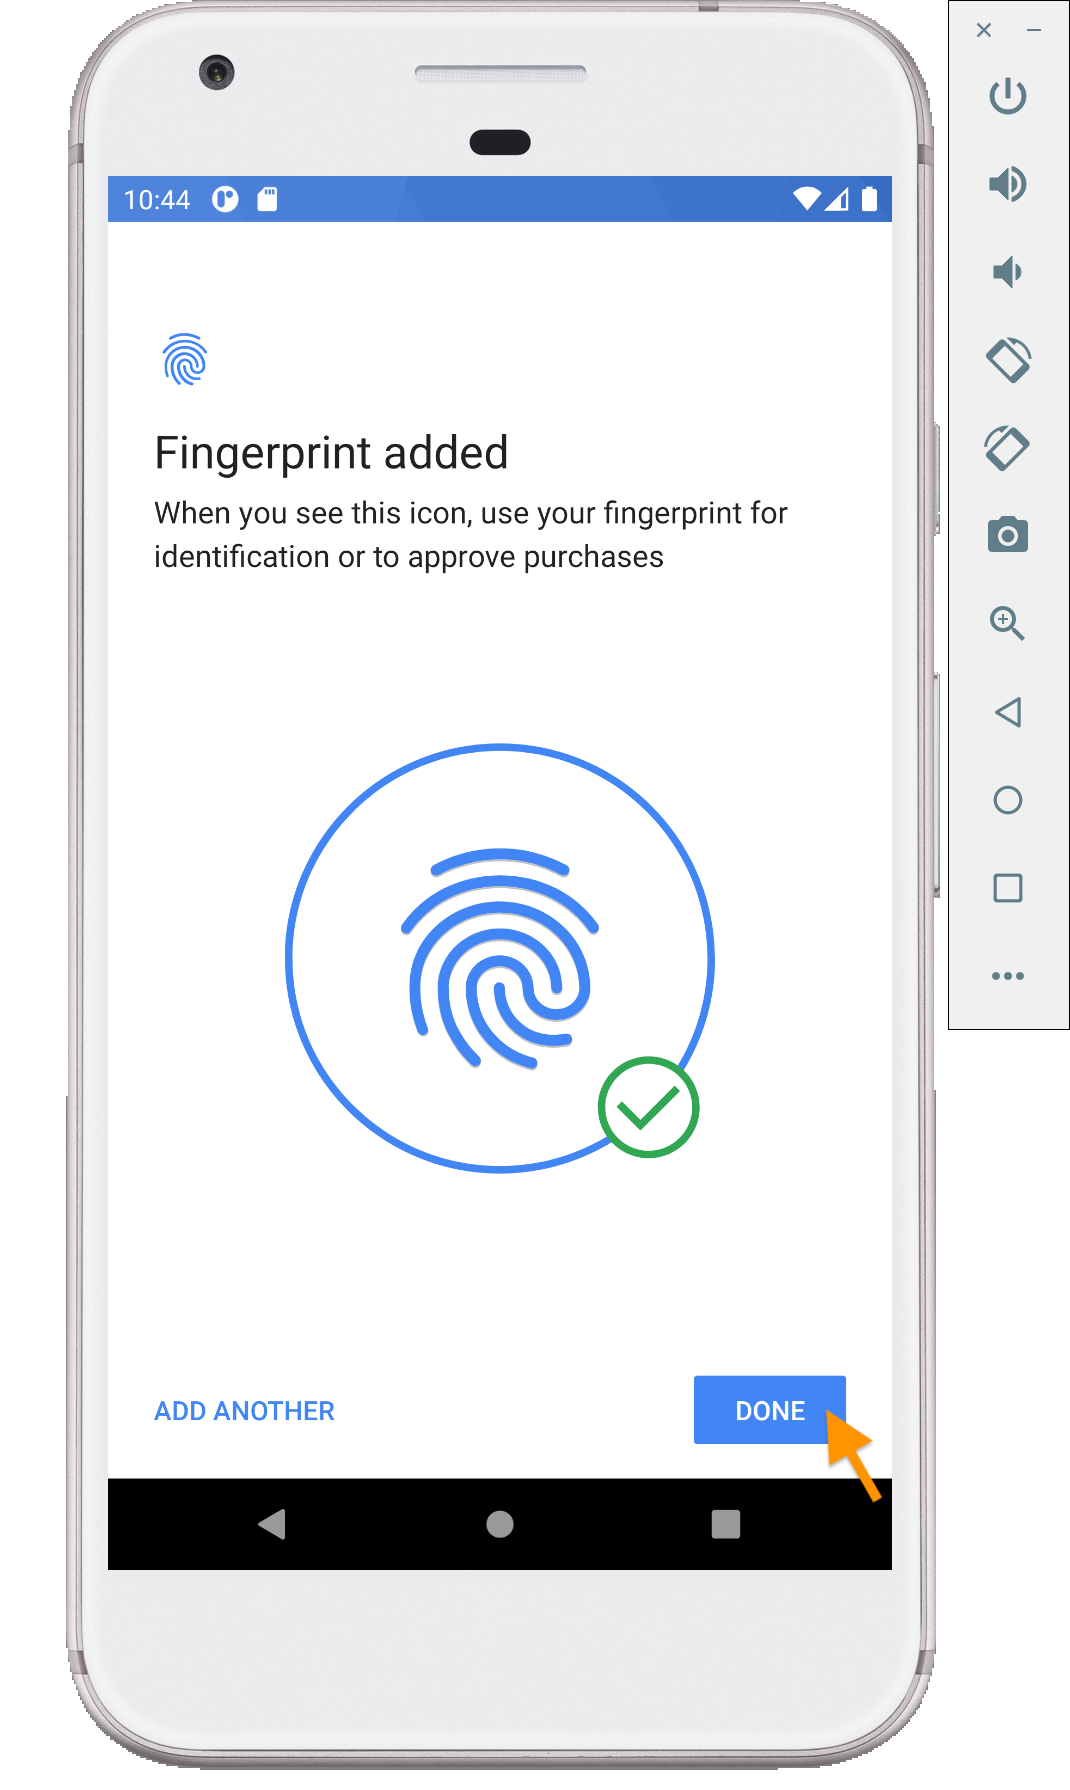
TOUCH THE SENSORbutton on the emulator’s extended control screen while the screen saying “Lift, then touch again” is up (screenshot). - Once the virtual fingerprint is registered, you should see the “Fingerprint added” screen (screenshot).
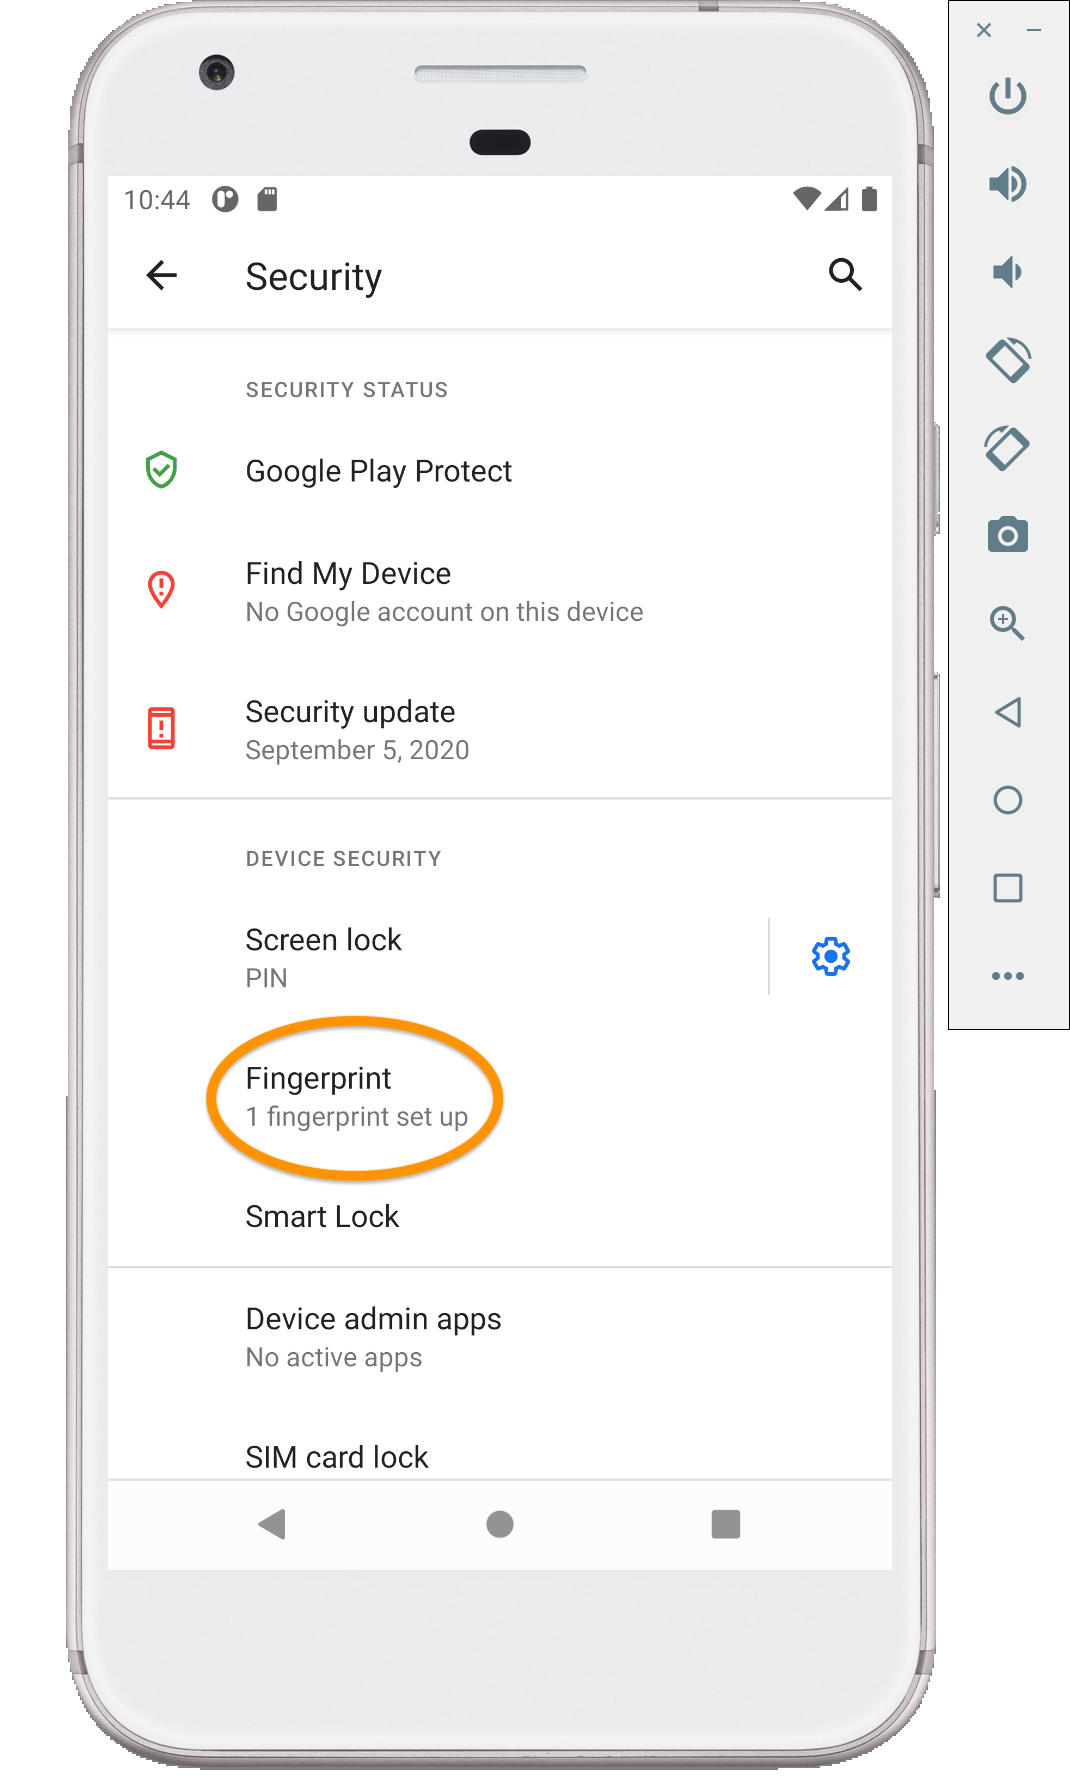
- Click
DONEand you should be back on the “Security” screen with “1 fingerprint set up” (screenshot). Congratulations!
- With the
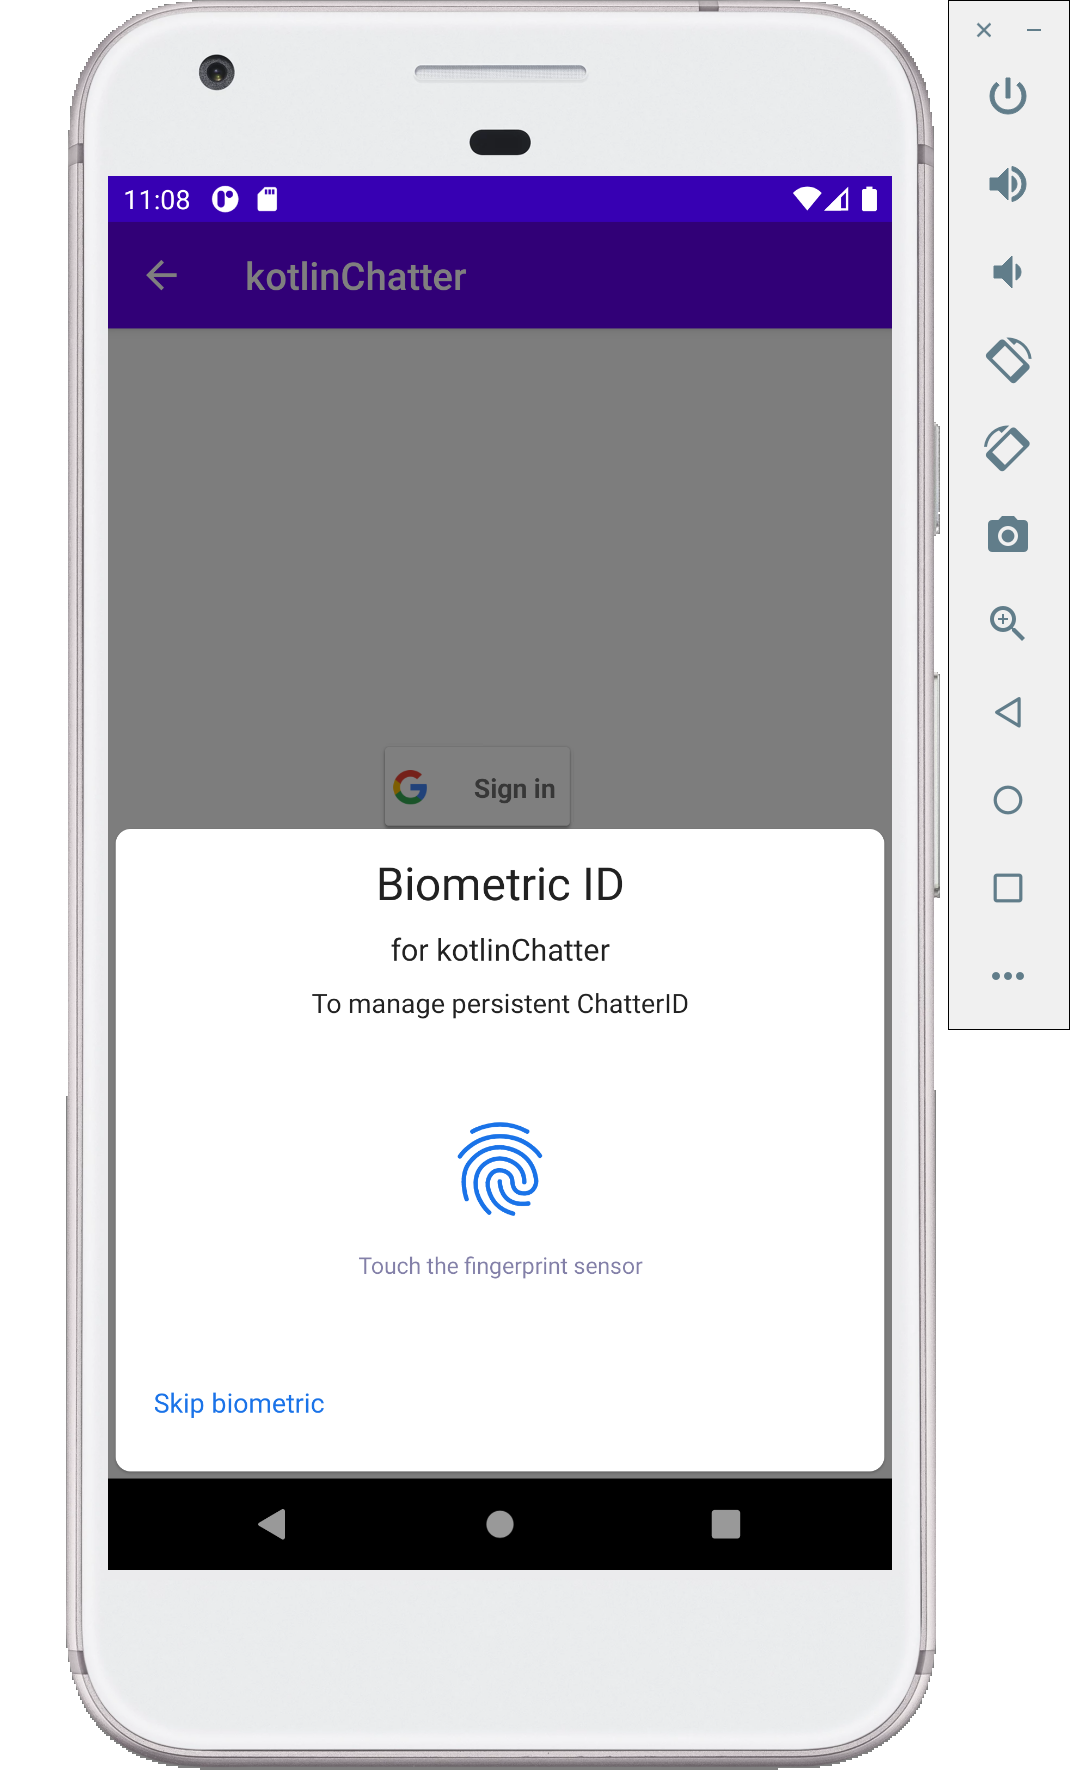
- Running the “SignIn” tutorial, whenever you are prompted for the “Biometric ID” (screenshot), click on the
TOUCH THE SENSOR" button on the emulator'sFingerprint` extended controls as you did previously when registering your virtual fingerprint (screenshot).
Publishing an Android app
GooglePlay’s Testing Tracks can be used for beta testing (even A/B test).
To publish your app, follow Google’s Publish your app instructions.
References
- Meet Android Studio
- Gradle Basics for Android Developers
- Why Android created emulator rather than simulator?
- Simulator or Emulator? What is the difference?
- How to install Google Play app in Android Studio emulator?
Publishing an Android app
| Prepared by Alexander Wu, Mark Wassink, Yibo Pi, and Sugih Jamin | Last updated: October 20th, 2025 |