Tutorial: Audio SwiftUI
Cover Page
This tutorial can largely be completed on the iOS simulator.
Preparing your GitHub repo
In the following, replace /YOUR:TUTORIALS/ with the name of your tutorials folder:
- On your laptop, navigate to
/YOUR:TUTORIALS/ - Unzip your
chatter.zipfile. Double check that you still have a copy of the zipped file for future reference! - Rename your newly unzipped
chatterfolderaudio - Push your local
/YOUR:TUTORIALS/repo to GitHub and make sure there’re no git issues:git push
- Open GitHub Desktop and click on
Current Repositoryon the top left of the interface - Click on your assignment GitHub repo
- Add Summary to your changes and click
Commit to main - If you have pushed other changes to your Git repo, click
Pull Originto synch up the clone on your laptop - Finally click on
Push Originto push changes to GitHub
- Open GitHub Desktop and click on
![]() Go to the GitHub website to confirm that your folders follow this structure outline:
Go to the GitHub website to confirm that your folders follow this structure outline:
  reactive
    |-- audio
        |-- swiftUIChatter
            |-- swiftUIChatter.xcodeproj
            |-- swiftUIChatter
    |-- chatterd
    |-- chatterd.crt
    # and other files or folders
If the folders in your GitHub repo does not have the above structure, we will not be able to grade your assignment and you will get a ZERO.
Working with audio
We will use the AVFoundation library: AVAudioRecorder to record from the device’s microphone and
save to local file, and AVAudioPlayer to play back audio on the device’s speakers. We’ll put all
interactions with the AVFoundation subsystems in an AudioPlayer struct. UI to access the audio
player we’ll put in the AudioView View.
Requesting permission
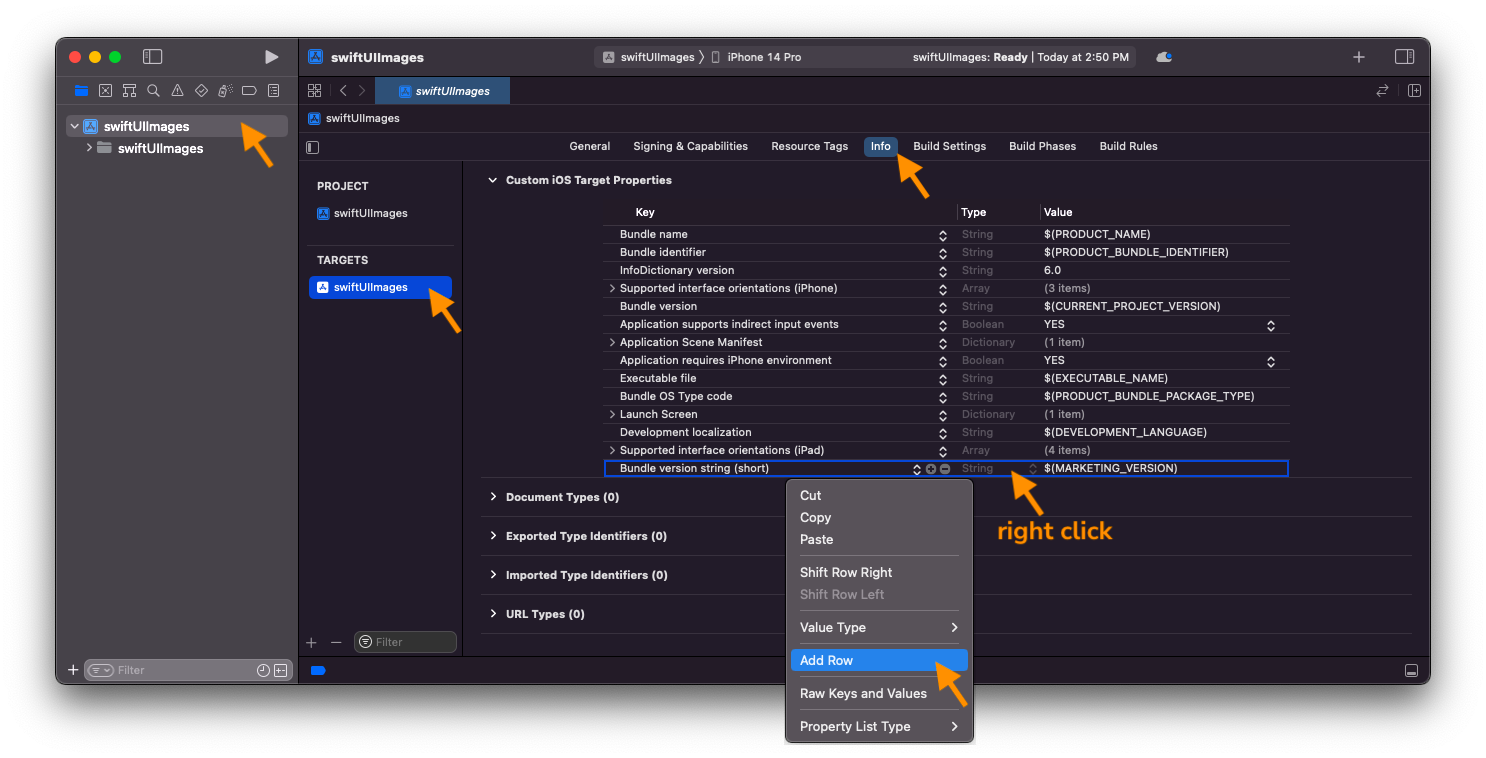
To record audio, we need user’s permission to access the device’s microphone. Add justification for
microphone use to your Info list. Click on your project name (first item in your left/navigator
pane), then click on the project in the TARGETS section, and then the Info tab. In the Custom
iOS Target Properties section, right click (or ctl-click) on any row in the table and choose Add
Row (screenshot). In the drop down menu,
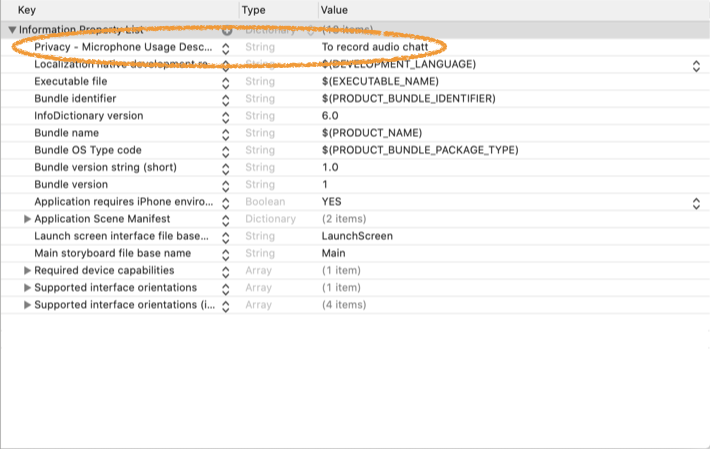
select Privacy - Microphone Usage Description and, in the Value field to the right, enter the
reason you want to access the mic, for example, “to record audio chatt”. What you enter into the
value field will be displayed to the user when seeking their permission
(screenshot).
When you try to access the mic, iOS will automatically check for access permission and, if it is your app’s first attempt to access the mic, iOS will automatically prompt the user for permission.
If you accidentally denied permission when your app requested it, go to
Settings > Privacy &
  Security > Microphone
, locate your app and slide the corresponding toggle to allow access.
AudioPlayer
Controlling the audio player itself is rather straight forward. The more complicated part is how to
handle the audio file. When the user clicks on a posted audio file, we play back it back and let
user change the playback point back and forth. We call this the playbackMode. When the user starts
recording, we enter a recordingMode and creata a recorded audio file. After recording, user may
want to play the recording back before posting. They may decide to record over the file. Or to
delete it all together and not post. After recording, they may want to play back a posted audio
before deciding what to do with the recording. The recordingMode spans all of these potential
activities, including the “nested” play back. We exit the recordingMode only when the user has
made a final decision on what to do with the recorded audio file.
Create a new Swift file, call it AudioPlayer. Create an observable AudioPlayer class and put the
following properties in it: its two modes, audio files, and control of the audio player, along with
the initialization of the audio player:
import Foundation
import AVFoundation

@Observable
final class AudioPlayer: NSObject, AVAudioRecorderDelegate, AVAudioPlayerDelegate, @unchecked Sendable {
    // playback and recording modes:
    var recordingMode = false
    var playbackMode = false

    // audio files:
    var playback: Data? = nil
    var recorded: Data? = nil

    private let audioFilePath = FileManager.default.urls(for: .documentDirectory, in: .userDomainMask)[0].appendingPathComponent("chatteraudio.m4a")

    // audio player:
    private let audioSession = AVAudioSession.sharedInstance()
    private var audioRecorder: AVAudioRecorder! = nil
    private var audioPlayer: AVAudioPlayer! = nil
    // audio player states:
    var isRecording = false
    var isPlaying = false

    override init() {
        super.init()

        do {
            try audioSession.setCategory(.playAndRecord, mode: .default)
            try audioSession.setActive(true)
        } catch {
            print("AudioPlayer: failed to setup AVAudioSession")
        }
    }

    // audio player controls
}
AudioPlayer dates back to iOS’s Objective-C era and must be declared an NSObject
subtype so that it can conform to the AVAudioRecorderDelegate and AVAudioPlayerDelegate
protocols by which the AVFoundation subsystem delivers various playback events via
callback functions. The property audioFilePath must be initialized to point to a
temporary audio file. AVAudioRecorder requires the audio data to be stored in a file,
as opposed to memory.
We tag AudioPlayer @Observable so that changes to its properties can be observed
and reflected by AudioView.
From “standby”, the audio player can be put in recordMode or playbackMode. Add
the following AudioPlayer methods to replace the comment // audio player controls:
    func setupRecorder() {
        doneTapped()
        recordingMode = true
        playbackMode = false

        guard audioRecorder != nil else {
            let settings = [
                AVFormatIDKey: Int(kAudioFormatMPEG4AAC),
                AVSampleRateKey: 12000,
                AVNumberOfChannelsKey: 1,
                AVEncoderAudioQualityKey: AVAudioQuality.high.rawValue
            ]
            audioRecorder = try? AVAudioRecorder(url: audioFilePath, settings: settings)
            guard let _ = audioRecorder else {
                print("setupRecorder: failed")
                return
            }
            audioRecorder.delegate = self
            return
        }
    }

    func audioRecorderEncodeErrorDidOccur(_ recorder: AVAudioRecorder, error: Error?) {
        print("Error encoding audio: \(error!.localizedDescription)")
        audioRecorder.stop()
        isRecording = false
    }


    func setupPlayer(_ audioStr: String) {
        if let audio = Data(base64Encoded: audioStr, options: .ignoreUnknownCharacters) {
            playbackMode = true
            playback = audio
            preparePlayer(audio)
            playTapped()
        }
    }

    func audioPlayerDecodeErrorDidOccur(_ player: AVAudioPlayer, error: Error?) {
        print("Error decoding audio \(error?.localizedDescription ?? "on playback")")
        // don't dismiss, in case user wants to record
    }

    // preparing the player
We provide a callback handler for encoding error, as required by conformance to the
AVAudioRecorderDelegate protocol. Similarly, we provide a callback handler for decoding error to
conform to the AVAudioPlayerDelegate protocol. In the case of encoding error during recording, we
stop the recording.
When the player is set to playbackMode, we expect to be passed a base64-encoded audio string to be
played back. This would normally be an audio clip associated with a posted chatt. We store the
decoded string in the audio property and prepare the AVAudioPlayer for playback.
AVAudioPlayer
Add the following preparePlayer() method to the AudioPlayer class, replacing the
// preparing the player comment:
    private func preparePlayer(_ audio: Data) {
        audioPlayer = try? AVAudioPlayer(data: audio)
        guard let audioPlayer else {
            print("preparePlayer: failed")
            return
        }
        audioPlayer.volume = 10.0
        audioPlayer.delegate = self
        audioPlayer.prepareToPlay()
    }

    func audioPlayerDidFinishPlaying(_ player: AVAudioPlayer, successfully flag: Bool) {
        stopTapped()
    }

    // playback point controls
Conforming to the AVAudioPlayerDelegate protocol, we provided AVAudioPlayer a callback handler,
audioPlayerDidFinishPlaying().
With the AVAudioPlayer set up, we now fill in the functions to control the playback point. They go
where the // playback point controls comment is, one after another, starting with playTapped(),
which toggles the audioPlayer between pause() and play():
    func playTapped() {
        guard let audioPlayer else {
            print("playTapped: no audioPlayer!")
            return
        }
        if audioPlayer.isPlaying {
            audioPlayer.pause()
            isPlaying = false
        } else {
            audioPlayer.play()
            isPlaying = true
        }
    }
The fast-forward and rewind playback controls simply move the play head forward or backward by 10
seconds, by assigning a new value to audioPlayer.currentTime, respectively:
    func ffwdTapped() {
        audioPlayer.currentTime = min(audioPlayer.duration, audioPlayer.currentTime + 10.0) // seconds
    }

    func rwndTapped() {
        audioPlayer.currentTime = max(0, audioPlayer.currentTime - 10.0) // seconds
    }
When the stop button is tapped, if we’re in simple playbackMode mode, we reset the play head to
the beginning of the audio clip, by resetting currentTime to 0. If we’re playing back while
“nested” in a recordingMode, however, we reset the playback audio file to the recorded audio
file so that the user can resume working with the recorded audio file, whether to post, re-record,
or delete it.
    func stopTapped() {
        isPlaying = false
        audioPlayer.stop()
        if playbackMode && recordingMode, let recorded {
            playback = recorded
            preparePlayer(recorded)
        } else {
            audioPlayer.currentTime = 0
        }
    }
AVAudioRecorder
Once the recorder is set up, by a call to setupRecorder() defined earlier, recording is initiated
by the user tapping the record button, which calls recTapped():
    func recTapped() {
        if isRecording {
            audioRecorder.stop()
            if let audio = try? Data(contentsOf: audioFilePath) {
                recorded = audio
                playback = audio
                preparePlayer(audio)
            }
            isRecording = false

        } else {
            playback = nil
            recorded = nil
            audioRecorder.record()
            isRecording = true

        }
    }
Similar to playTapped(), recTapped() toggles recording. When recording is stopped, we point
playback to the resulting recorded file and prepare AVAudioPlayer for play back in case the
user wants to play back the recorded audio before deciding what to do with it.
Once the user is satisfied with the recording, doneTapped() stops any ongoing recording and
playback. If the audio player is in recordingMode and something has been recorded, even if we’re
leaving the audio player, we’re not really done since the user hasn’t yet decided what to do with
the recorded file. So we set playback file to point to the recorded file and prepare the
player to play it back should the user wishes to do so. Otherwise, we set the audio player back to
“standby” mode.
    func doneTapped() {
        if isRecording {
            audioRecorder.stop()
            isRecording = false
        }
        if isPlaying {
            audioPlayer.stop()
            isPlaying = false
        }
        if recordingMode, let recorded {
            // restore recorded audio
            playback = recorded
            preparePlayer(recorded)
        } else {
            playback = nil
            recordingMode = false
            playbackMode = false
        }
    }
The user can dispose of the recorded audio file in two ways: post it or delete it. Once the user
made their decision, we call endRecording() to finally exit the recordingMode and delete the
recording:
    func endRecording() {
        isRecording = false
        recordingMode = false
        playback = nil
        recorded = nil
        audioRecorder?.deleteRecording()  // clean up
    }
Hoisting the AudioPlayer
We will have one instance of the AudioPlayer for the whole app. For this
instance of AudioPlayer to be accessible to all Views in the app, we
instantiate it in swiftUIChatterApp and make it available as an
environment object at the very root of the app’s View hierarchy.
Add the environment(_:) modifier to your NavigationStack() in
swiftUIChatterApp:
            NavigationStack {
                ContentView()
                // . . .
            }
            .environment(AudioPlayer())
Be sure to retain your existing .environment(viewModel) while
hoisting the instance of AudioPlayer into the environment.
While we’re in swiftUIChatterApp.swift, add the following property
to your ChatViewModel:
var showPlayer = false
We’ll use it to control the showing of AudioView later.
With that, we are done with AudioPlayer!
Now we declare the UI to go along with the audio player.
AudioView
The UI for our audio player consists of buttons one would expect of an audio player: record, play, stop, rewind, and fast forward. In addition, we also have a “done” button, for when the user is done and wish to exit the audio player, and a “trash” button, to delete recorded audio without posting it.
Create a new Swift file, call it AudioView and put the following AudioView struct in it:
import SwiftUI

struct AudioView: View {
    @Environment(ChattViewModel.self) private var vm
    @Environment(AudioPlayer.self) private var audioPlayer

    var body: some View {
        HStack {
            RecButton()
            Spacer()
            // just for "decoration"
            Image(systemName: "waveform")
                .foregroundColor(.blue.opacity(0.5))
                .scaleEffect(0.8)
            Spacer()
            StopButton()
            Spacer()
            RwndButton()
            Spacer()
            PlayButton()
            Spacer()
            FfwdButton()
            Spacer()
            // just for "decoration"
            Image(systemName: "waveform")
                .foregroundColor(.blue.opacity(0.5))
                .scaleEffect(0.8)
            Spacer()
            if audioPlayer.recordingMode {
                TrashButton()
            } else {
                DoneButton()
            }

        }
        .frame(height:24)
        .font(.title)
        .padding(.horizontal, 16)
        .padding(.vertical, 12)
        .background(
            RoundedRectangle(cornerRadius: 12)
                .fill(Color(.systemGray5))
        )
        .padding(.horizontal, 16)
        .padding(.bottom, 8)
        .onDisappear {
            audioPlayer.doneTapped()
        }
    }
}
The modifier .onDisappear(perform:) allows us to call a function with side-effect
when a View disappears. In this case, when user exits AudioView() we call doneTapped()
to stop all playback and recording.
The play back buttons are pretty straightforward. They are enabled only when
the audio player is playing. Put all of the following outside your AudioView struct:
struct StopButton: View {
    @Environment(AudioPlayer.self) private var audioPlayer

    var body: some View {
        Button {
            audioPlayer.stopTapped()
        } label: {
            Image(systemName: "stop.fill")
                .scaleEffect(0.7)
        }
        .disabled(!audioPlayer.isPlaying)
    }
}

struct RwndButton: View {
    @Environment(AudioPlayer.self) private var audioPlayer

    var body: some View {
        Button {
            audioPlayer.rwndTapped()
        } label: {
            Image(systemName: "gobackward.10")
                .scaleEffect(0.8)
        }
        .disabled(!audioPlayer.isPlaying)
    }
}

struct FfwdButton: View {
    @Environment(AudioPlayer.self) private var audioPlayer

    var body: some View {
        Button {
            audioPlayer.ffwdTapped()
        } label: {
            Image(systemName: "goforward.10")
                .scaleEffect(0.8)
        }
        .disabled(!audioPlayer.isPlaying)
    }
}

struct PlayButton: View {
    @Environment(AudioPlayer.self) private var audioPlayer

    var body: some View {

        Button {
            audioPlayer.playTapped()
        } label: {
            Image(systemName: audioPlayer.isPlaying
                               ? "pause.fill" : "play.fill")
            .scaleEffect(0.8)
        }
        .disabled(audioPlayer.playback == nil)
    }
}
The play button toggles between play and pause, showing the corresponding icon as appropriate.
The record button similarly toggles between recording or not recording. Further, the record button
is shown and enabled only when the audio player is in recordingMode and is not playing. If we
don’t show a button when it is disabled, the space it would have occupied will be filled by another
view instead of being left blank. To leave a blank space of the right dimension when a View is
disabled, we render it with opacity 0.
struct RecButton: View {
    @Environment(AudioPlayer.self) private var audioPlayer

    var body: some View {
        Button {
            audioPlayer.recTapped()
        } label: {
            Image(systemName: audioPlayer.isRecording ? "stop.circle.fill" : "record.circle.fill")
                .scaleEffect(0.8)
                .foregroundColor(Color(audioPlayer.isRecording ? .systemRed : .systemBlue))
        }
        .disabled(!audioPlayer.recordingMode || audioPlayer.isPlaying)
        .opacity(!audioPlayer.recordingMode || audioPlayer.isPlaying ? 0 : 1)
    }
}
In addition to calling doneTapped() the done button also dismisses the AudioView:
struct DoneButton: View {
    @Environment(ChattViewModel.self) private var vm
    @Environment(AudioPlayer.self) private var audioPlayer

    var body: some View {
        Button {
            audioPlayer.doneTapped()
            vm.showPlayer = false
        } label: {
            Image(systemName: audioPlayer.recordingMode ?
                  "square.and.arrow.up" : "xmark.square")
                .scaleEffect(0.8)
                .foregroundColor(Color(.systemBlue))
        }
        .disabled(audioPlayer.isRecording)
    }
}
The trash button not only does what the done button does, it also calls endRecording() to reset
the audio player’s recordingMode and delete any recorded audio. The trash button is enabled only
when there is recorded audio and the audio player is not playing, including not playing in a
“nested” play back mode in the middle of recording. It is not shown at all unless the audio player
is in recordingMode:
struct TrashButton: View {
    @Environment(ChattViewModel.self) private var vm
    @Environment(AudioPlayer.self) private var audioPlayer

    var body: some View {
        Button {
            audioPlayer.doneTapped()
            audioPlayer.endRecording()
            vm.showPlayer = false
        } label: {
            Image(systemName: "trash.fill")
                .scaleEffect(0.7)
                .foregroundColor(Color(audioPlayer.isPlaying || audioPlayer.recorded == nil ? .systemGray : .systemRed))
        }
        .disabled(audioPlayer.isPlaying || audioPlayer.recorded == nil)
        .opacity(!audioPlayer.recordingMode ? 0 :
                    audioPlayer.isPlaying || audioPlayer.recorded == nil ? 0.2 : 1)
    }
}
Now we’re really done with the audio player and its Views!
The networking
Chatt
Add a new stored property audio to the Chatt struct, as the last property in the list, to hold the audio associated with each
chatt:
struct Chatt: Identifiable {
    //...
    var audio: String?

    // ...
}
ChattStore
We update postChatt(_:errMsg) by:
- pointing
apiUrlto the/postaudioAPI endpoint. - adding an
audiofield toChattwhen preparingchattObj, and
The rest of the function remains the same as in the Chatter tutorial.
Next we update getChatts(errMsg:). First update apiUrl to point to the /getaudio API endpoint.
Then add code to chatts.append() to decode the audio field:
                    chatts.append(Chatt(name: chattEntry[0],
                                         message: chattEntry[1],
                                         id: UUID(uuidString: chattEntry[2] ?? ""),
                                         timestamp: chattEntry[3],
                                         audio: chattEntry[4]))
The UI
Now we update the app’s UI.
Recording and posting audio
Let’s define an AudioButton to show/hide the AudioView we can use to control the AudioPlayer.
Put the following in your ContentView.swift file, outside the ContentView struct:
struct AudioButton: View {
    @Environment(ChattViewModel.self) private var vm
    @Environment(AudioPlayer.self) private var audioPlayer

    var body: some View {
        Button {
            if !vm.showPlayer {
                audioPlayer.setupRecorder()
                vm.showPlayer.toggle()
            } else if audioPlayer.playbackMode {
                audioPlayer.setupRecorder()
            } else if !audioPlayer.isRecording {
                vm.showPlayer.toggle()
            }
        } label: {
            Image(systemName: audioPlayer.recorded == nil ? "mic" : "mic.fill")
                .foregroundColor(Color(audioPlayer.recorded == nil ? .systemBlue : .systemRed))
                .scaleEffect(1.1)
                .padding(11)
        }
        .background(Color.secondary.opacity(0.2))
        .clipShape(Circle())
    }
}
Add an icon for the AudioButton to the left of the TextField View in ContentView.
When AudioButton is tapped, we want to show the AudioView above the AudioButton,
spanning the whole width of the screen. Replace the HStack { } in your
ContentView, below ScrollViewReader, with the following. We also update its
.padding modifier to make the whole ensemble look a bit nicer:
            Divider()
            VStack(spacing: 0) {
                if (vm.showPlayer) {
                    AudioView()
                        .transition(.opacity)
                }

                HStack (alignment: .center, spacing: 10) {
                    AudioButton()

                    // Chatt input and submit
                    TextField(vm.instruction, text: Bindable(vm).message)
                        .focused($messageInFocus) // to dismiss keyboard
                        .textFieldStyle(.roundedBorder)
                        .cornerRadius(20)
                        .shadow(radius: 2)
                        .background(Color(.clear))
                        .border(Color(.clear))

                    SubmitButton(scrollProxy: $scrollProxy)
                }
                .padding(.horizontal, 20)
            }
            .padding(.vertical, 4)
When the user taps anywhere on the screen, we want to close the AudioView. Add to the
.onTapGesture {} modifier of your outermost VStack in ContentView, the one before
.navigationTitle the following line:
vm.showPlayer = false
In your SubmitButton, grab the AudioPlayer environment object by adding
this property to the struct:
@Environment(AudioPlayer.self) private var audioPlayer
and update the call to postChatt(_:errMsg:) with:
                vm.showPlayer = false
                await ChattStore.shared.postChatt(Chatt(name: vm.onTrailingEnd, message: vm.message.isEmpty ? "Audio message" : vm.message, audio: audioPlayer.recorded?.base64EncodedString()), errMsg: Bindable(vm).errMsg)
                audioPlayer.doneTapped()
                audioPlayer.endRecording()
After the user successfully posted a chatt, we stop all play back and recording
and end the recording “session” and delete the recorded audio.
Finally, set the color of the Image() foreground color in SubmitButton’s label by
availability of recorded audio:
Image(systemName: "paperplane.fill")
    .foregroundColor(Color(vm.message.isEmpty && audioPlayer.recorded == nil ? .systemGray : .systemYellow))
    .padding(10)
Then set the background color and whether the SubmitButton is disabled to also check
for availability of audio recording:
        .disabled(isSending || (vm.message.isEmpty && audioPlayer.recorded == nil))
        .background(Color(isSending || (vm.message.isEmpty && audioPlayer.recorded == nil) ? .secondarySystemBackground : .systemBlue))
Displaying audio message notification
On the chatt timeline, if a chatt has audio data, we display a waveform icon in its bubble,
next to the message. Due to the alternating alignment display of text bubbles, depending on whether
the user is the poster, we put the waveform icon on the right or left of the message, to go with
the text bubble alignment. In ChattScrollView.swift, in the ChattView struct, add two
properties to grab the ChattViewModel and AudioPlayer from the SwiftUI environment:
    @Environment(ChattViewModel.self) private var vm
    @Environment(AudioPlayer.self) private var audioPlayer
and wrap the Text displaying the message in an HStack so that a waveform icon is displayed
either to its left (onTrailingEnd) or right (!onTrailingEnd). Keep the
modifiers for the text bubble so that they become modifiers for the whole HStack. Replace
your call to the Text() View displaying the chatt message with:
                HStack(alignment: .top, spacing: 10) {
                    if onTrailingEnd, chatt.audio != nil {
                        Waveform()
                            .foregroundStyle(.white)
                    }

                    Text(msg)

                    if !onTrailingEnd, chatt.audio != nil {
                        Waveform()
                            .foregroundStyle(.blue)
                    }
                }
Add the following Waveform() function inside your ChattView, making it a
method of ChattView:
    @ViewBuilder
    func Waveform() -> some View {
        if let playback = chatt.audio {
            Image(systemName: "waveform")
                .font(.caption)
                .scaleEffect(1.4)
                .padding(EdgeInsets(top: 5, leading: 3, bottom: 3, trailing: 3))
                // tap to play back audio message
        }
    }
When user taps the waveform icon, we want to play back the audio message associated with
the chatt and show the audio control AudioView. To achive that, we add a tap gesture recognizer to
the waveform icon. Replace // tap to play back audio message with:
                            .onTapGesture {
                                audioPlayer.setupPlayer(playback)
                                vm.showPlayer = true
                            }
Congratulations! You’re done with the front end! (Don’t forget to work on the back end!)
Run and test to verify and debug
You should now be able to run your front end against your back end. You will not get full credit if your front end is not set up to work with your back end!
Front-end submission guidelines
We will only grade files committed to the main branch. If you use multiple branches, please merge them all to the main branch for submission.
Push your front-end code to the same GitHub repo you’ve submitted your back-end code:
- Open GitHub Desktop and click on
Current Repositoryon the top left of the interface - Click on the GitHub repo you created at the start of this tutorial
- Add Summary to your changes and click
Commit to mainat the bottom of the left pane - If you have pushed code to your repo, click
Pull Originto synch up the repo on your laptop - Finally click
Push Originto push all changes to GitHub
![]() Go to the GitHub website to confirm that your front-end files have been uploaded to your GitHub repo under the folder
Go to the GitHub website to confirm that your front-end files have been uploaded to your GitHub repo under the folder audio. Confirm that your repo has a folder structure outline similar to the following. If your folder structure is not as outlined, our script will not pick up your submission and, further, you may have problems getting started on latter tutorials. There could be other files or folders in your local folder not listed below, don’t delete them. As long as you have installed the course .gitignore as per the instructions in Preparing GitHub for Reactive Tutorials, only files needed for grading will be pushed to GitHub.
  reactive
    |-- audio
        |-- swiftUIChatter
            |-- swiftUIChatter.xcodeproj
            |-- swiftUIChatter
    |-- chatterd
    |-- chatterd.crt
    # and other files or folders
Verify that your Git repo is set up correctly: on your laptop, grab a new clone of your repo and build and run your submission to make sure that it works. You will get ZERO point if your tutorial doesn’t build, run, or open.
IMPORTANT: If you work in a team, put your team mate’s name and uniqname in your repo’s README.md (click the pencil icon at the upper right corner of the README.md box on your git repo) so that we’d know. Otherwise, we could mistakenly think that you were cheating and accidentally report you to the Honor Council, which would be a hassle to undo. You don’t need a README.md if you work by yourself.
Review your information on the Tutorial and Project Links sheet. If you’ve changed your teaming arrangement from previous tutorial’s, please update your entry. If you’re using a different GitHub repo from previous tutorial’s, invite eecsreactive@umich.edu to your new GitHub repo and update your entry.
References
| Prepared by Ollie Elmgren, Tiberiu Vilcu, Nowrin Mohamed, Xin Jie ‘Joyce’ Liu, Chenglin Li, and Sugih Jamin | Last updated: August 15th, 2025 |